Difference between revisions of "Release notes/1.2"
(Added breaking extensions changes for 1.2-alpha0) |
|||
| Line 665: | Line 665: | ||
* Dithering for gradients (see [[#Dithering|Dithering section]]) is available with a build flag (<code>-DWITH_INTERNAL_CAIRO=ON</code>), which causes Cairo to be patched for dithering during the build process. Please find more information in [https://gitlab.com/inkscape/inkscape/-/merge_requests/3812 MR #3812]. | * Dithering for gradients (see [[#Dithering|Dithering section]]) is available with a build flag (<code>-DWITH_INTERNAL_CAIRO=ON</code>), which causes Cairo to be patched for dithering during the build process. Please find more information in [https://gitlab.com/inkscape/inkscape/-/merge_requests/3812 MR #3812]. | ||
== Important changes for extension authors == | |||
=== New Style API === | |||
Added in [https://gitlab.com/inkscape/extensions/-/merge_requests/294 MR extensions#294], [https://gitlab.com/inkscape/extensions/-/merge_requests/296 MR extensions#296], [https://gitlab.com/inkscape/extensions/-/merge_requests/298 MR extensions#298], [https://gitlab.com/inkscape/extensions/-/merge_requests/300 MR extensions#300], [https://gitlab.com/inkscape/extensions/-/merge_requests/352 MR extensions#352], [https://gitlab.com/inkscape/extensions/-/merge_requests/403 MR extensions#403] | |||
Inkex now exposes styles to extensions authors as intended by the SVG specification. This means: | |||
* <code>BaseElement</code> now has functions <code>cascaded_style</code>, <code>specified_style</code> and <code>presentation_style</code>. | |||
* In most use cases, extensions querying a style will use <code>specified_style</code>. This computes the [https://www.w3.org/TR/CSS22/cascade.html#specified-value effective style] of the element, including CSS classes / pseudo-selectors, inherited styles, presentation attributes etc. | |||
* While <code>style.get()</code> and <code>style[key]</code> has been unchaged, a new getter has been added in form of <code>style(key)</code> (similar to a function call), which attempts to parse the attribute in a reasonable datatype. If the attribute is unset, the (parsed) default value will be returned. For example: | |||
** <code>style("fill")</code> returns a <code>Color</code> / <code>Gradient</code> / <code>Pattern</code> / <code>None</code>, | |||
** <code>style("opacity")</code> returns a value between 0 and 1, regardless if opacity is defined as percentage or as float, is out of bounds or undefined, | |||
** <code>style("stroke-dasharray")</code> returns a list of floats of dash/gap/dash/gap in user units. | |||
* Not for all attributes there is a parser defined - in that case, a string will be returned. Additional parsers may be added in the future. | |||
=== New Units API === | |||
Added in [https://gitlab.com/inkscape/extensions/-/merge_requests/329 MR extensions#329], [https://gitlab.com/inkscape/extensions/-/merge_requests/343 MR extensions#343], [https://gitlab.com/inkscape/extensions/-/merge_requests/415 MR extensions#415] | |||
The existing functions <code>unittouu</code> and <code>uutounit</code> are widely used, but for different purposes. Different extension authors try to answer different questions using these function, and, inevitably, some answers were incorrect (see linked issues in [https://gitlab.com/inkscape/extensions/-/merge_requests/329 MR extensions#329]). | |||
In Inkscape 1.2, new methods have been added to make working with dimensional values easier. These are <code>to_dimensionless</code>, <code>to_dimensional</code>, <code>viewport_to_unit</code> and <code>unit_to_viewport</code>. The existing functions <code>unittouu</code> and <code>uutounit</code> are not deprecated, but discouraged; in most cases, the new functions are more reliable. | |||
* <code>to_dimensionless(value)</code> fulfills the following task: '''Convert this string from the XML into a number, while processing the unit. When using this function on any SVG attribute and replace the original value with the result, the output doesn't change visually.''' | |||
* <code>viewport_to_unit(value, target_unit="px")</code> answers the following questions: | |||
** '''What is the length (e.g. the length of a rectangle, without a unit) of an object that has size <code>value</code> on the viewport?''' This is relevant because in Inkscape toolbars / tools, all dimensions are shown in "viewport units". | |||
** In other words: '''What is the SVG representation of entering <code>value</code> in the width/height widget of the selection tool (set to the unit of value)?''' Consider <code><svg width="210mm" viewBox="0 0 105 147.5"><rect width="?" height="?"/></svg></code>, i.e. a "mm-based" SVG with scale=2. When typing <code>200</code> in the rectangle tool, set to mm, the XML editor shows <code>100</code> = <code>100px</code>. That's what <code>viewport_to_unit("200mm") = 100</code> does. | |||
** Note that this is different than <code>viewport_to_unit("200", "mm")</code>, which would be for a rectangle with a width (in the width/height widget of the rectangle tool) of 200 (px), while writing the width in <code>mm</code> ''in the SVG'': <code><rect width="7.00043mm" height="7.00043mm"/>.</code> | |||
* <code>to_dimensional</code> simply converts a float to its equivalent with attached unit. It's the opposite of <code>to_dimensionless</code>. | |||
* <code>unit_to_viewport(value, unit="px")</code> answers the following question: '''What does the the width/height widget of the selection tool (set to <code>unit</code>) show when selecting an element with width <code>value</code> as defined in the SVG?''' Consider again <code><svg width="210mm" viewBox="0 0 105 147.5"><rect width="100" height="100"/></svg></code>, i.e. a "mm-based" document with scale=2. To create this rectangle, one has to type <code>viewport_to_unit("100", unit="mm") = 200</code> into the rectangle tool, if the rectangle tool is set to mm. | |||
With the same spirit, the functions for width/height of the document have been updated. <code>svg.width</code> and <code>svg.height</code> have been deprecated, and replaced with <code>svg.viewbox_width</code>, <code>svg.viewport_width</code>, <code>svg.viewbox_height</code> and <code>svg.viewport_height</code>. | |||
There is also <code>svg.scale</code>, which returns the ratio of the viewport and viewbox width, and <code>svg.inkscape_scale</code> which is the scale reported in the Document properties dialog. | |||
=== Deprecations === | |||
* The Transforms multiplication operator has been changed from <code>*</code> (<code>*=</code>) to <code>@</code> (<code>@=</code>), in accordance with [https://www.python.org/dev/peps/pep-0465/ PEP-465] ([https://gitlab.com/inkscape/extensions/-/merge_requests/389 MR extensions#389], [https://gitlab.com/inkscape/extensions/-/issues/327 Issue extensions#327]) | |||
* <code>svg.width</code> and <code>svg.height</code> have been deprecated, and replaced with <code>svg.viewbox_width</code>, <code>svg.viewport_width</code>, <code>svg.viewbox_height</code> and <code>svg.viewport_height</code>, see [[Release notes/1.2#New Units API|New Units API]]. | |||
* <code>selection.paint_order</code> has been renamed to <code>selection.rendering_order</code> to be conformant with the specification ([https://gitlab.com/inkscape/extensions/-/merge_requests/344 MR extensions#344], [https://gitlab.com/inkscape/extensions/-/issues/310 Issue extensions#310]) | |||
* <code>FallbackStyle</code> has been deprecated in favor of <code>Style</code>, see [[Release notes/1.2#New Style API|New Style API]]. | |||
== Known issues == | == Known issues == | ||
Revision as of 21:46, 5 February 2022

|
These Release Notes are in Draft Status.
Important Links:
|

|
Pending questions:
|
Release highlights
Definitely not released yet.
- Inkscape documents can now hold multiple pages, which are managed by the new Page tool
- Editable markers and dash patterns
- Layers and objects dialog merged
- On-canvas alignment snapping
- Selectable object origin for numerical scaling and moving
- All alignment options in a single dialog
- Gradient editing in the Fill and Stroke dialog
- Redesigned Export dialog with preview and ability to select objects/layers/pages and even multiple file formats to export to
- Snap settings refactored
- Configurable Tool bar, continuous icon scaling and many more new customization options
- Performance improvements for many parts of the interface and many different functions
- Many crash & bug fixes
General user interface
Color palette
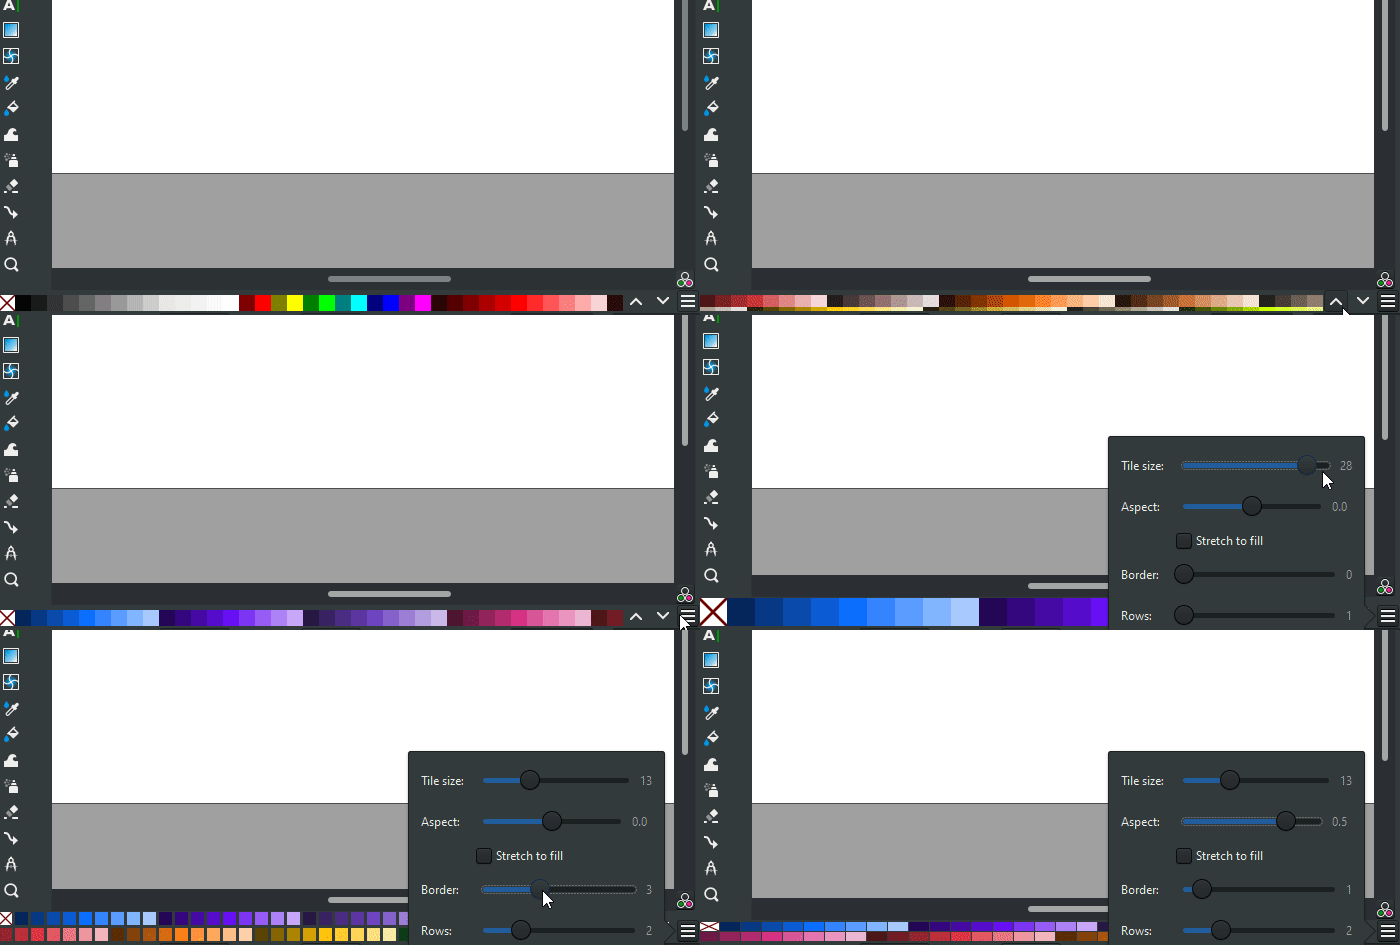
The overall look and options of the Color palette and the Swatches dialog got a massive overhaul (MR #2881):
- When switching the color palette, the switcher shows a colorful preview line for each palette
- Between 1 and 5 palette rows that can be displayed all at once, or scrolled through vertically / using the arrow buttons
- Improved and reliably working settings for padding, tile size and tile shape / auto-stretching
[TODO: add autostretch to demo animation?]
Status Bar
- The layer selection dropdown has been replaced by a layer indicator. Clicking on the indicator opens the new Layers and object dialog. This change improves Inkscape's performance for documents with many layers (MR #3648).
- The status bar contents is now configurable, see Customization section.
Tool bar
- The tool bar width can now be resized by dragging edge and wraps into multiple columns
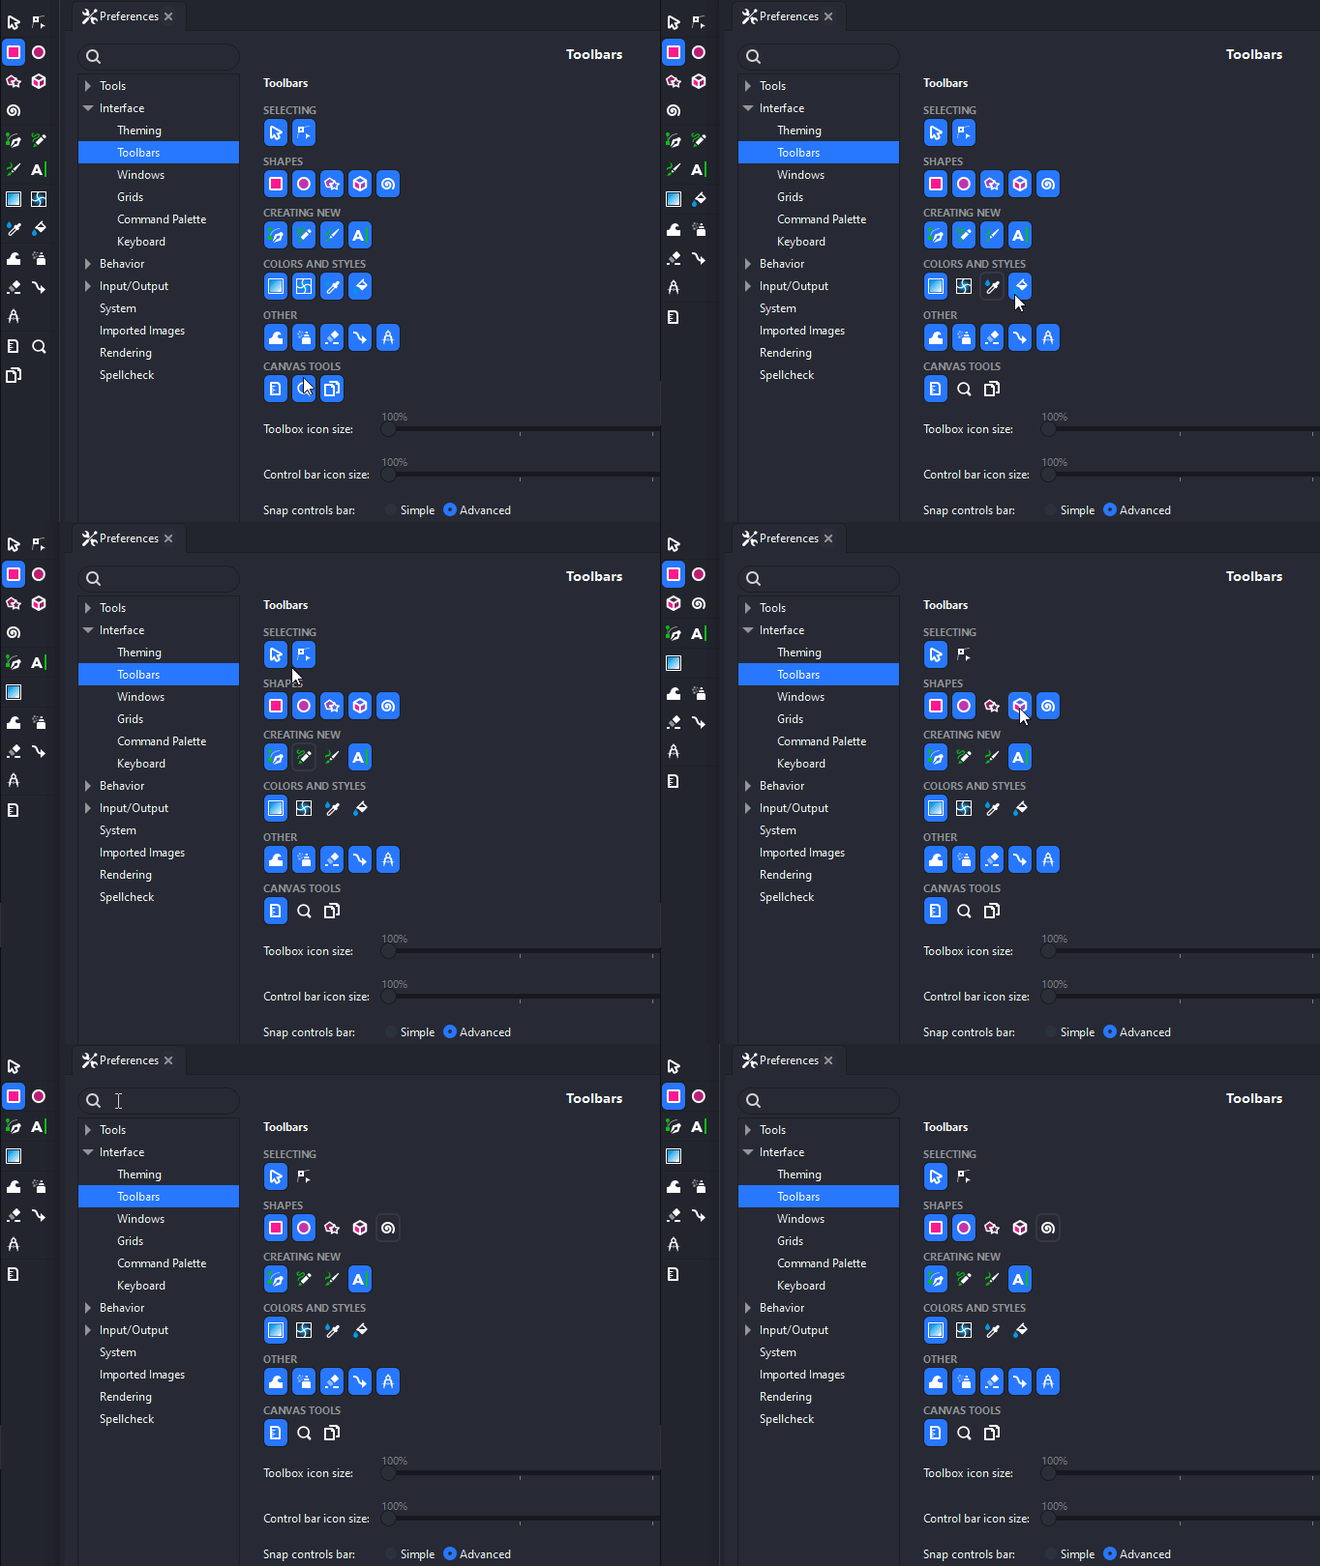
- You can customize which tools will be part of the tool bar in the preferences, see Customization section
Dithering
[REVIEW before release with regards to available formats] [TODO: add nicer/more obvious comparison image]
Inkscape's gradients sometimes suffered from visible steps between colors, a phenomenon also known as gradient banding. Gradient banding is caused by the difference between how many different colors are available for the selected image file format and how many colors a human eye can discern. The effect becomes especially prominent when exporting a gradient that only spans a small color range to a high-resolution image. There just aren't enough colors available for a smooth transition.
Dithering softens these steps by scattering pixels of the different adjacent colors along the gradient, a little bit like a blur.
Dithering is now used both for Export of raster images as well as for displaying gradients on canvas(MR #3812). This functionality requires a special version of Cairo, our rendering engine. This means that it will only be available in the pre-packaged builds (for macOS, Windows and for the Linux AppImage).
For standard Linux package formats (deb, rpm, …), it depends upon your Linux distribution maintainers whether they will patch up the version of Cairo they want to distribute. We hope that this change will one day also be included in the official Cairo packages (Link to ongoing discussion).
Canvas
Page
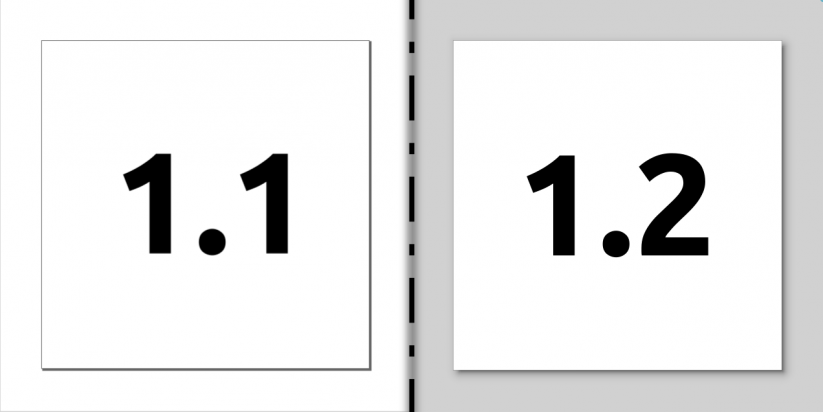
- The page shadow now has a more realistic, blurry, fade-out look (MR #3128).
- Settings for the page background / decoration were refactored, see section about Document properties dialog.
- Inkscape documents can now hold multiple pages! Learn more in the section about the new Page tool.
Snapping
Snap bar is now Snap popover
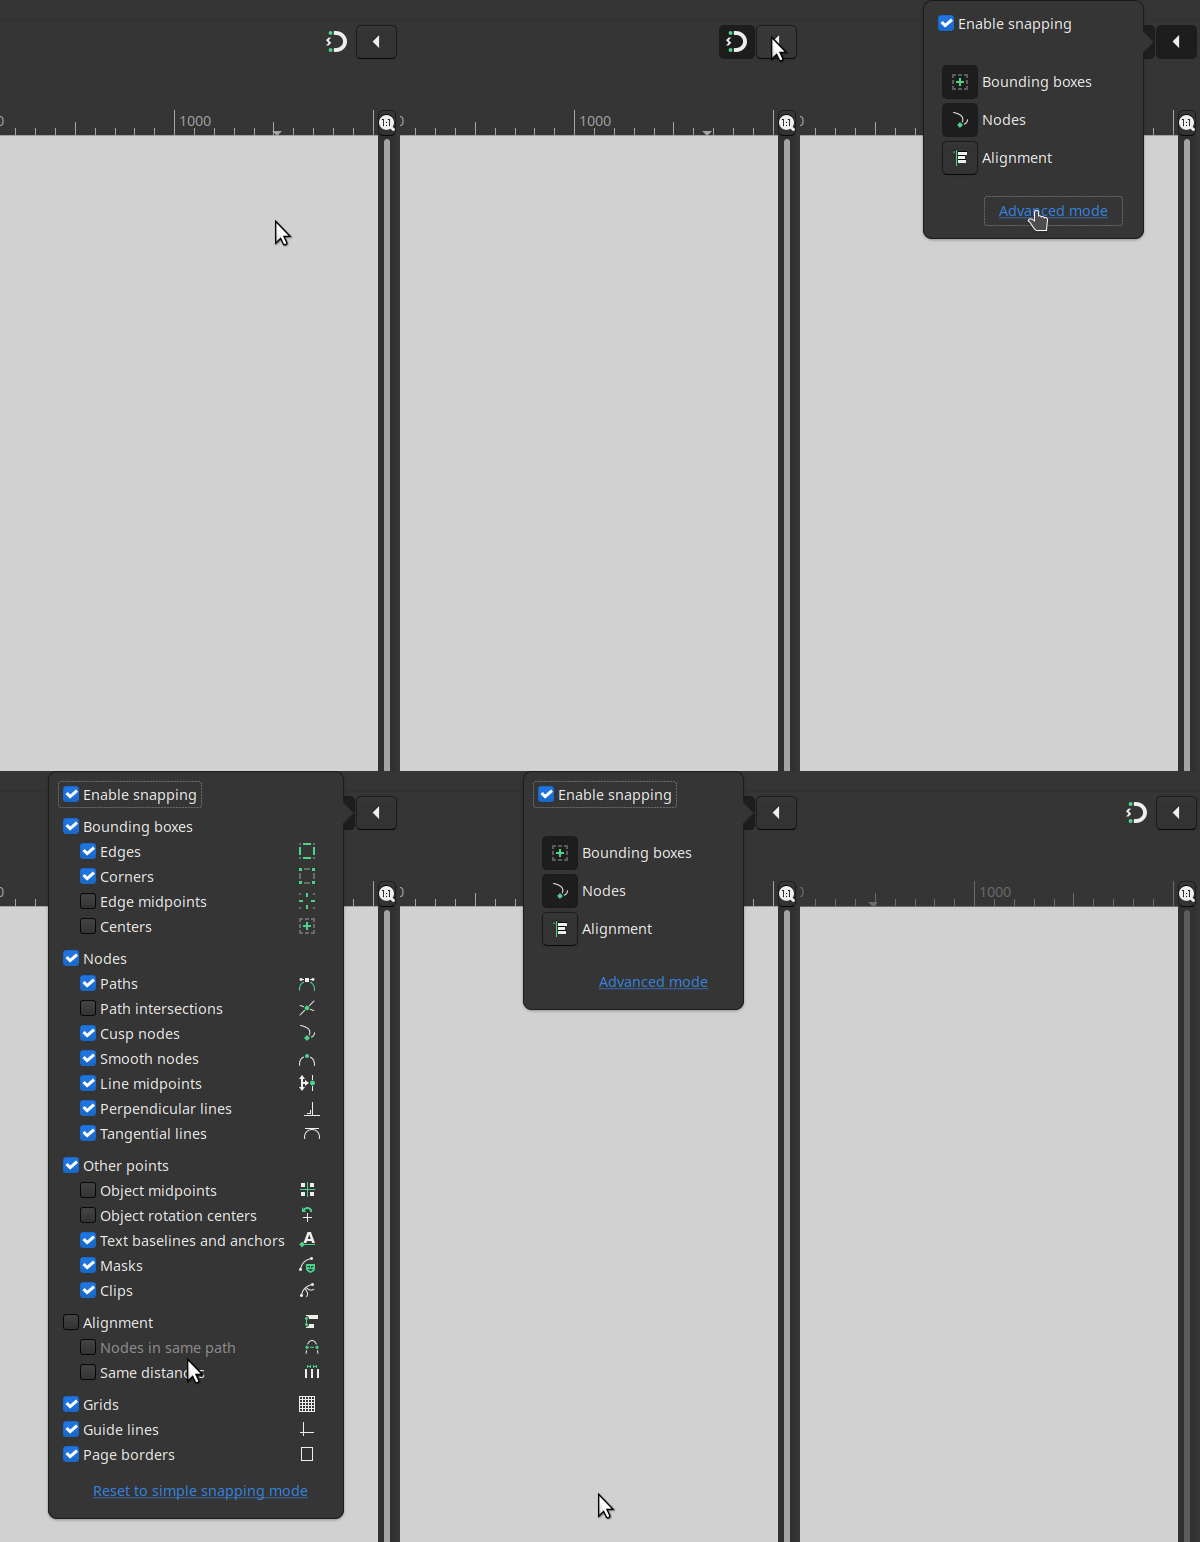
The snap bar has been replaced with a new 'popover'-type dialog, which will unfold when you click on the little arrow symbol in the top right corner, next to the snap symbol. Snap options now have always-visible descriptions, to make them easier to understand (MR #3323).
To activate / deactivate snapping globally, click on the snap symbol in the top right corner or press %.
The popover dialog has two different modes:
- Simple: Only 3 options: snap bounding boxes and paths, activate / deactivate the new alignment snapping). This provides a simple preset for many use cases.
- Advanced: Gives the familiar granular control over every snapping option. Switching from 'Advanced' back to 'Simple' is not merely a visual change, but will reset snap settings to defaults.
Snapping preferences globalized
Snap settings are no longer saved with the document, but are set globally for all documents in the preferences and in the snap popover dialog. The option for enabling snapping in new documents has been removed, as it no longer makes sense.
The options for snapping perpendicularly and tangentially to paths or guide lines have been moved from the document preferences to the snap popover to make them more discoverable. The other snap options from the document settings dialog were removed. [TODO: check whether this is still true at the time of release]
Alignment and Distribution snapping
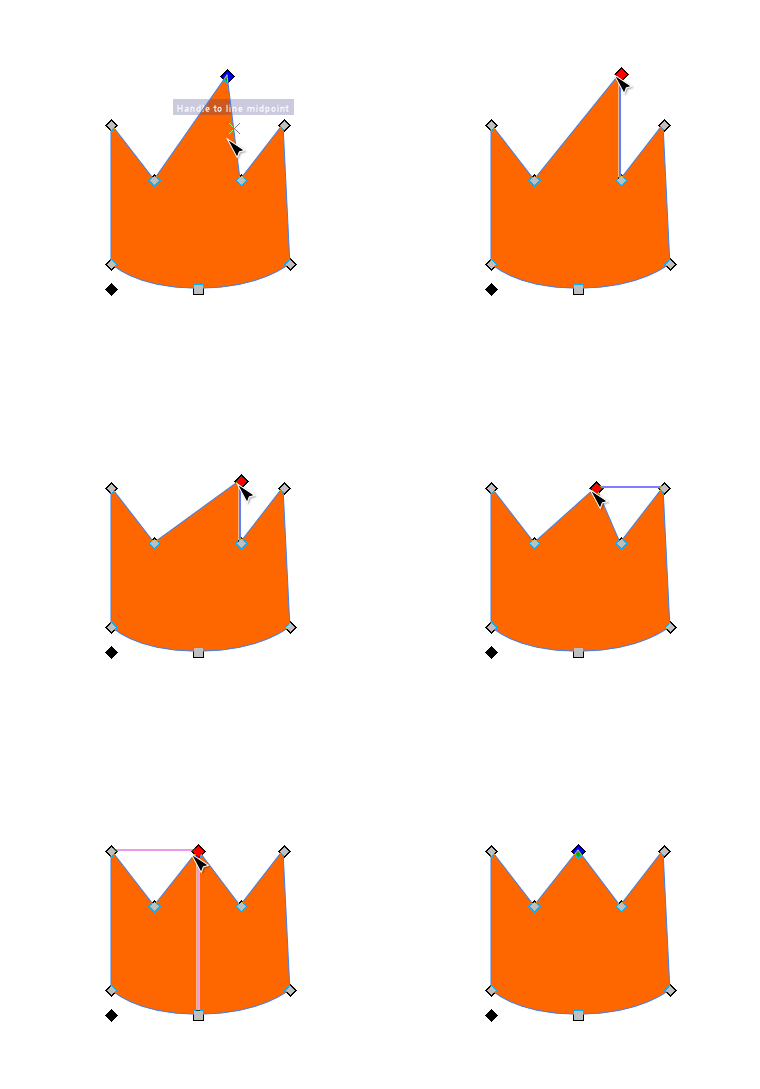
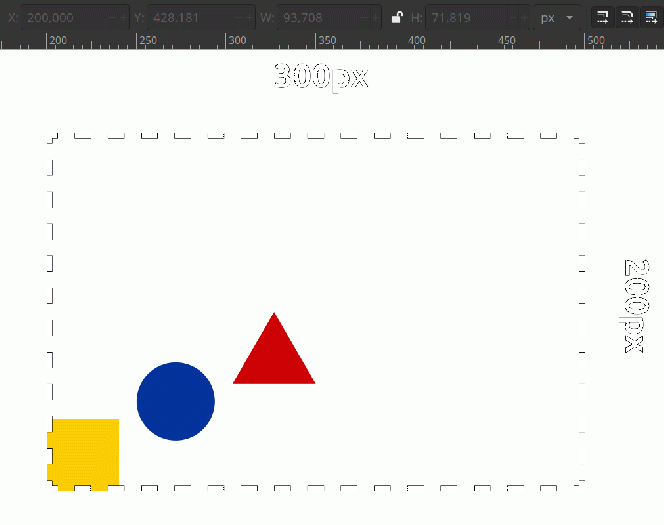
During Google Summer of Code 2021, GSOC student Parth Pant worked on adding on-canvas alignment and distribution snapping, with support of the mentors Thomas Holder and Marc Jeanmougin. As a result, three new modes of on-canvas snapping have been added. These new modes make aligning and distributing objects a very easy drag-and-drop operation (MR #3294)..
When on-canvas alignment is active, Inkscape will display horizontal or vertical temporary guide lines that indicate when the selected object can be aligned relative to another object on the canvas. It connects the points of the objects that are in alignment. With distribution snapping, multiple objects close by are taken into account, making it possible to align objects in a grid, with very little effort.
The temporary guide lines only appear while editing / moving objects on the canvas. Once a guide shows up, the movement of the selection is loosely constrained in the direction of the guide.
Alignment and Distribution snapping guide lines display the distance(s) between objects as a little label per default. This can be disabled from Edit → Preferences → Snapping: Show snap distance in case of alignment or distribution snap.
The 'Simple' mode of the snapping popover dialog allows you to simply activate or deactivate Alignment snapping. The 'Advanced' mode gives you additional control by allowing you to en-/disable:
Available additional options:
- Alignment Snapping: Tools and objects snap to position of other objects
- Self snapping: Alignment snapping for nodes in the same path while editing nodes or node handles.
- Distribution snapping: Objects snap to same gap size as their neighbours
Guides
- The size of the handles is now adjustable in the Preferences via the existing setting
Interface → Handle size. Nonetheless, the guide handles react to this setting at half the rate of other handles; at large settings, the effective size of a guide handle is about half the size of an auto-smooth node. At the same time, a minimum size is enforced, equal to the previously hard-coded size. As a result of this mechanism, the handle is only enlarged when theHandle sizepreference is set to a value of 7 or larger. Since the default value is 3, the size of guide handles does not change on new installs or for users on default settings. - The handle now has a hitbox and reacts to mouse events in the same way as the guide line itself. This makes it easier to interact with the guide. Taken together, these two changes address #3111 (closed).
- The colour of the handle is now the same as the colour of the guide, except when the guide is locked.
- When a guide is locked, its handle turns gray (and changes the shape to an "x", as before).
- The handle is always correctly centered on the guide line. This change also fixes a similar positioning error that affected node handles.
Fixes #2022 (closed); Fixes #2604 (closed); Fixes #3111 (closed);
MR #3870
Performance
Canvas rendering got significate refracturing and should be faster to render while panning and zooming
Tools
Page tool
The new Page tool (lowest button in the tool bar) allows you to create multi-page Inkscape documents, and to import as well as export multi-page PDF documents. (MR #3486, MR #3785, MR #3821). It supports overlapping pages and pages of different sizes in a single document.
Tool usage:
- To create a new page either:
- click-and-drag on the canvas
- or click on the 'Create a new page' button in the tool controls
- To delete a page, click on the page to select it, then click on the button
Delete selected pageor use theDelorBackspacekeys. - To move a page on the canvas, click-and-drag it to the desired new position. If the option to
Move overlapping objectsis active, this will also move any objects that touch the page along with it. - To change a page's size:
- click on a page whose size you want to change to select it, then drag the square-shaped handle in its bottom right corner
- click on the page, and then choose one of the predefined sizes in the page size dropdown, or enter your size values for the 'Custom' option, by typing them into the field in the form of
10cm x 15cm
- To fit a page to:
- the size of the drawing: make sure to have no object selected before you switch to the Page tool. Then select a page by clicking on it, then click on the button 'Fit page to drawing or selection' in the tool controls
- a selected object: first select the object(s) with the selection tool, then switch to the Page tool, click on a page to select it, then press the the button 'Fit page to drawing or selection' in the tool controls
- To add a label to your page, select the page by clicking on it, then enter a name or label for it into the text field in the page tool's tool controls. Labels are always visible, no matter which tool is currently selected.
- To export a multi-page PDF file, use
File → Save a copy … → PDF. This will automatically include all pages. - To open or import a multi-page PDF or (pdf-based) AI file, use
File → Open/Import → select file name → choose to import 'All' pages[Known issue: 'import' moves content of some pages to some far out place in the drawing]
Note: Multi-page SVG files are an Inkscape-specific concept. Web browsers will only display the first page of your document, which corresponds to the 'viewbox' area of the SVG file.
[TODO: needs gif!]
Selector Tool
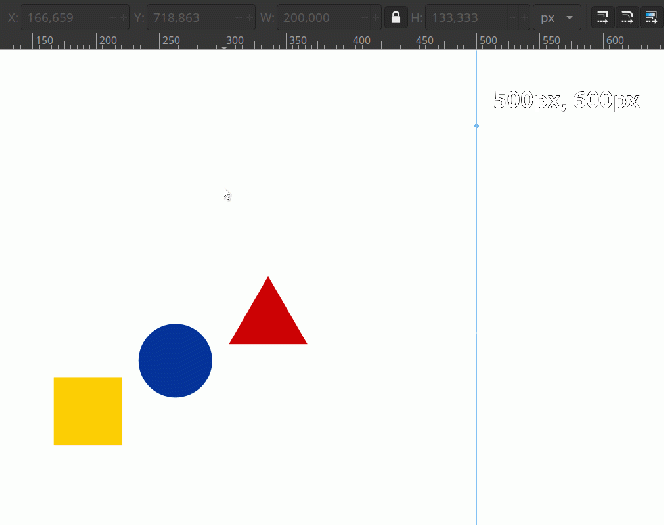
The tool now allows to set the origin of the selection for precise numerical positioning:
- Click on one of the 9 object handles to select your desired origin for the scaling, or select and then drag the middle handle to the desired position
- A small red circle with lines now indicates the new origin and the x/y position in the tool controls will adjust to the new origin.
- Now edit the x, y, width or height values to move and scale your object using the new origin (MR #2700)
- Shift click on origin reset original position of origin
Text Tool
- Kerning options are now symbolized by a button between the subscript and text direction selectors. Clicking on it will open a so-called pop-over, where all previously available options can be found. This change saves space in the Text tool's toolbar.
- Negative kerning values can now be as little as
-1000(previously -100), making them symmetrical to their positive counterparts (MR #2569, MR #3434) - Padding: Text that is flowed into a shape and standard flowed text now have an additional square-shaped handle in the top right corner. Move the handle to adjust the text padding inside the frame (MR #2769) [Currently broken]
- Exclusion zones: Text can now flow around one or more movable objects [Currently broken]:
- Select all object(s) (use only shapes and paths on the same object hierarchy level as the text; no groups / clones / images supported) and the text.
- Set the exclusion zone by going to
Text → Set subtraction frames. - Now you can move the exclusion objects around or edit their shape, and the text will adjust automatically.
- If you want to change the exclusion zones again at a later point, repeat the process with all objects that the text should flow around.
Background info:
SVG 2.0 flowed text allows for shape-padding and shape-subtract attributes. shape-padding lets the text flow into a shape and leave some space between its edges and w where the text will start to flow. shape-subtract subtracts shapes with margin, so text can flow around other objects in the scene. These attributes were supported in Inkscape 1.0, but not exposed to the user. This version of Inkscape includes both an adjustable on-canvas knot for changing the padding as well as a Text menu item for setting text subtraction properties with a further knot to adjust it's margins.
[See merge request for animated gifs to add here]
Gradient Tool
We Added New control in to Preferences → Gradient Tool. Auto delete gradients that are not used This is turned on my default. This setting prevents gradients that are not used on any object to stay in gradient library and this prevents gradients to fill up library. This is not a new behavior we just added ability to turn it off .
Path Operations
- New Split path operation, available from
Path → Split path:
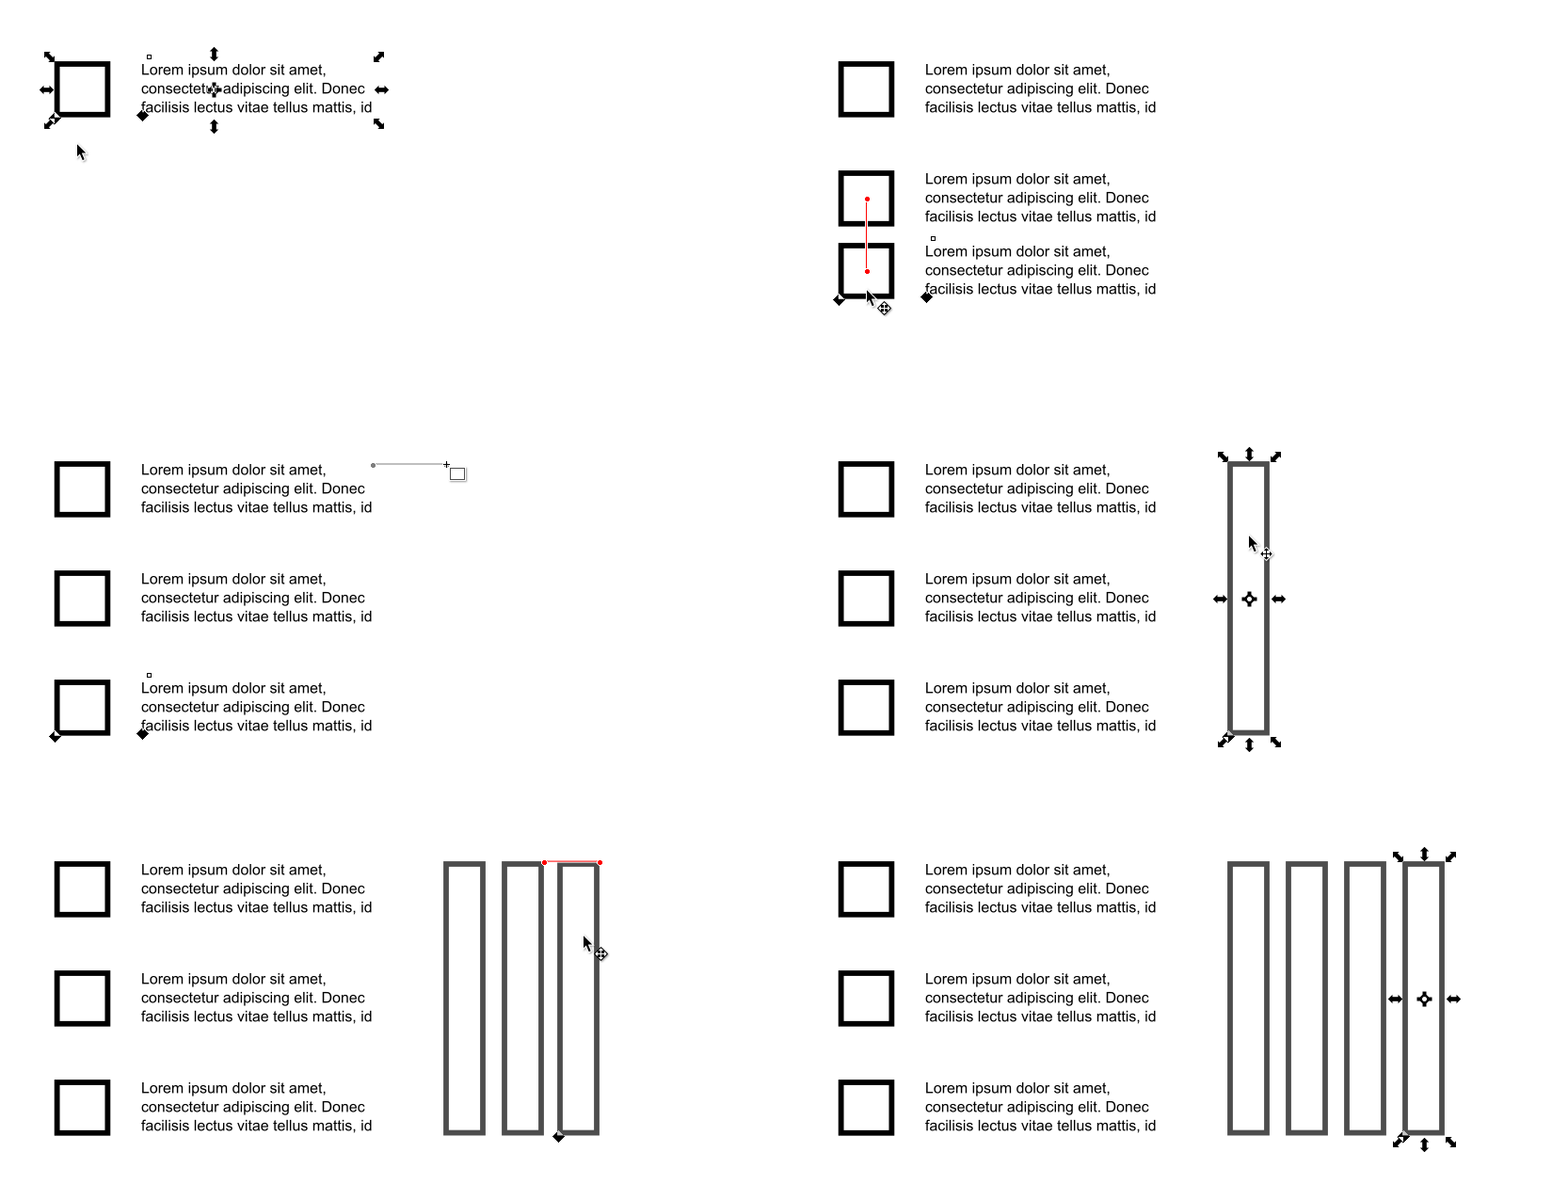
The function separates a path object that consists of multiple subpaths into a set of path objects that 'belong together'. This means that parts of a path that have holes in them are kept as whole objects. The function works by splitting up a path into non-intersecting bits, keeping intersecting bits together.
Example: A path that consists of a word, like 'Inkscape' will be split into 8 parts, one for each letter. With the familiar 'Break apart' function, there would be 12 parts, because of the holes in the letters that would be split off as their own objects, too (MR #3738).[TODO: add animation]
Dialogs
General
- A mini-menu (downward pointing arrow symbol) was added into the title bar of every multi-dialog panel (also called 'notebook'). You can use it to close the current tab, to undock it, or to close the whole panel. It also shows a list of available dialogs, sorted by purpose, allowing you to open them with a click ((MR #3728) [TODO: screenshot ]
- Open dialogs are now less costly for performance, because they do not update when it's not needed (MR #3369), or when they are hidden (MR #3761)
- Docking zones now expand and flash slowly when a dialog is dragged close to them. This makes it easier to see where docking is possible (MR #3729)
- The text labels of docked dialogs are now more responsive to the width of dialog (MR #3627)
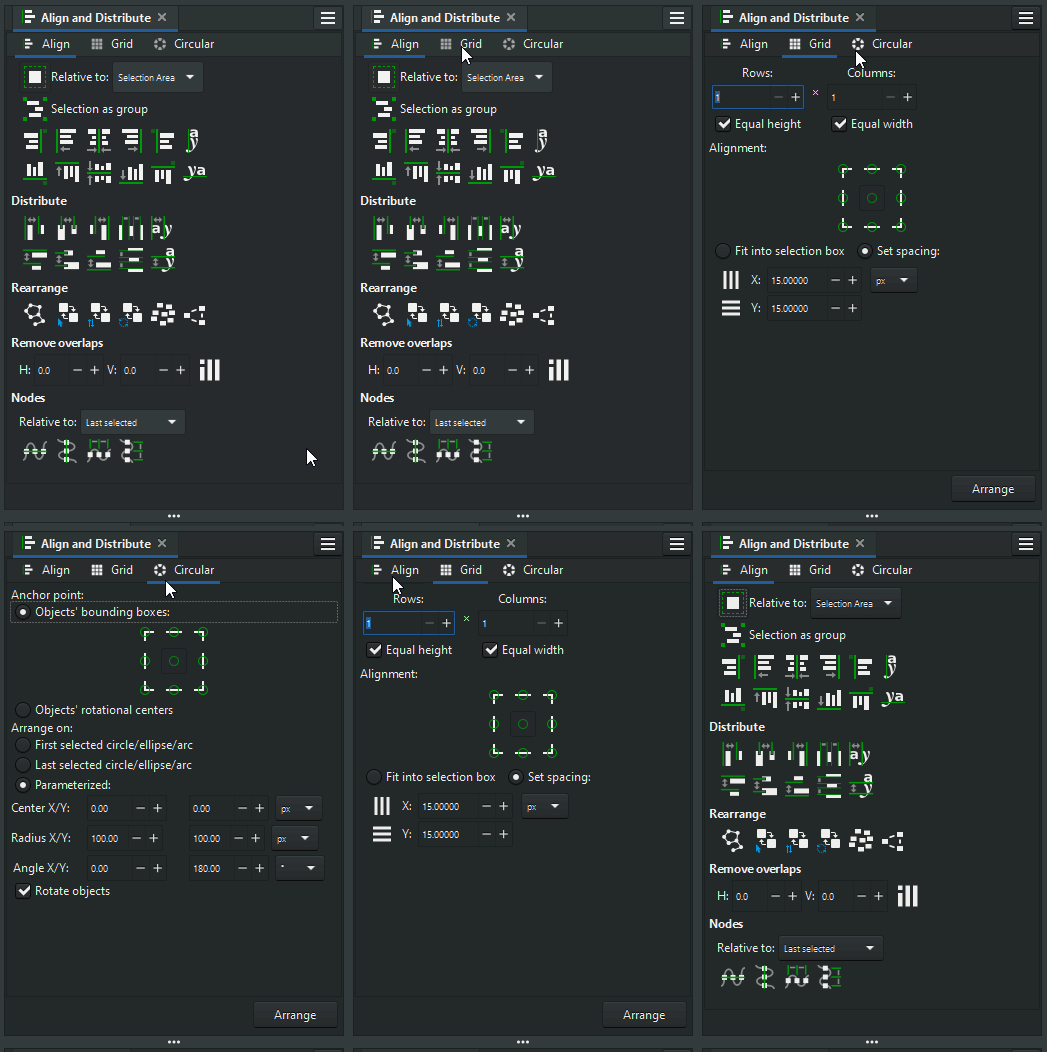
Align and distribute
- The formerly separate
Arrangedialog is now integrated with theAlign and Distributedialog. With its three tabs, more user-friendly names and some small visual tweaks, the dialog now holds everything that is needed for aligning, distributing and arranging objects in your drawing (MR #3382, MR #3667). - The icons inside this dialog are now smaller.
- Node alignment and distribution is no longer shown on first run Just when you use node editing tool
[TODO: needs re record with small icons]
Document Properties
The 'Snapping' tab was removed in favor of a global snapping preference, see Snapping section.
The first tab of the Document properties dialog was refactored thoroughly to make it easier to use:
- It's now labelled 'Display' instead of 'Page'
- The long list of different document formats is now available from a dropdown
- There is a preview available of the page format and colors [TODO: needs screenshot]
- The page area(s) in a document can now have a different color than the underlying 'desk' area [TODO: mention in highlights?]
- The other options have been rearranged to look tidier
- The option to add margins to a document when resizing it is currently unavailable [TODO: hopefully get that back before the release]
(MR #3700).
Fill and Stroke dialog
Color selector
- The more intuitive HSL mode (hue, saturation, lightness) is now the default mode of the color selector.
- All color selection modes (e.g. HSL, HSV, RGB, CMYK, color wheel, CMS) have been moved into drop-down menu, with icons. You can get the old, tabbed look back by disabling the option in
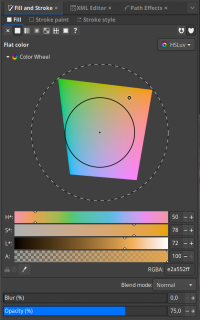
Edit → Preferences → Interface: Use compact color selector mode switch(MR #3443). - New: HSLuv mode added for color picker. This mode lets you more intuitively select optically similar saturation of different hues (Wikipedia).
Gradient Editor is back
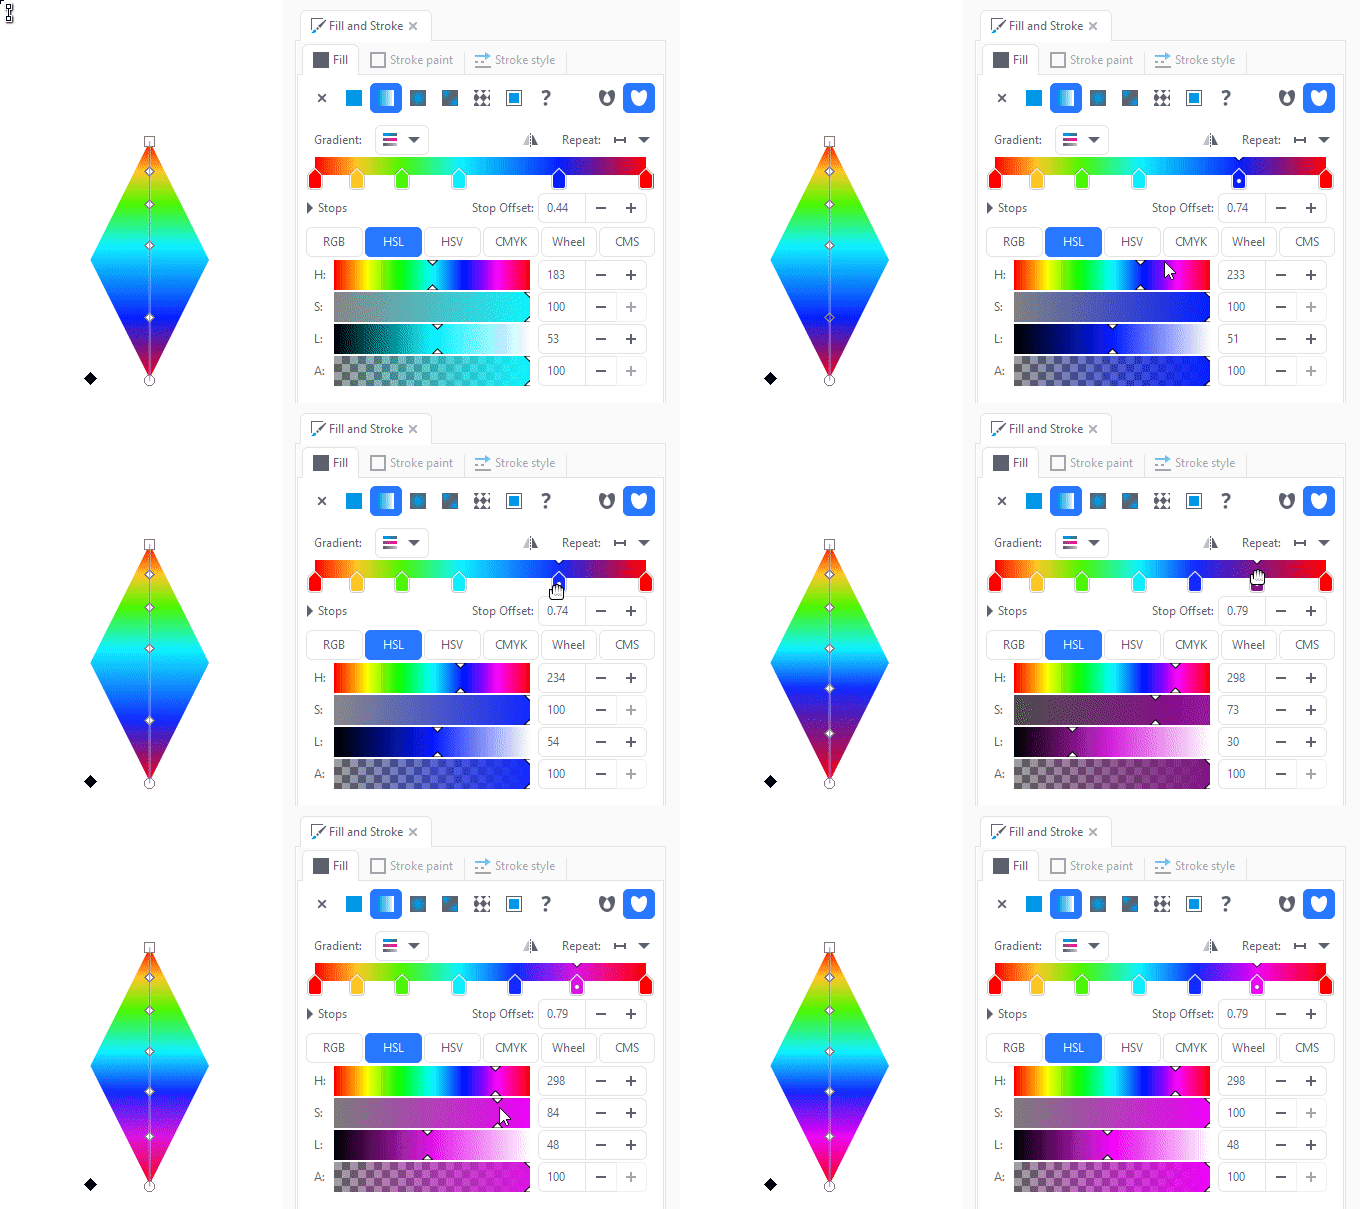
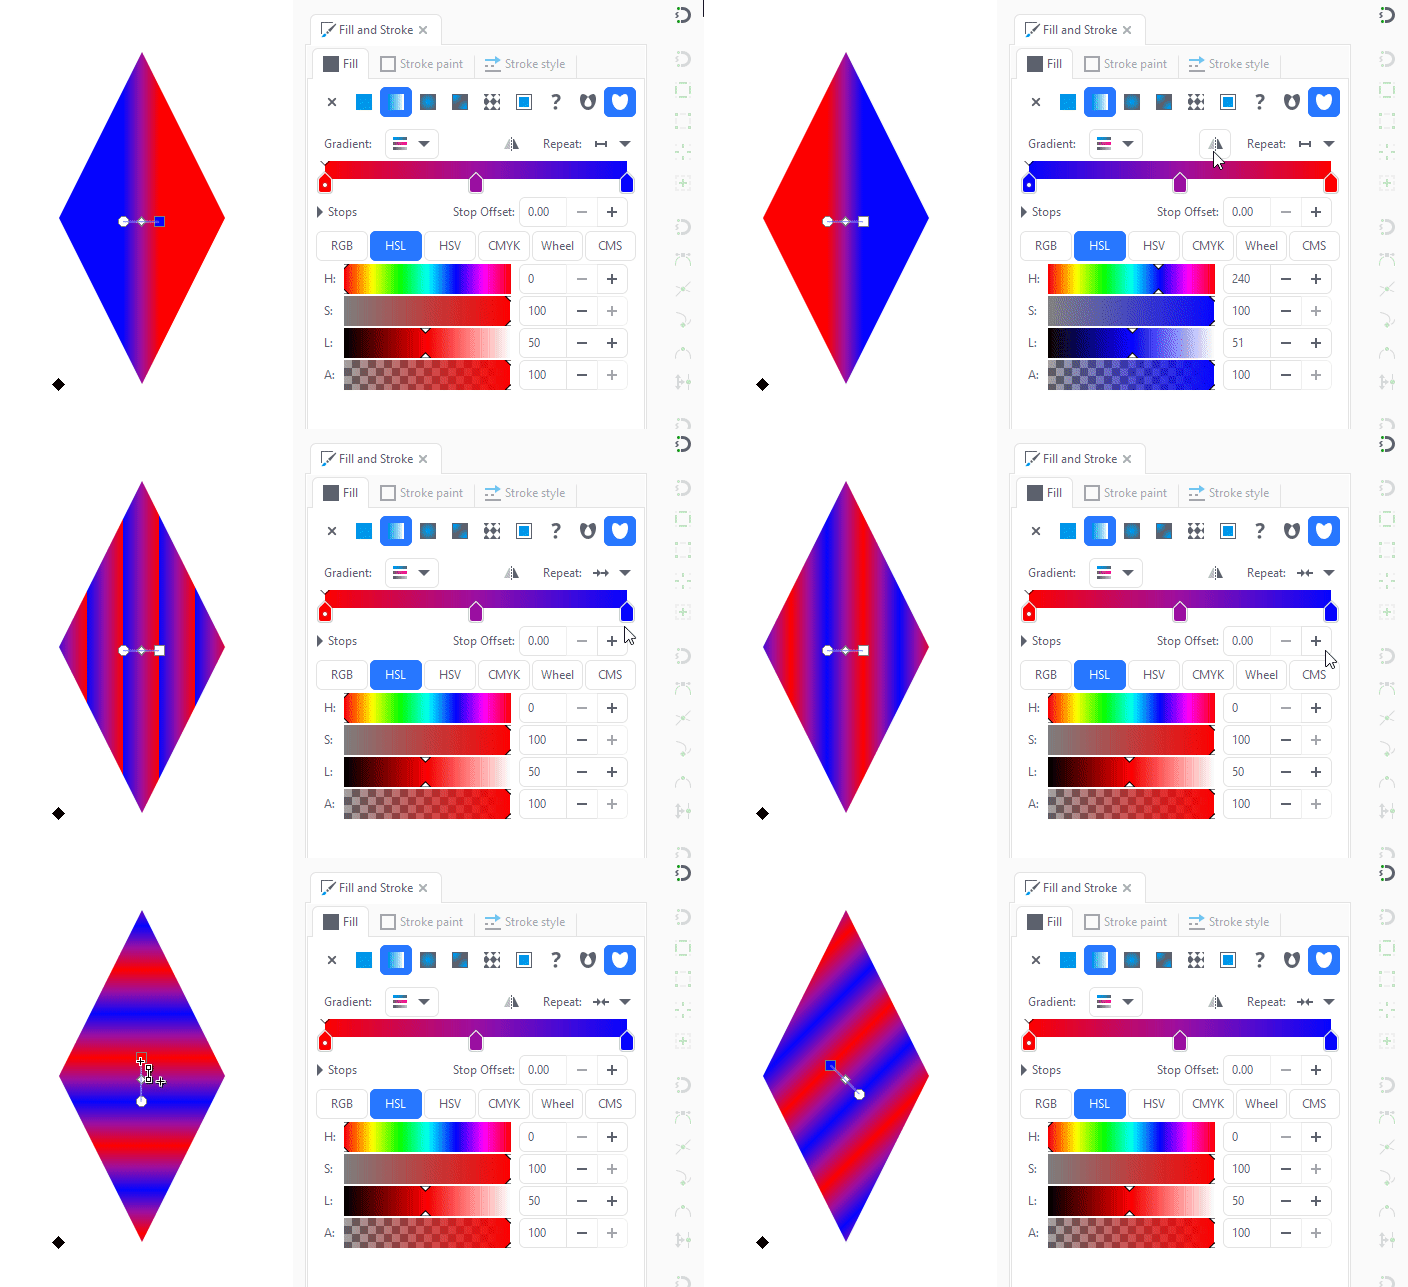
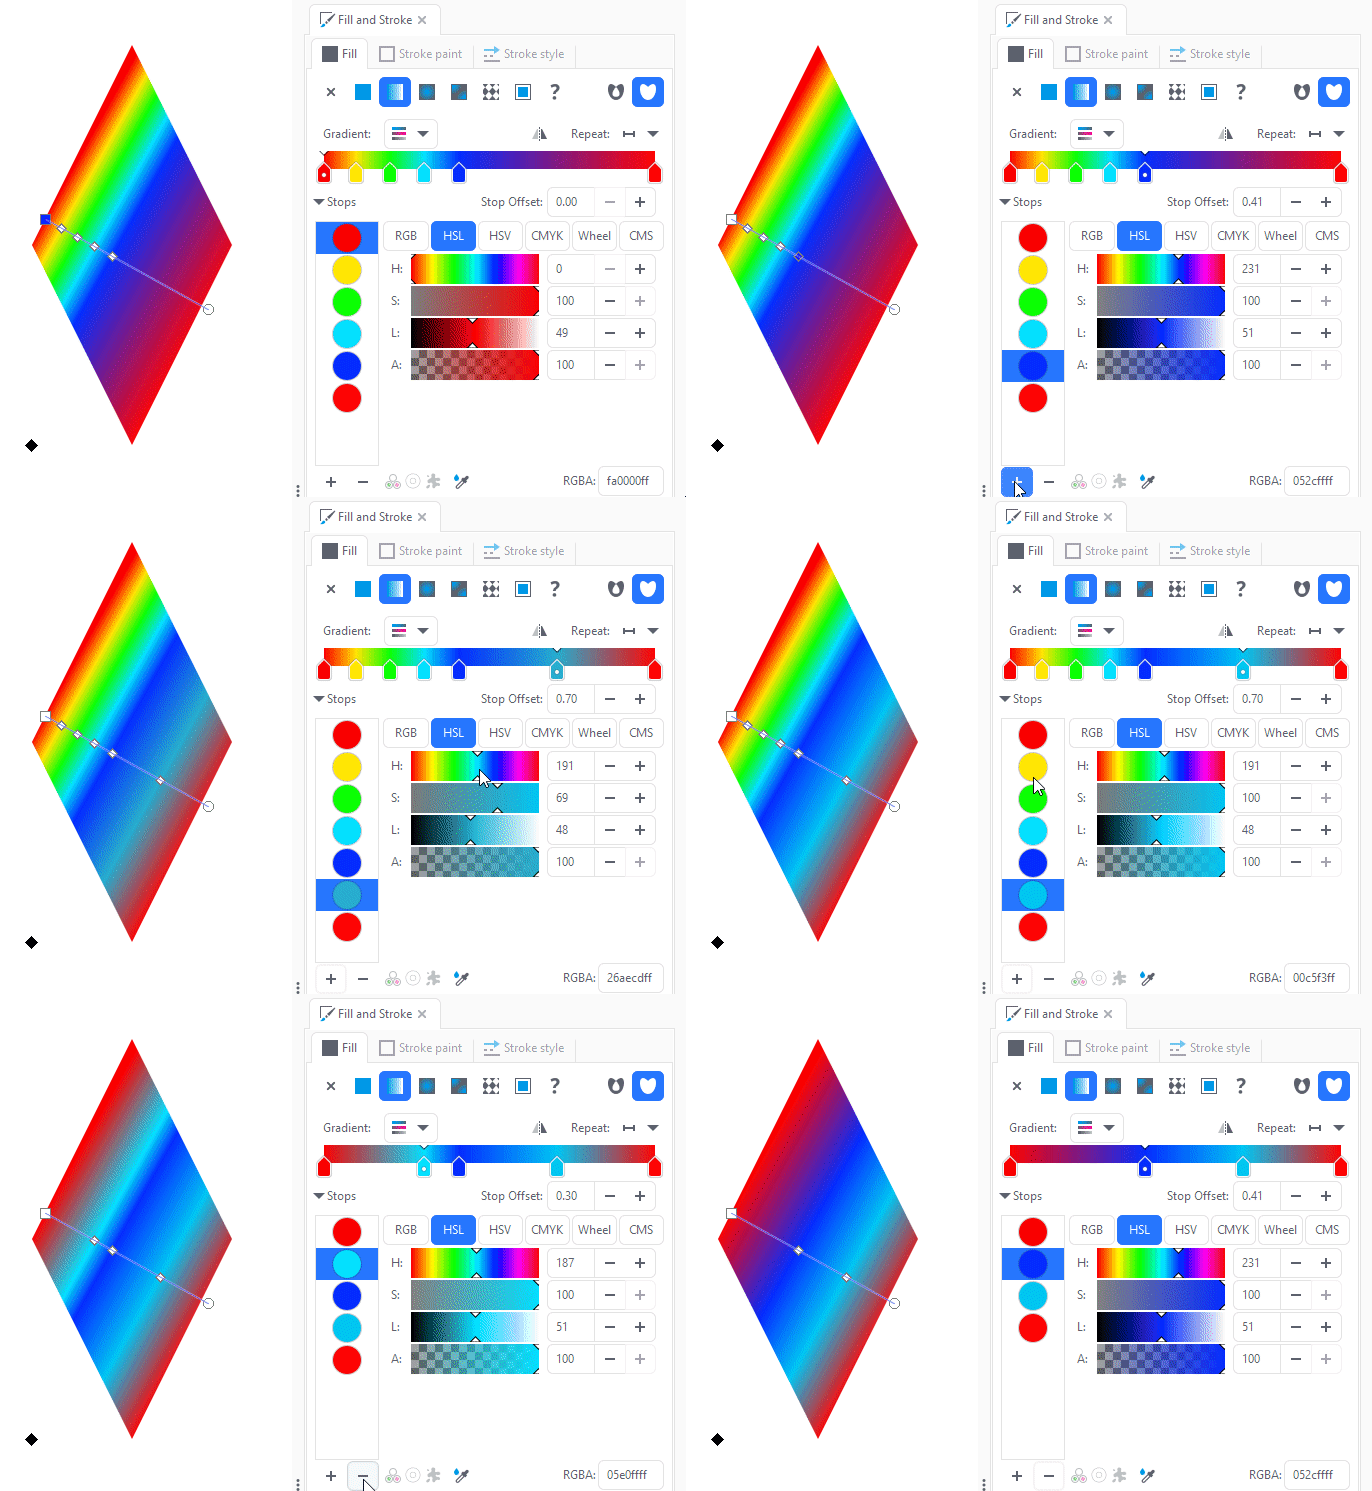
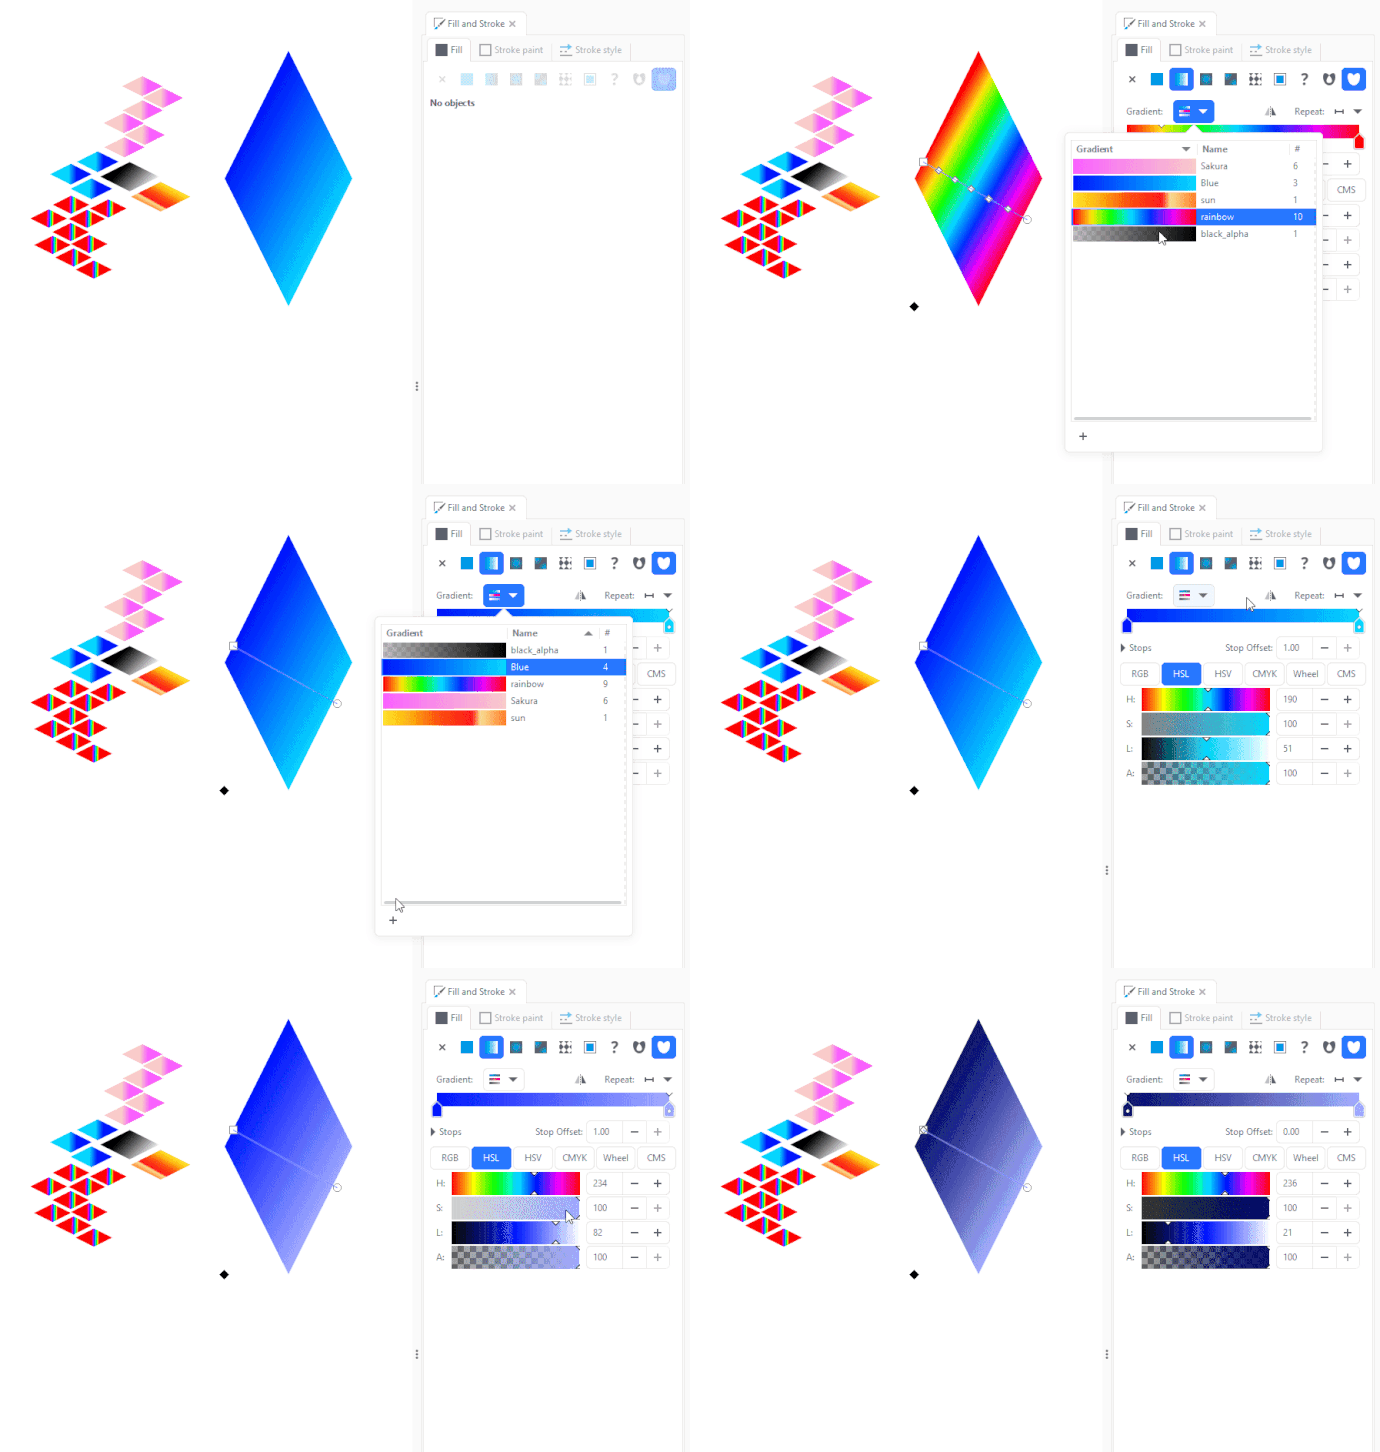
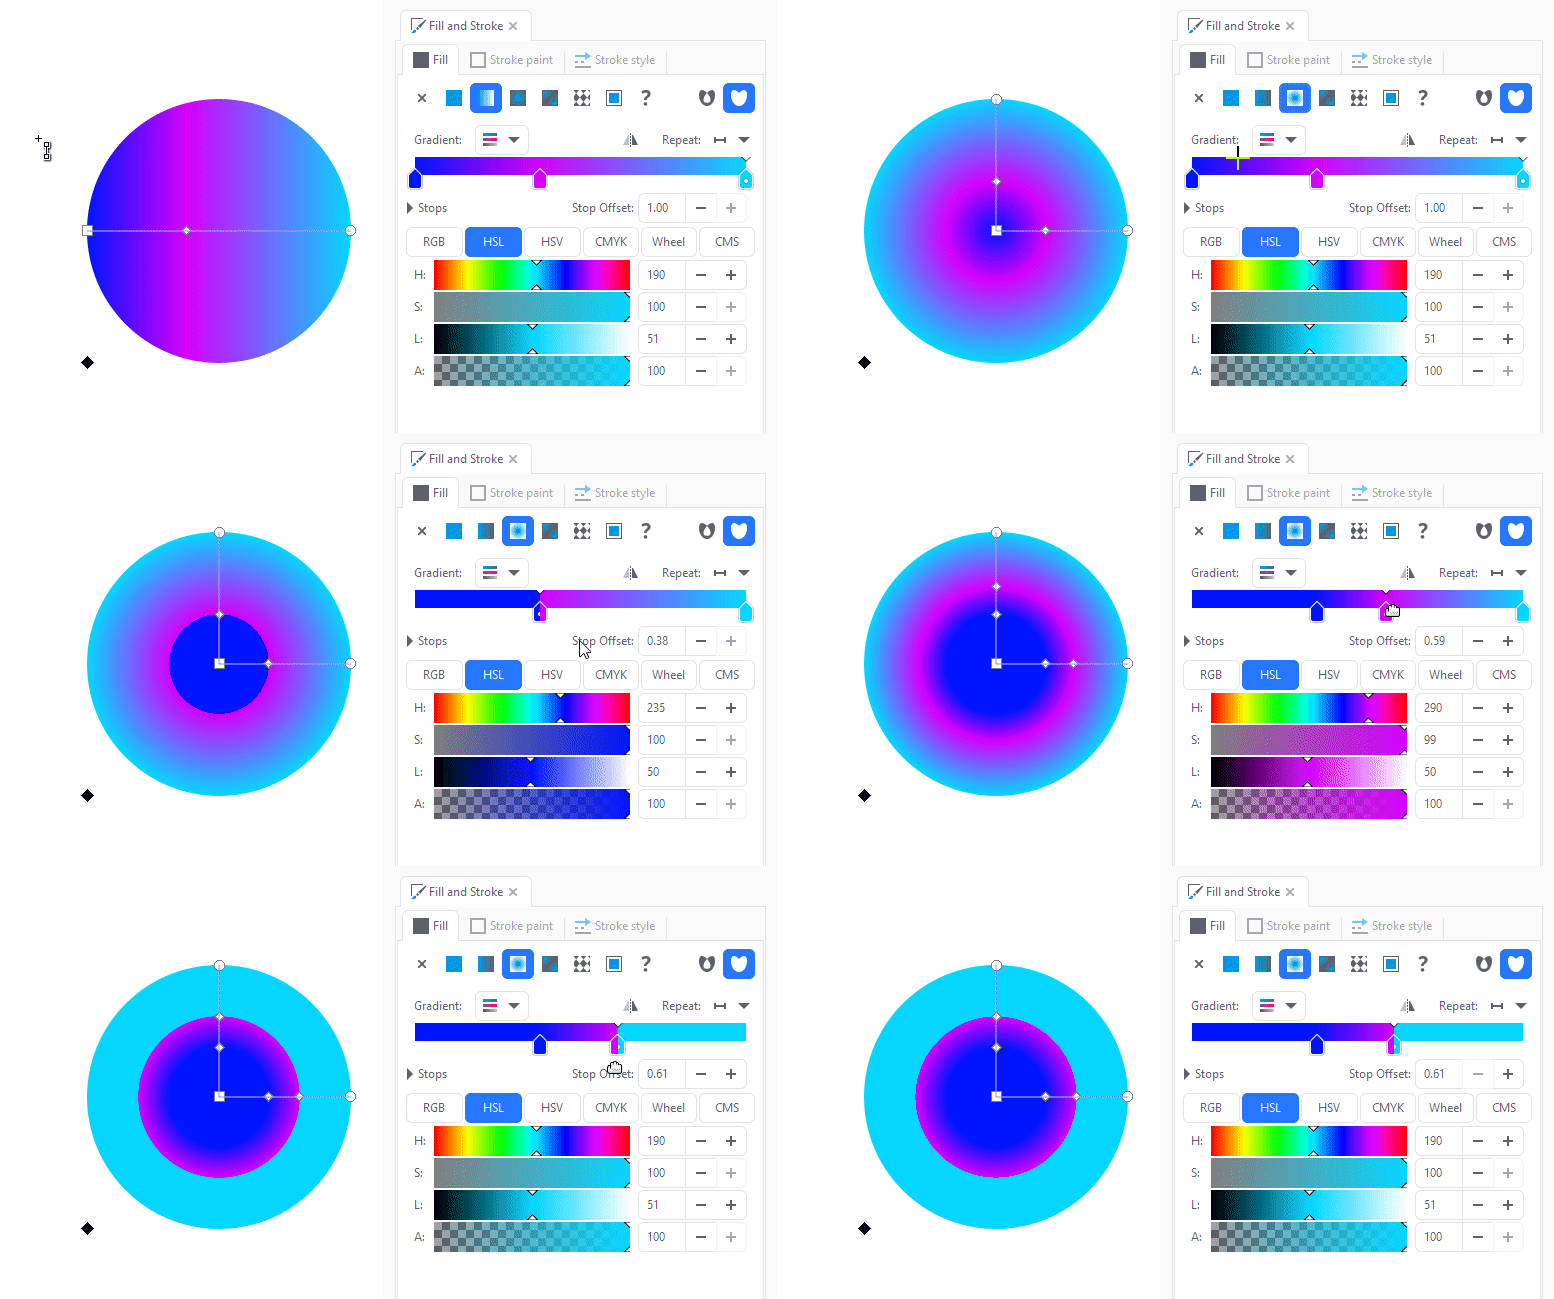
A replacement for the gradient editor was added to the Fill and Stroke dialog (MR #2688, Bug ux#67).
This allows you to add, edit and delete gradient stops directly in the 'Fill and Stroke' dialog again:
- to add a new stop, double click on the gradient preview
- to move a stop, click and drag it along the gradient preview or enter the stop offset numerically for more precision
- to remove a stop, click on it to select it, then press the
DelorBackspacekey - The Gradient tool toolbar options `repeat mode`, `reverse gradient direction`, a gradient selection library and a list of all stops have been added here, too, so all the options pertaining to gradients are in easy reach.
- we added a preference to auto delete non used gradients. previously, inkscape deletes the non used gradients automatically. now, we made this optional so that, users can preserve those gradients in SVG file. https://gitlab.com/inkscape/inkscape/-/merge_requests/3897
Markers
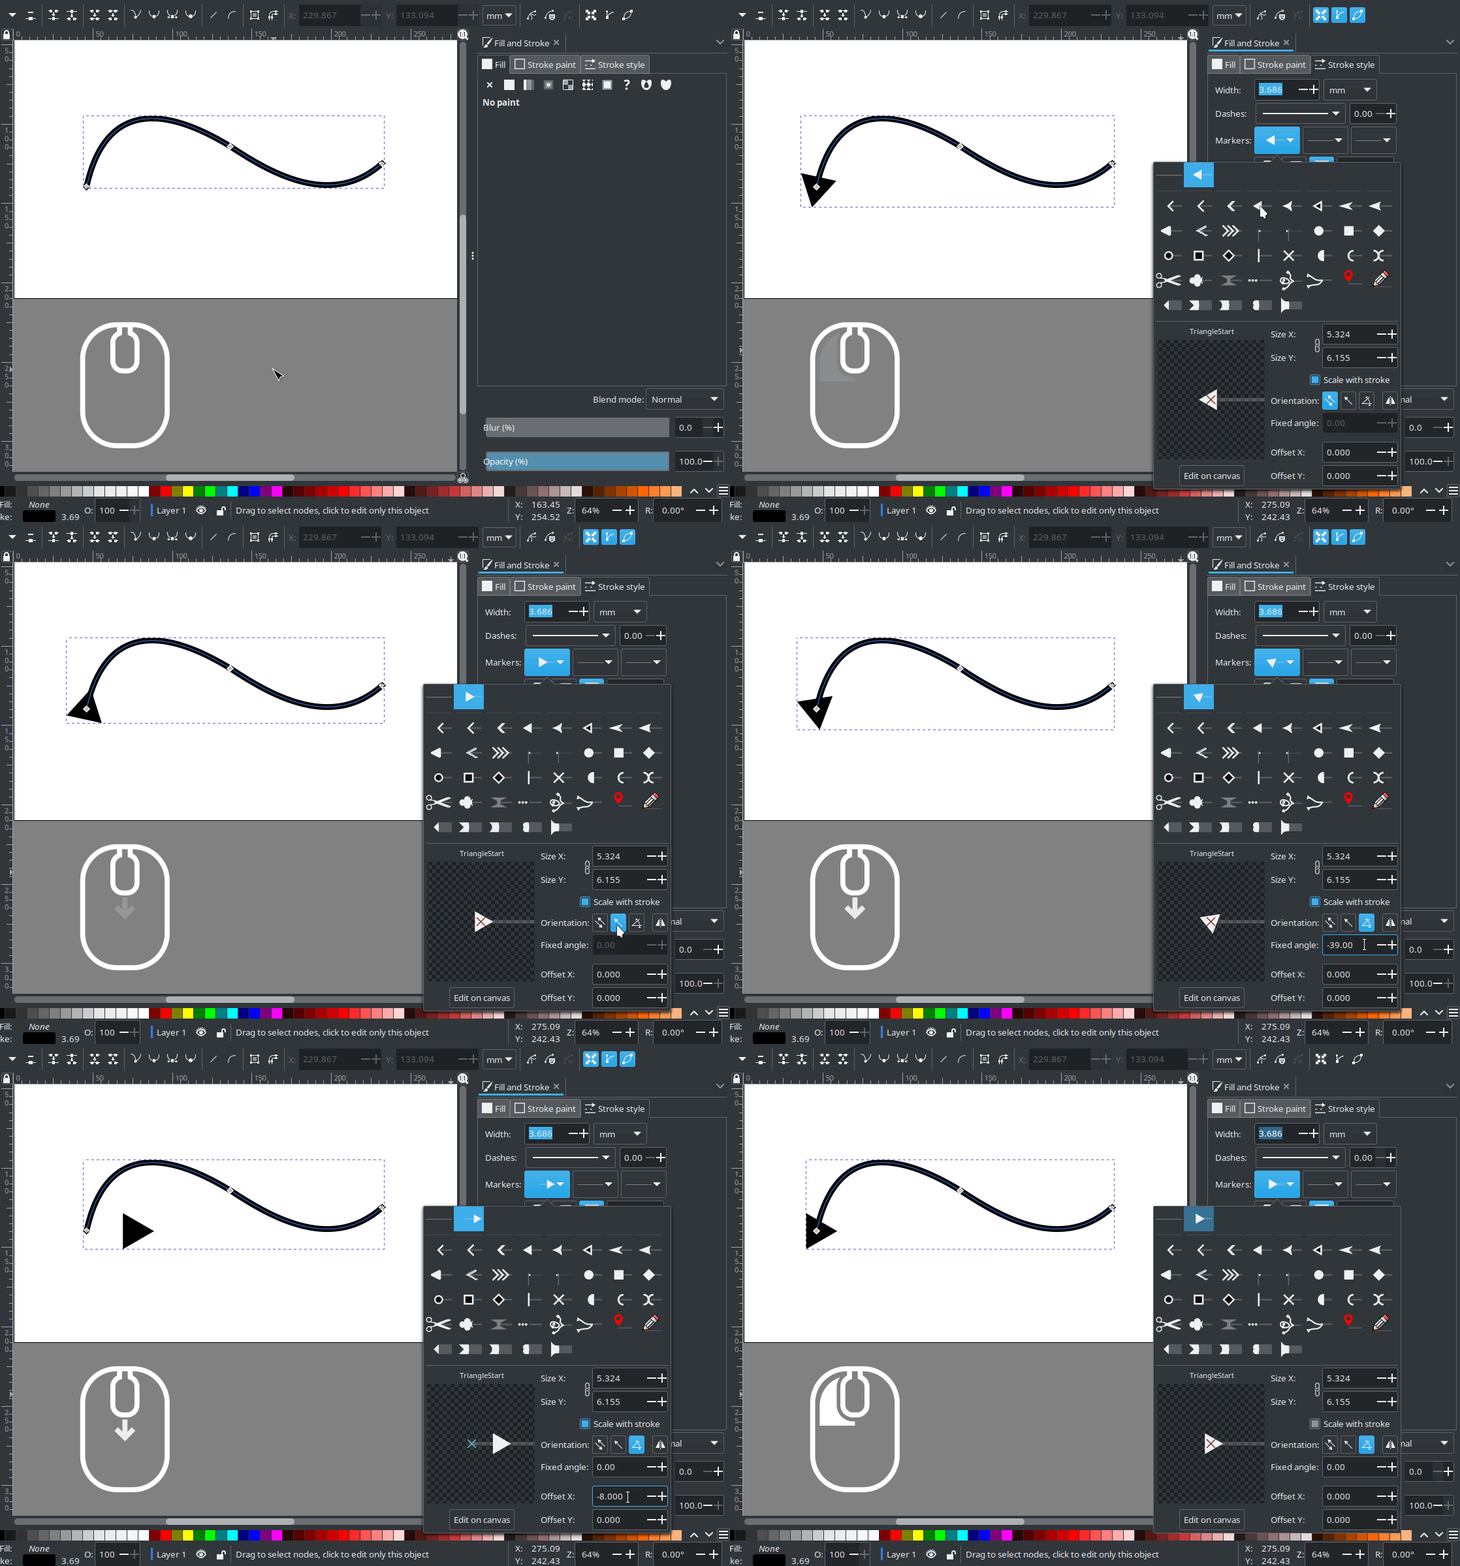
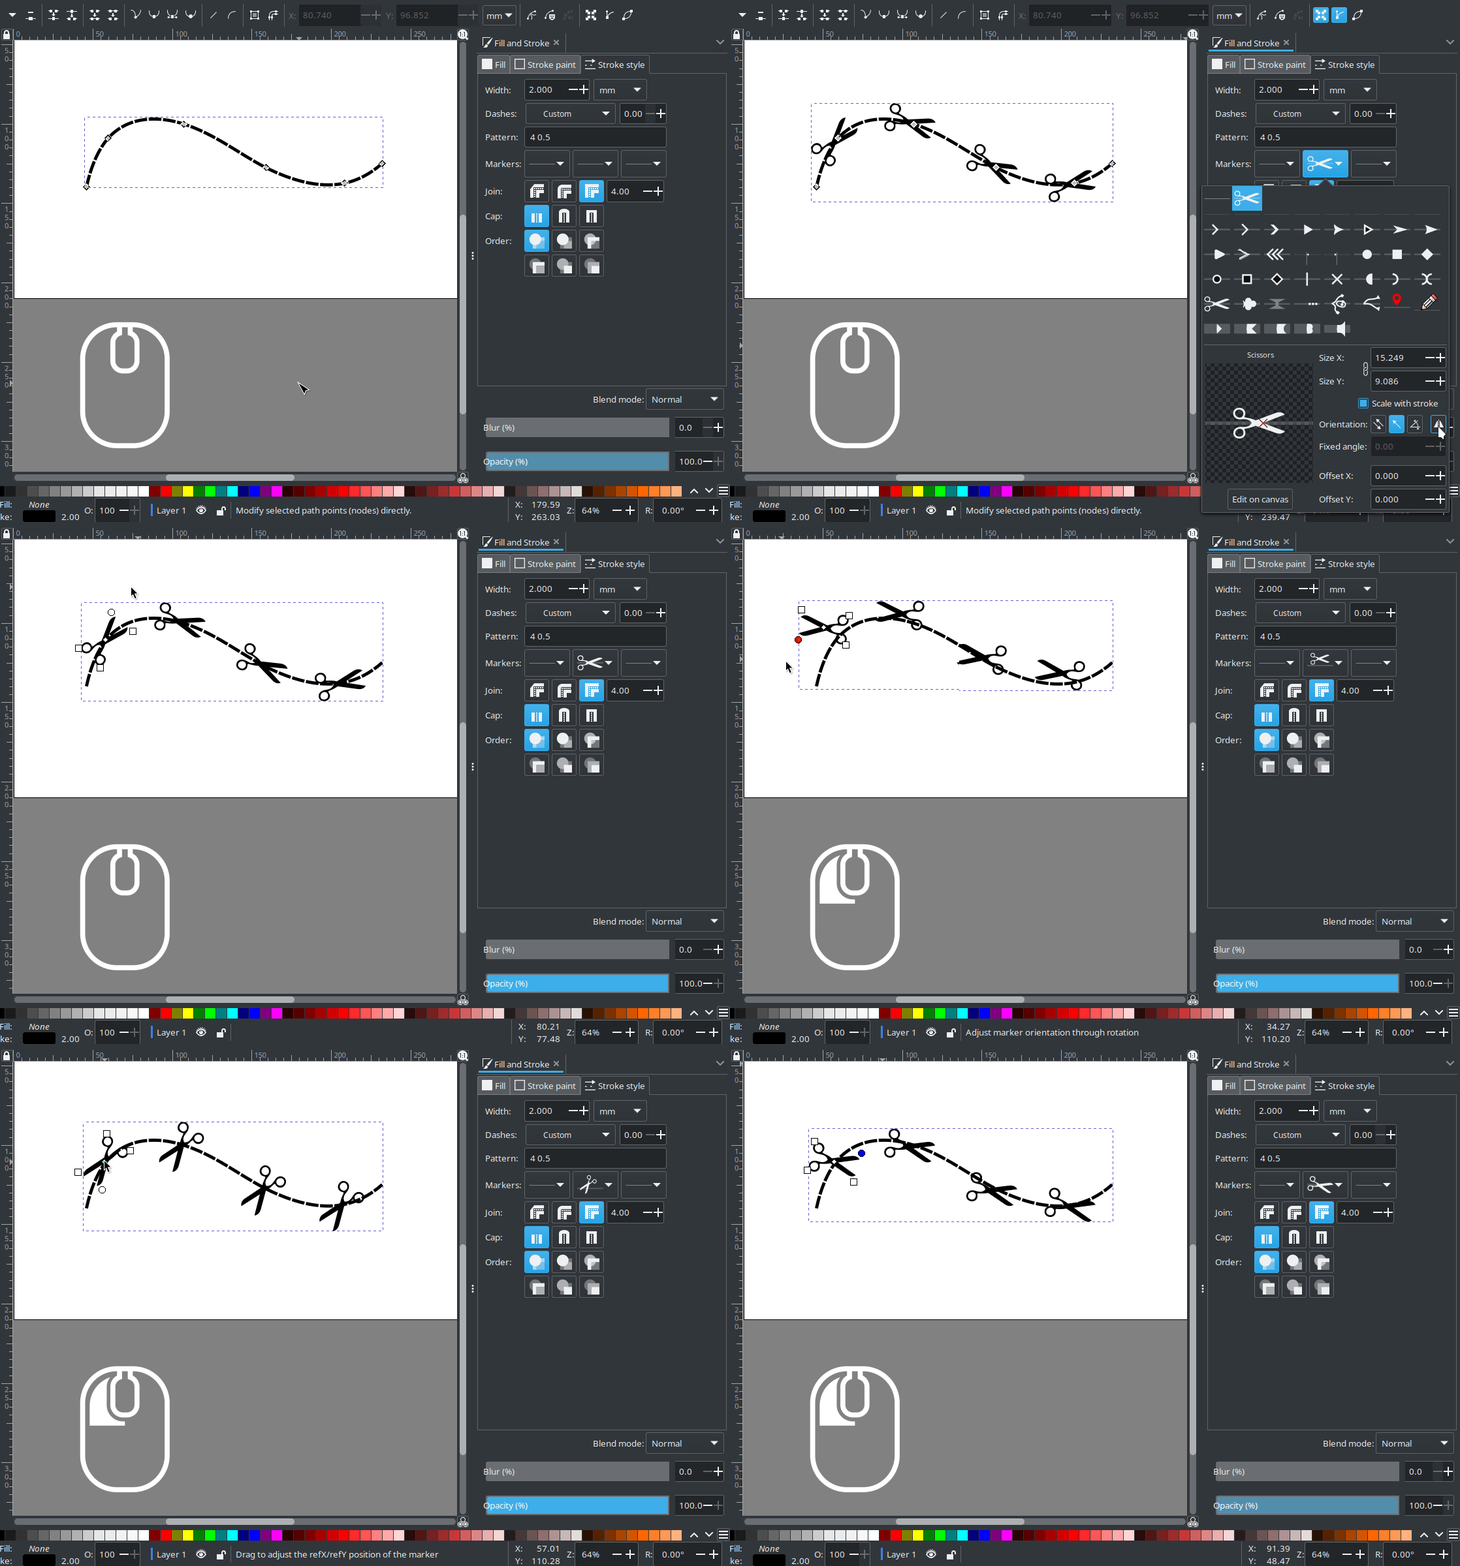
The markers drop down list has been replaced by a little dialog that displays all available markers in a grid, and even allows you to edit the selected marker! This project was undertaken by GSOC student Rachana Podaralla with the mentors Michael Kowalski, Marc Jeanmougin and Martin Owens (MR #3394, MR #3420).
When clicking on the drop down for the start, middle or end markers, you will see the following:
- a list of markers used in the current document at the top
- below that, a list of all available markers, which also contains some fun new markers!
- at the bottom, the 'Edit' section, with:
- a preview of how the marker will look
- some number fields to change the size of the marker (keep the lock on to scale proportionally)
- an option to scale the markers when the stroke width is changed
- options for changing the marker direction
- the option to change the marker's angle and to have that angle fixed
- marker offsetting options
- a button to enable editing of markers (rotate, scale, move) on the canvas
TODO: record new animation where rotation is also presented
Custom Dash patterns
To choose your own dash pattern, select Custom in the dash pattern drop-down menu. This will make a new text field show up where you can add your new custom dash pattern by typing in numbers. Each number corresponds to the length of a dash or a gap. It always starts with a dash, and when it reaches the end, it will continue with the first number again, for the next gap or dash. So if you enter an even number of numbers, e.g. '1 1 4.5 4.5' the pattern will be 'dot - short gap - dash - long gap' and then repeat again, and for an uneven number of numbers, the pattern will be inverted when the first 'set' ends.
On the canvas, you can watch how your object changes when you change the custom dash pattern numbers.
[TODO: needs gif]
Other small changes
Line cap and line join order buttons have been reordered, so they match vertically (MR #3402).
Layers and Objects dialog
A new dialog was created that merges the functionality of the familiar 'Layers' and 'Objects' dialogs, with better performance (MR #2466, MR #3635, MR #2466, MR #3741, MR #3597, MR #3645).
It is available from both the 'Layers' and the 'Objects' menu and offers the following functionality:
- a button to toggle between 'Layers' and 'Objects' view
- a list of all layers and objects in the drawing, featuring new icons for the different object types
- 8 alternating default colors for layers and the objects in them:
- these colors are used for drawing the paths in the respective layers
- the colors can be set (in case they clash with your theme, or you cannot see the paths that you draw) in the file
style.cssin your Inkscape preferences directory
- layer and object colors can be customized for each layer/object on its own, by clicking on the vertical color bar at the end of each line
- tiny mask and scissor symbols indicate that a clip or mask is applied to an object
- object and layer names (label, not id) can be changed after a double-click on the current name
- icons for locking and hiding a layer/object light up when you hover over the layer's row:
- click to hide/unhide, lock/unlock, Shift+click to hide/lock other items [TODO: check whether 'on same level' would apply, doesn't work currently]
- holding Alt while hovering over an object in the dialog will highlight that object on canvas
- layers as well as objects can be multi-selected
- the context (right-click) menu for layers provides options to move, delete, rename the current layer, to lock/hide all/other/the current layers, to add a new layer and to convert a layer to a group
- the context menu for objects provides the same options as it would when you right-click on the object on canvas
Note:
- the (partially hidden) setting for path colors in the preferences file is no longer respected. Adjust the style.css file as a workaround.
- the dialog no longer offers the options to change opacity, blur or blend mode. Use the Fill and Stroke dialog as a workaround.
- the type-forward search to filter for objects is no longer available. For objects, use the Search and Replace dialog as a workaround, for layers there is currently no replacement.
[TODO: needs a picture]
Preferences
- The preferences zoom ruler now respects your theme's look (MR #3450)
- An option to make
Select samebehave likeSelect allwith respect to whether it selects objects only in the current layer or in all layers was added toEdit → Preferences → Behavior → Selecting(MR #2832)
SVG Font Editor
With lots of user feedback, the Font Editor workflow has been updated with better previews, better performance and a higher degree of organization.
These changes result in a new recommended workflow:
- Open the typography template from
File > New from Templateor useExtensions > Typography > 1 - Setup Typography canvasto load a suitable template into Inkscape. - Open the SVG Font Editor dialog
- Select a name for your new font, using the + icon in the top right corner of the dialog
- Adjust the horizontal advance and the major font metrics to your liking
- Switch to the
Glyphstab of the dialog - Click
+to add your first letter/glyph/character to the list. You can also click the button repeatedly to automatically create a list of commonly used font characters, fromSpaceto common special characters, numbers and then upper case and lower case letters A to Z, and then even more special characters after that. - If you like to, switch from list preview to grid preview in the bottom right corner.
- Select one of the lines / blocks in the glyphs list.
- Click on
Edit. This will:- Create a new layer for the selected glyph (if there isn't one yet) and activate that layer.
- Hide all other layers
- Now draw your letter/number/… in the new layer
- Make sure it's a single path (e.g. do
Path > Union) - Keep it selected, and click on
Get curves. - Continue selecting glyphs from the list, adding / editing them and turning them into SVG font characters until your font is complete.
- In the last tab,
Kerning, you can select two different glyphs from the two dropdown lists, to adjust the default distance between them.- After you've selected them, click on
Add pair. - Now adjust the distance between them. In addition to the preview that shows just these two glyphs, you can also make use of the sample text to see how it will look in a sentence.
- Continue adjusting letter distances until you're happy with the result.
- After you've selected them, click on
- Save your file as Inkscape SVG, and open it with another program (e.g. FontForge) to be able to convert that SVG font into a ttf or otf font.
The workflow is based upon the following SVG Font Editor dialog improvements:
- speed improvements: Inkscape can now handle fonts with thousands of glyphs!
- automatic glyph generation: adding a new glyph creates a new entry and populates its unicode string, based upon the previously defined glyph (next in unicode order)
- glyph management: glyph editing action creates glyph-specific layers to keep glyphs organized
- grid glyph view: offers a larger preview than a list
[TODO: needs screenshot] (MR #3396, MR #3552, MR #3628)
Swatches
The Swatches dialog uses the same improved settings as the color palette.
Text and Font dialog
The dialog's width has been reduced, so it won't take up excessive amounts of space when docked (MR #3314).
Trace Bitmap
The Trace Bitmap dialog received a few updates and some more polish (MR #3405):
- The preview auto-updates more reliably and shows a better preview image.
- The preview location now adjusts to the dialog's format: if it is wider than tall, it moves to the right side, and if it is taller than wide, the preview appears at the bottom of the dialog.
- The number entry fields are now accompanied by draggable sliders.
Transform dialog
We cleaned up this dialog, reduced width and added explanation for metric transformations (MR #3381)
Filters
Live path effects
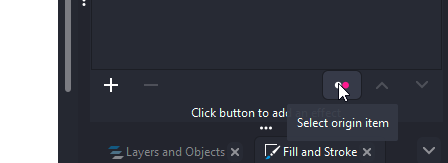
If you have an object selected that was created by the Live Path Effect of another object, you can now quickly find the responsible LPE object by clicking on the new button at the bottom of the Live Path Effects dialog. This is very useful for all Live Path effects that create dependent objects which can be selected independently, like the new Copies LPE, the Boolean Operations LPE, the Rotate Copies LPE and many more (MR #3479).
Copies LPE
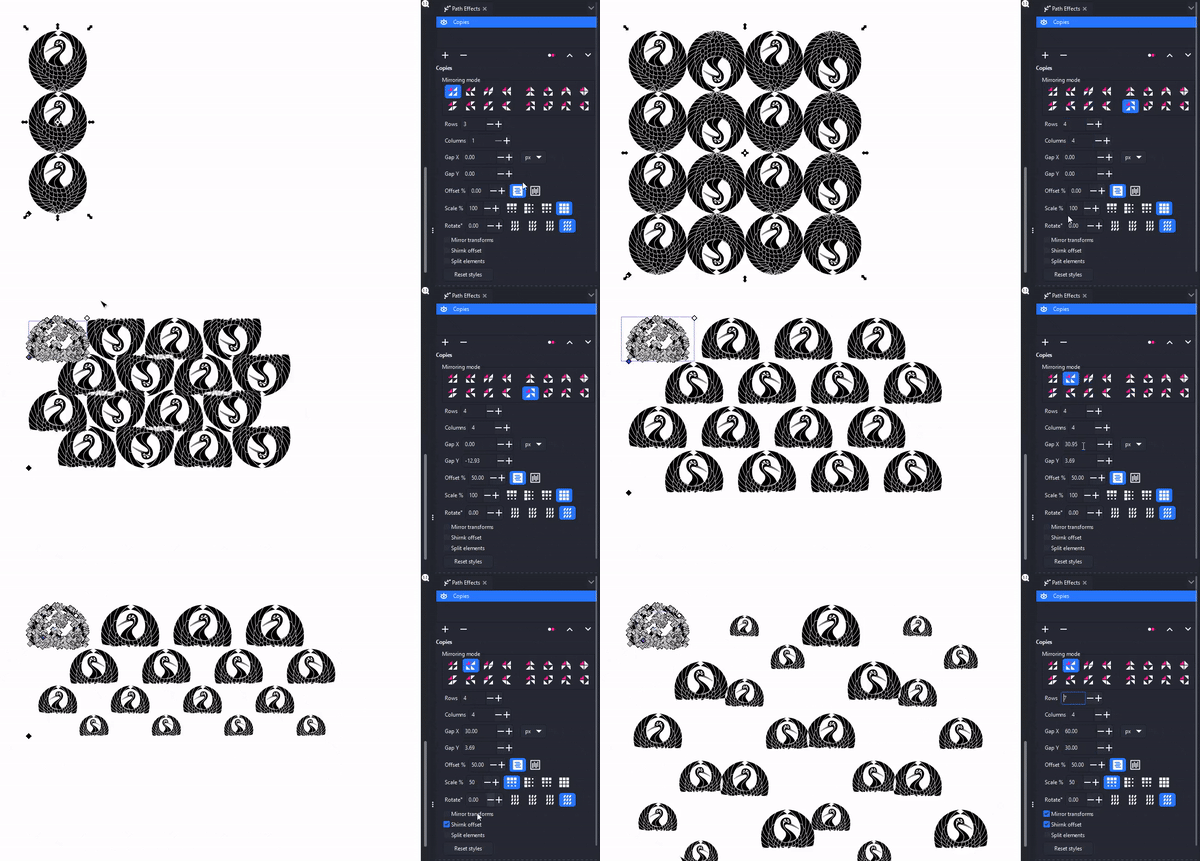
Internally, we call this the \'Tiled Clones dialog on steroids\' - interactive tiling, using a huge range of different tiling types, setting the distance between objects numerically, changing scale, location, rotation per row / column, add more rows and columns on the fly. This can be used to quickly copy large numbers of objects non destructively and to create interesting grids and patterns and variations quickly (MR #3814).
Features:
- Cloning of objects in rows and columns
- Offset of rows and columns
- 16 different mirroring modes
- Linear scaling (4 modes + mirroring)
- Linear rotation change (4 modes + mirroring)
- Custom gap controls, with units
- Custom styling of clones
Import / Export
Export Dialog
[TODO:fill in ]
Anshudhar Kumar Singh with mentors Michael Kowalski, Ted Gould, Tavmjong Bah and finished By Martin Owens
We re-named This dialog from Export PNG image to Export to reflect new abilities of this dialog.
Features:
- Ability to export images in to multiple Raster formats: PNG, Jpeg, WebP, Tiff but also Vector formates:Svg, Inkscape SVG, PDF
- The export dialog can export to *any* raster extension marked as a raster extension in it's INX file. THEN if you check the extra setting in the preferences
Edit → Preferences → Input/Output → show all outputs in Export dialog, It will show all extensions, raster and not. So you may export to DXF, LaTex or whatever else you have available. - Single Image has 4 modes:
- Document - will export all objects in the documents (basically ignores page)
- Page - will export what is exactly in a active page (with exact size of page)
- Selection - will export area of objects that are selected (use checkbox export selection only if you wan just selected objects)
- Custom - You can manually define are you want to export from top left corner to bottom right corner
- Bach export that allows you to export parts of the document in to separate files formats and sizes
- Bach export will use names of the objects as a names of files
- Bach export has 4 modes:
- Selection - will export objects (pro tip: group object that belong in to single file)
- Layers - will export all layers
- Pages - will export content o pages (new feature )
- You can add multiple formats/ versions by clicking button
Add export. this is useful because you can export many files with single click. - Changing DPI control size of images (pixel resolution) (90 is default if you want 2x resolution set it to 180 etc)
- Suffix adds text at the end of the file name
- You can remove objects from selection you un-checking the object in a preview list
- Checkbox
export selection onlyif you want export just selected objects (ei: not object under or over objects). This is useful for exporting game assets or parts of the designs for website - Interactive Preview of export
- Cleaned UP and simplified UI
[TODO: Add images / Videos]
MR 3825
Customization / Theming
General User Interface
- The font size in the user interface can be adjusted at
Edit → Preferences → Interface → Theming: Font scale(MR #3690) - The
+/-buttons for number entry fields are now smaller. If you prefer the old, wider buttons, they can be turned on again by disablingPreferences → Interface : Use narrow number entry boxes. (MR #3358)
Bars / Toolbars
- You can now hide elements from the status bar (style indicator, layer indicator, mouse coordinates, canvas rotation) at
Edit → Preferences → Interface: Status bar(MR #3445) - You can now hide tools from the tool bar at
Edit → Preferences → Interface → Toolbars: Toolbars(MR #3515)
Cursors
- The drop shadow is now optional for mouse cursors. You can turn it off in
Edit → Preferences → Interface → Mouse cursors: Show drop shadow(MR #3352).
Icons
- Multiple icons in the Multicolor icons set got small retouches and other improvements to readability or contrast, e.g. the green color is now a little brighter when using a dark theme, to improve contrast.
- Cursors and icons in Multicolor icon theme for the Bézier tool and the Calligraphy tool in the tool bar now use the same imagery [to be confirmed]
Align and distributeicons are now smaller, some were redesigned to fit in to 16x16 grid.- The icon sizes for the tool bar and the control / tool controls bar can now be adjusted smoothly on a continuous scale from from 100% to 300% in
Edit → Preferences → Interface → Toolbars: Toolbox icon size / Control bar icon size. Changing the size no longer requires a restart.
Themes
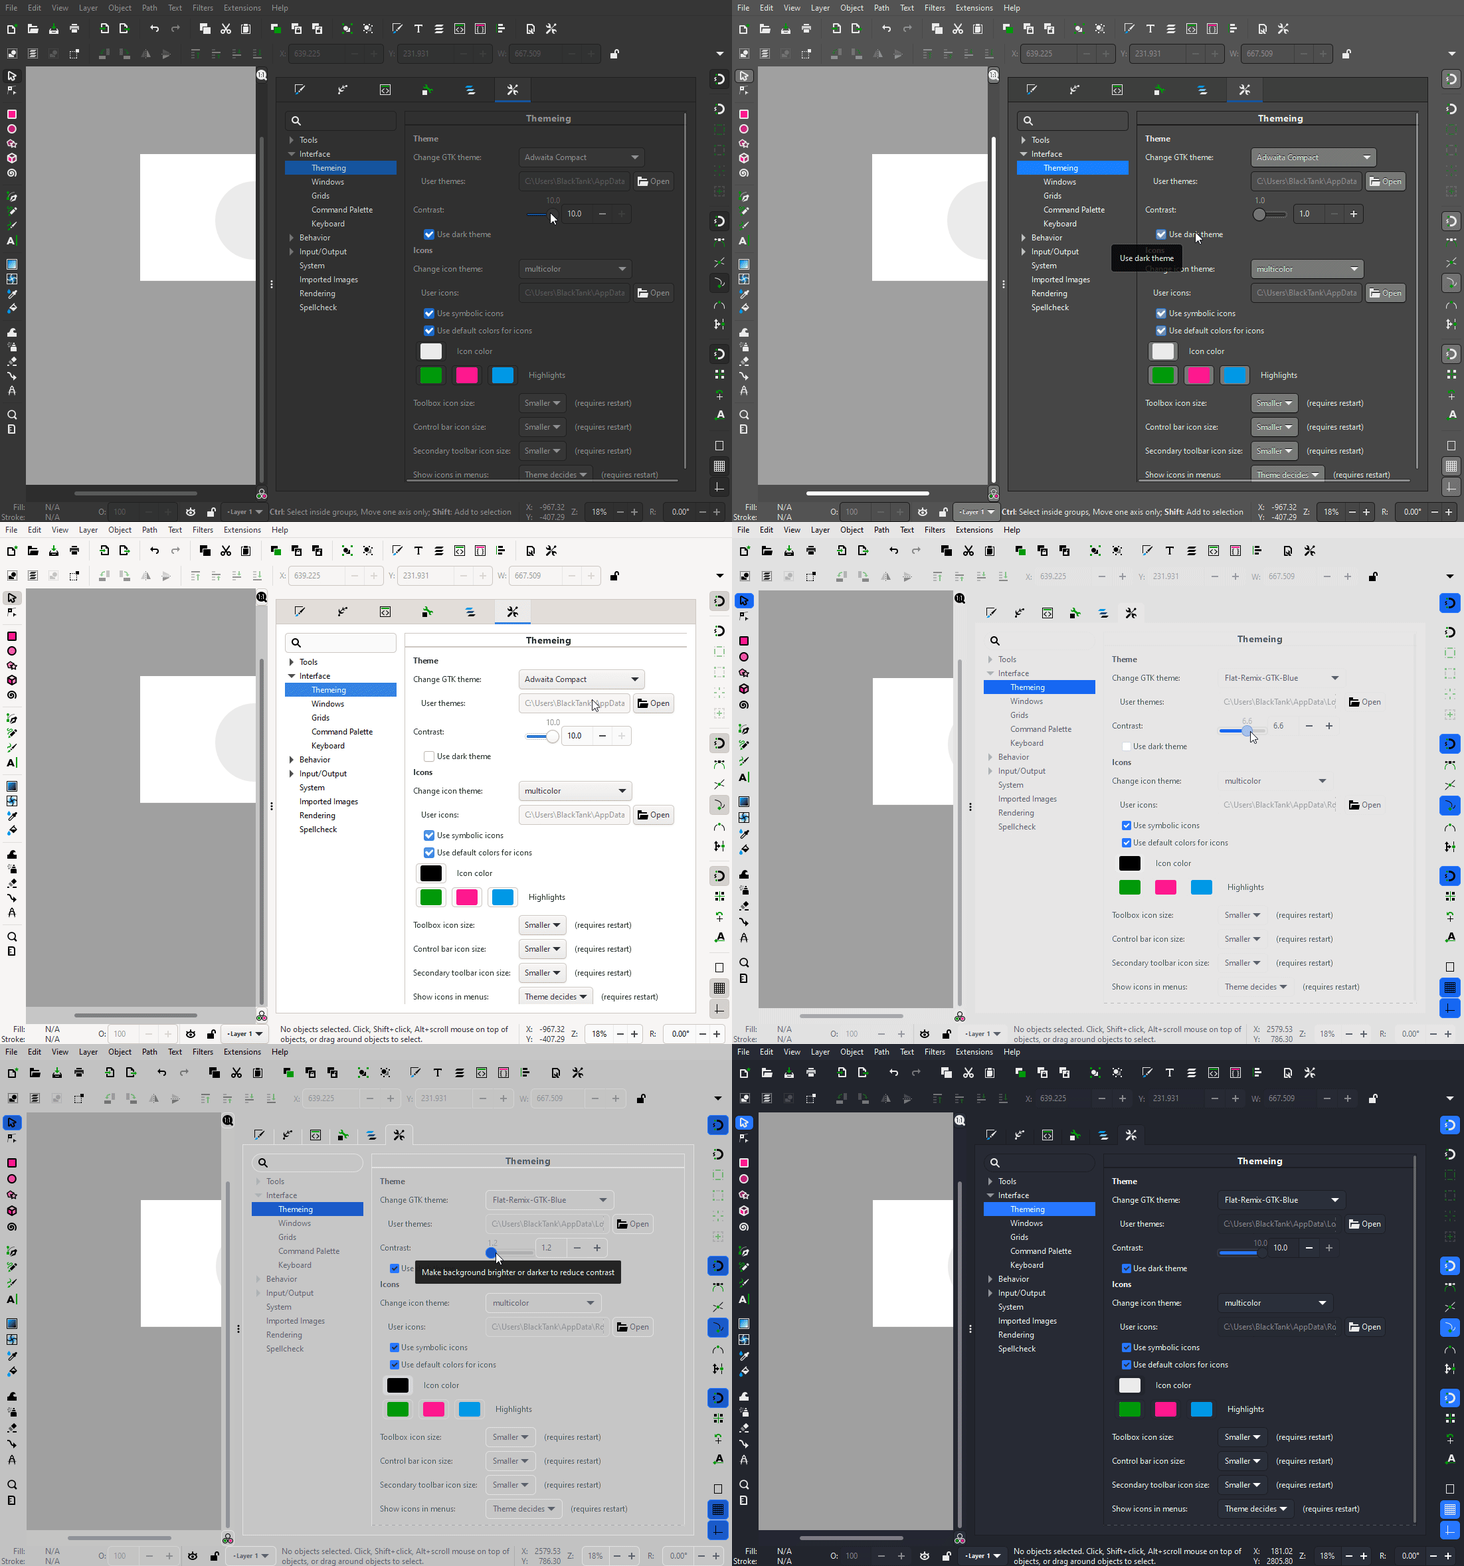
- A contrast slider was added for fine tuning the selected theme's colors at
Edit → Preferences → Interface → Theming: Contrast(MR #906)
macOS-specific Changes
The minimum operating system version supported is now macOS 10.13. (The prior version, Inkscape 1.1.x, supported macOS 10.11 and newer.)
On macOS, enable all special menu items in the application menu and hide them from other menus (MR #3767)
Windows-specific Changes
Modifier keys now work with pen input (Commit #46c12b)
Extensions
Features added
- Add new Document > Process Illustrator SVG... extension to assist with importing Adobe Illustrator documents with layers and the correct scale
- Add option to limit output extension to save copy (MR #3600)
- Added Python app dirs dependency (MR #3568) [Is this a bug fix?]
Bugs
Command line
- 'verbs' have been removed. All verbs are available as 'actions' now (see below for more context)(MR #3884, MR #3880, MR #3874).
- A new action for scaling by a factor has been added, it replaces the previous one, which is now called 'grow' (MR #3880).
Behind the curtains
- Gio::Actions: The old 'verbs' were converted to 'actions'. This work was done to prepare for migrating to Gtk4. It also makes it possible to reach them all from the commands palette, to assign keyboard shortcuts them and to use them on the command line. A big part of this work was done by Google Summer of Code student SUSHANT A.A. with the mentors Alexander Valavanis, Ted Gould and Tavmjong Bah.
Symbols
Add support for x, y, width and height SVG2 attributes on <symbol>. Follows logic of <svg> element, which already supported these attributes (MR #3828)
Notable bugfixes
Crash fixes
- Check knot still exists before updating (MR #717)
- Masive collection of crash fixes related to number of LPE (copy, stampe, duplicate) (MR #3479)
- Action after grouping 3D boxes crash Fix (MR #3698)
- Fix for crashing of inkscape while Quitting (MR #3681)
- Fix crash due to invalid or malformed direct-action string (MR #3663)
- Bezier curve tool Backspace crash (MR #3715)
- Fix crash scrolling across line height units (MR #3541)
- Fix adding a path effect to symbol causes crash (MR #3520)
- Fix drag-and-drop svgs, stops crash (MR #3710)
- Handle two items in spray tool's single path mode (MR #3470)
- Icon preview crash (MR #3439)
- Prevents crashing during 3D box import (MR #3592)
- Fill between Paths LPE crash on selecting (MR #3801)
Other bug fixes
- Inkscape no longer slows down when using grids and havign the Document Properties dialog open on macOS
- Calligraphy tool: use correct tool tilt direction (MR #3782, Bug #1692)
- duplicated gradeint does not get deleted (MR #3361)
- Last line in paragraph is not justified anymore (MR #3780)
- Fix #1034 - Recursively flatten css style when copying (MR #3656)
- new boolean operation algorithm (MR #3724)
- Respect mouse down before mouse move coordinates (WIN) (MR #3735)
- Remove mandatory break from end of paragraphs, added in Pango 1.49 (MR #3630)
- Fix: Subsequent font changes to words in the same textbox now apply (MR #3631)
- Fix numpad input for unimode in text tool (MR #3689)
- Restore refresh of units trackers (MR #3665)
- Fix find and replace if text has description, nested tspans (MR #3551)
- all canvas knots should have same size and be controlled form preferences (MR #3679, MR #3699)
- Fix multiline vertical text positioning in browsers (MR #3537)
- Stop changing line height when units change (MR #3544)
- Fix Clone Tiler menu item, action mismatch (MR #3650)
- fix: Cannot quit Inkscape on macOS Big Sur from welcome screen (MAC) (MR #2762)
- Fix: Position of flowed text no longer applies extra transforms on text (MR #3695)
- Fix default value for saturate in color matrix filter (MR #3626)
- nodes widget no longer appears on startup in align and distribute dialog (MR #3677)
- fixes #2621. Clicking on fill/stroke in the status bar now reopens the dialog if it is hidden (MR #3754)
- Fix KP_2,4,6,8 shortcuts for rect tool (MR #3773)
- Transform handle modifiers are now displayed on status bar (MR #3809)
- Perspective/envelope LPE now works on objects with 0 width or height . (edge cases for single line stroke) (MR #2712)
Even more bug fixes
There were even more issues fixed than those listed above, but these probably only affect a small portion of users, or are relevant for development and packaging only.
For a complete list, visit our GitLab issue tracker and see the commit history.
Translations
The following UI translations received updates:
- …
The Windows installer translation was updated for [2021-03-03]:
- …
The following documentation translations received updates:
- …
Contributing to interface translations
Want to help with translations? Learn how to help!
Documentation
- …
Contributing to documentation and documentation translation
Contributions to the documentation translations, as well as improvements to its contents, are welcome at the inkscape-docs repository.
Website
[TODO: update if merged] Ishaan Arora with mentors Thomas Holder, Martin Owens
Important changes for packagers
- New dependency on
python-cssselectadded which is required for usage of Inkscape extensions (MR #3239) - As Python
distutilsare now deprecated, they have been replaced bypython3-packaging(MR extensions#368) - Dithering for gradients (see Dithering section) is available with a build flag (
-DWITH_INTERNAL_CAIRO=ON), which causes Cairo to be patched for dithering during the build process. Please find more information in MR #3812.
Important changes for extension authors
New Style API
Added in MR extensions#294, MR extensions#296, MR extensions#298, MR extensions#300, MR extensions#352, MR extensions#403
Inkex now exposes styles to extensions authors as intended by the SVG specification. This means:
BaseElementnow has functionscascaded_style,specified_styleandpresentation_style.- In most use cases, extensions querying a style will use
specified_style. This computes the effective style of the element, including CSS classes / pseudo-selectors, inherited styles, presentation attributes etc. - While
style.get()andstyle[key]has been unchaged, a new getter has been added in form ofstyle(key)(similar to a function call), which attempts to parse the attribute in a reasonable datatype. If the attribute is unset, the (parsed) default value will be returned. For example:style("fill")returns aColor/Gradient/Pattern/None,style("opacity")returns a value between 0 and 1, regardless if opacity is defined as percentage or as float, is out of bounds or undefined,style("stroke-dasharray")returns a list of floats of dash/gap/dash/gap in user units.
- Not for all attributes there is a parser defined - in that case, a string will be returned. Additional parsers may be added in the future.
New Units API
Added in MR extensions#329, MR extensions#343, MR extensions#415
The existing functions unittouu and uutounit are widely used, but for different purposes. Different extension authors try to answer different questions using these function, and, inevitably, some answers were incorrect (see linked issues in MR extensions#329).
In Inkscape 1.2, new methods have been added to make working with dimensional values easier. These are to_dimensionless, to_dimensional, viewport_to_unit and unit_to_viewport. The existing functions unittouu and uutounit are not deprecated, but discouraged; in most cases, the new functions are more reliable.
to_dimensionless(value)fulfills the following task: Convert this string from the XML into a number, while processing the unit. When using this function on any SVG attribute and replace the original value with the result, the output doesn't change visually.viewport_to_unit(value, target_unit="px")answers the following questions:- What is the length (e.g. the length of a rectangle, without a unit) of an object that has size
valueon the viewport? This is relevant because in Inkscape toolbars / tools, all dimensions are shown in "viewport units". - In other words: What is the SVG representation of entering
valuein the width/height widget of the selection tool (set to the unit of value)? Consider<svg width="210mm" viewBox="0 0 105 147.5"><rect width="?" height="?"/></svg>, i.e. a "mm-based" SVG with scale=2. When typing200in the rectangle tool, set to mm, the XML editor shows100=100px. That's whatviewport_to_unit("200mm") = 100does. - Note that this is different than
viewport_to_unit("200", "mm"), which would be for a rectangle with a width (in the width/height widget of the rectangle tool) of 200 (px), while writing the width inmmin the SVG:<rect width="7.00043mm" height="7.00043mm"/>.
- What is the length (e.g. the length of a rectangle, without a unit) of an object that has size
to_dimensionalsimply converts a float to its equivalent with attached unit. It's the opposite ofto_dimensionless.unit_to_viewport(value, unit="px")answers the following question: What does the the width/height widget of the selection tool (set tounit) show when selecting an element with widthvalueas defined in the SVG? Consider again<svg width="210mm" viewBox="0 0 105 147.5"><rect width="100" height="100"/></svg>, i.e. a "mm-based" document with scale=2. To create this rectangle, one has to typeviewport_to_unit("100", unit="mm") = 200into the rectangle tool, if the rectangle tool is set to mm.
With the same spirit, the functions for width/height of the document have been updated. svg.width and svg.height have been deprecated, and replaced with svg.viewbox_width, svg.viewport_width, svg.viewbox_height and svg.viewport_height.
There is also svg.scale, which returns the ratio of the viewport and viewbox width, and svg.inkscape_scale which is the scale reported in the Document properties dialog.
Deprecations
- The Transforms multiplication operator has been changed from
*(*=) to@(@=), in accordance with PEP-465 (MR extensions#389, Issue extensions#327) svg.widthandsvg.heighthave been deprecated, and replaced withsvg.viewbox_width,svg.viewport_width,svg.viewbox_heightandsvg.viewport_height, see New Units API.selection.paint_orderhas been renamed toselection.rendering_orderto be conformant with the specification (MR extensions#344, Issue extensions#310)FallbackStylehas been deprecated in favor ofStyle, see New Style API.
Known issues
- Gradient editing [as of 2022-01-24]:
- If you convert your gradient to swatch, the gradient editor cannot be used for editing it anymore.
- Canvas stops and gradient editor stops highlighting will stop working in some cases.
Other releases
- Inkscape 1.5 — development branch
- Inkscape 1.4 — current stable release branch (1.4.1, 1.4.2, 1.4.3, 1.4.4 next bugfix release)
- Inkscape 1.3 (1.3.1, 1.3.2)
- Inkscape 1.2 (1.2.1, 1.2.2)
- Inkscape 1.1 (1.1.1, 1.1.2)
- Inkscape 1.0 (1.0.1, 1.0.2)
- Inkscape 0.92 (0.92.1, 0.92.2, 0.92.3, 0.92.4, 0.92.5)
- Inkscape 0.91
- Inkscape 0.48 (0.48.1, 0.48.2, 0.48.3, 0.48.4, 0.48.5)
- Inkscape 0.47
- Inkscape 0.46
- Inkscape 0.45
- Inkscape 0.44
- Inkscape 0.43
- Inkscape 0.42
- Inkscape 0.41
- Inkscape 0.40
- Inkscape 0.39
- Inkscape 0.38
- Inkscape 0.37
- Inkscape 0.36
- Inkscape 0.35
