Release notes/1.2
Release highlights
Released on May 16, 2022
- Inkscape documents can now hold multiple pages, which are managed by the new Page tool
- Editable markers and dash patterns
- Layers and objects dialog merged
- On-canvas alignment snapping and Snap settings redesign
- New 'Tiling' Live Path Effect
- Redesigned Export dialog with preview and ability to select objects/layers/pages and even multiple file formats to export to
- Import SVG images from Open Clipart, Wikimedia Commons and other online sources
- Selectable object origin for numerical scaling and moving
- All alignment options in a single dialog
- Gradient editing in the Fill and Stroke dialog
- Gradient dithering
- SVG Font Editor updated
- Flowing text around shapes and text padding
- Convenience Boolean operation for splitting paths
- Configurable Tool bar, continuous icon scaling and many more new customization options
- Performance gains for many parts of the interface and many different functions
- Lots of improvements to the user interface
- Numerous crash & bug fixes in the main Inkscape program and in in the stock extensions
- and so much more!
General user interface
Color palette
The overall look and options of the Color palette and the Swatches dialog got a massive overhaul (MR #2881):
- When switching the color palette, the switcher shows a colorful preview line for each palette
- Between 1 and 5 palette rows that can be displayed all at once, or scrolled through vertically / using the arrow buttons
- Improved and reliably working settings for padding, tile size and tile shape / auto-stretching

- Context menus no longer contain functionality that is not available for the selected object (no greyed-out items anymore), making it easier to find what you're looking for. This also helps find objects you've hidden, as the option to unhide objects under the cursor only appears if there are hidden objects in that location (MR #3800).
- The Extract image command has been improved and works with multiple images now. You can now enter a base filename; if none is entered, the ids of the selected images are used as filename. You can also choose whether the embedded image data should be replaced by a link to the exported file (MR extensions#461, Bug extensions#167).
Dithering
Inkscape's gradients sometimes suffered from visible steps between colors, a phenomenon also known as gradient banding. Gradient banding is caused by the difference between how many different colors are available for the selected image file format and how many colors a human eye can discern. The effect becomes especially prominent when exporting a gradient that only spans a small color range to a high-resolution image. There just aren't enough colors available for a smooth transition.
Dithering softens these steps by scattering pixels of the different adjacent colors along the gradient, a little bit like a blur.
Dithering is now used both for Export of raster images as well as for displaying gradients on canvas (MR #3812). This functionality requires a special version of Cairo, our rendering engine. This means that it will only be available in the pre-packaged builds (for macOS, Windows and for the Linux AppImage).
Dithering can be turned off (better performance / smaller exported file size for raster images) in Preferences → Rendering → Use dithering.
Note:
- Dithering does not work for mesh gradients!
- For standard Linux package formats (deb, rpm, …), it depends upon your Linux distribution maintainers whether they will patch up the version of Cairo they want to distribute. We hope that this change will one day also be included in the official Cairo packages (Link to ongoing discussion).

Menu
- The option
View → Customwas removed, as the difference was the location of the snap controls bar, and that is gone now (MR #3647). - After installing a new extension with the Extensions Manager, the menu now updates without the need to restart Inkscape (Commit #0bb51a)
Performance
- Various performance improvements for rendering while panning and zooming (MR 3838)
- Improved performance on macOS
Settings
Some default settings have been changed to make Inkscape easier to use for new users:
- Rotation is now locked by default
- The default handle size has been increased (to 4)
- The default number of autosave files has been increased (to 50)
Status Bar
- The layer selection drop-down has been replaced by a layer indicator. Clicking on the indicator opens the new Layers and object dialog. This change improves Inkscape's performance for documents with many layers (MR #3648).
- The layer lock and hide icons now come after the layer indicator, which is more logical (MR #3856, Bug #3104)
- The status bar contents are now configurable from
Edit → Preferences → Interface: Status bar(MR #3445) - When your document has more than one page, the status bar shows the page navigation to the right of the message area, allowing you to leaf through the pages or to select a specific page directly
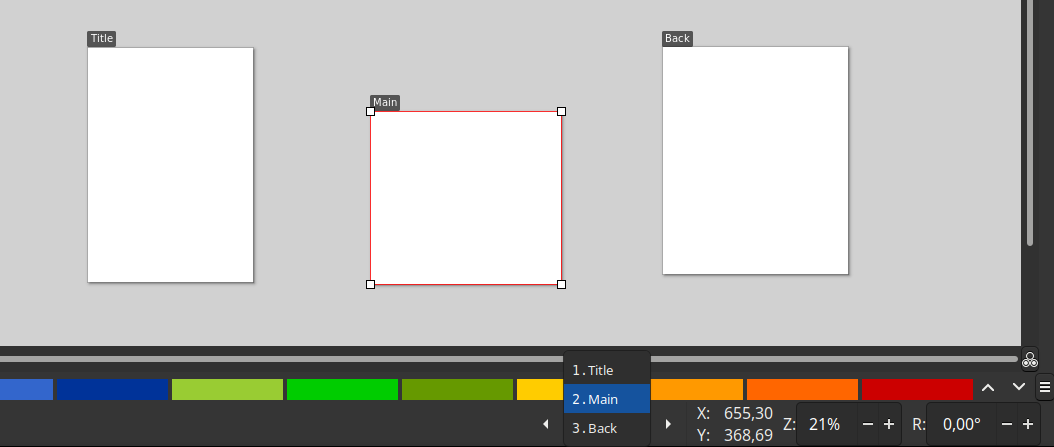
Page navigation in status bar

Toggling visibility of items in the status bar (click to see animation)


Tool Bar
- The Tool bar width can now be adjusted by dragging its edge. The tool icons will wrap into multiple columns, separated by tool category, depending upon the width.
- You can now hide tools from the tool bar at
Edit → Preferences → Interface → Toolbars: Toolbars(MR #3515)

Canvas
Page
- Inkscape documents can now hold multiple pages! Learn more in the section about the new Page tool.
- Page shadows now have a more realistic, blurry, fade-out look (MR #3128).
- Settings for the page background / decoration (shadow, border) were refactored, see section about Document properties dialog.
- The page's default color is white, and the default desk color is set to light gray. This way, it is easier to differentiate what is on the page(s) and what is outside of the page(s).

Snapping

Snap popover
The snap bar has been replaced with a new 'popover'-type dialog, which will unfold when you click on the little arrow symbol in the top right corner, next to the snap symbol. Snap options now have always-visible descriptions, to make them easier to understand (MR #3323).
To activate / deactivate snapping globally, click on the snap symbol in the top right corner or press %.
The popover dialog has two different modes:
- Simple: Only 3 options: snap bounding boxes and paths, activate / deactivate the new alignment snapping). This provides simple presets for many use cases.
- Advanced: Gives the familiar granular control over every snapping option.
Note: Switching from 'Advanced' back to 'Simple' is not merely a visual change, but will reset snap settings to defaults.
Alignment and Distribution snapping
During Google Summer of Code 2021, GSOC student Parth Pant worked on adding on-canvas alignment and distribution snapping, with the support of his mentors Thomas Holder and Marc Jeanmougin. As a result, two new modes of on-canvas snapping have been added. These new modes make aligning and distributing objects a very easy drag-and-drop operation (MR #3294)..
- When on-canvas alignment is active (option Alignment), Inkscape will display horizontal or vertical temporary guide lines that indicate when the selected object can be aligned relative to another object on the canvas. It connects the points of the objects that are in alignment. With the option Nodes in same path, alignment snapping is also available for nodes while editing a path with the node tool.
- With distribution snapping (option Same distances), multiple objects close by are taken into account, making it possible to align objects in a grid with very little effort.
The temporary guide lines only appear while editing / moving objects on the canvas. Once a guide shows up, the movement of the selection is loosely constrained in the direction of the guide.
Alignment and Distribution snapping guide lines can display the distance(s) between objects as a little label. This can be enabled from Edit → Preferences → Snapping: Show snap distance in case of alignment or distribution snap.
The 'Simple' mode of the snapping popover dialog allows you to simply activate or deactivate Alignment snapping. The 'Advanced' mode gives you additional control by allowing you to en-/disable:
Other Changes to Snapping
- Snap settings are no longer saved with the document, but are set globally for all documents in the preferences and in the snap popover dialog.
- The option for enabling snapping in new documents has been removed, as it no longer makes sense (MR #3580)
- The options for snapping perpendicularly and tangentially to paths or guide lines have been moved from the document preferences to the snap popover to make them more discoverable.
- The options to configure snap tolerances per snap target type that previously could be set in the document preferences have been removed to simplify snapping for users.
Snapping nodes in the same path
Demo of alignment and distribution snapping


Guides and Grids
- The size of the guide handles is now adjustable via the existing setting
Edit → Preferences → Interface → Handle size. Nonetheless, the guide handles react to this setting at half the rate of other handles; at large settings, the effective size of a guide handle is about half the size of an auto-smooth node. At the same time, a minimum size is enforced, equal to the previously hard-coded size. As a result of this mechanism, the handle is only enlarged when theHandle sizepreference is set to a value of 7 or larger. Since the default value is 3, the size of guide handles does not change on new installs or for users on default settings (Bug #3111, MR #3870) - Larger handles can now easily be grabbed with the mouse, because the handles themselves are now 'grabb-able', not only the guide lines below (Bug #3111, MR #3870)
- Handles now take on the guide's color. Only when the guide is locked, its handle turns grey (and changes the shape to an "x", as before) (Bug #3111, MR #3870)
- The default color of guides and grids was changed to a softer shade of blue (MR #4012)

Tools
Tool settings
- The Pen, Pencil, Text and Tweak tool now use the 'last used style' by default, and will not constantly reset to black fill / stroke respectively for new users with default preferences (MR #3533).
- The default 'Mass' value of the Eraser tool has been increased, so the result is now much smoother (MR #3440, Bug UX#107)
- The default 'Smoothing' value for the Pencil tool has been increased, so first-time users' first drawings will look less squiggly (MR #3966)
- The default font unit for the Text tool is pt.
Gradient Tool
To allow you to keep gradients, even when the last object that was using it has been deleted, we added a setting for automatically removing unused gradients at Preferences → Gradient Tool → Auto delete gradients that are not used. This is turned on by default, which corresponds to the behavior of the previous Inkscape version, but you can now turn it off (MR #3897).
Node tool
- The box (lasso) selection mode gained two new features: node deselection and inverted node selection:
- to deselect some of the selected nodes, drag a box around those nodes while holding Shift + Ctrl.
- to select all nodes but those that end up within the box, hold Ctrl while dragging the box around the nodes.
- When clicking on a path segment while holding Ctrl, the path segment becomes a straight line
- When double-clicking on a path segment while holding Ctrl, the path segment is removed


Page tool

The new Page tool (lowest button in the tool bar) allows you to create multi-page Inkscape documents, and to import as well as export multi-page PDF documents. (MR #3486, MR #3785, MR #3821). It supports overlapping pages and pages of different sizes in a single document.
Importing (Merge) / Exporting (Split)
Multi-page documents can be imported with their pages appended as new pages in the existing document. Select the correct option in the window that pops up to append pages rather than import shapes as usual. This can be used to merge multiple pdf files.
Exporting multiple pages can be done in the new export dialog in batch mode. As well as each individual page in the Single export tab. Use this to split into single page svg or pdf documents. Note: it's not yet possible to select a sub-selection of multiple pages to export yet.
Tool usage:
- To create a new page either:
- click-and-drag on the canvas
- or click on the 'Create a new page' button in the tool controls
- To delete a page, click on the page to select it, then click on the button
Delete selected pageor use theDelorBackspacekeys. - To move a page on the canvas, click-and-drag it to the desired new position. If the option to
Move overlapping objectsis active, this will also move any objects that touch the page along with it. - To change a page's size:
- click on a page whose size you want to change to select it, then drag the square-shaped handle in its bottom right corner
- click on the page, and then choose one of the predefined sizes in the page size dropdown, or enter your size values for the 'Custom' option, by typing them into the field in the form of
10cm x 15cm
- To fit a page to:
- the size of the drawing: make sure to have no object selected before you switch to the Page tool. Then select a page by clicking on it, then click on the button 'Fit page to drawing or selection' in the tool controls
- a selected object: first select the object(s) with the selection tool, then switch to the Page tool, click on a page to select it, then press the the button 'Fit page to drawing or selection' in the tool controls
- To add a label to your page, select the page by clicking on it, then enter a name or label for it into the text field in the page tool's tool controls. Labels are always visible, no matter which tool is currently selected.
- To export a multi-page PDF file, use
File → Save a copy … → PDF. This will automatically include all pages. If you only want to export a certain page, or a selection of pages, the updatedFile → Exportdialog's batch export tab can help you get that done (one file per page). - To open or import a multi-page PDF or AI (pdf-based) file, use
File → Open/Import → select file name → choose to import 'All' pages[Known issue: 'import' moves content of some pages to some far out place in the drawing] - You can navigate pages with page navigator on that will show up in right down corner of status bar
Note: Multi-page SVG files are an Inkscape-specific concept. Web browsers will only display the first page of your document, which corresponds to the 'viewbox' area of the SVG file.

Creating a page using the tool controls

Navigating pages from the status bar
Moving objects along with the page
Labelling pages
Deleting pages and their contents


Selector Tool
The tool now allows to set the origin of the selection for precise numerical positioning to one out of 8 possible positions:
- If no handle is selected, the default origin is the top left corner of the bounding box.
- To change, click on one of the other 7 outside object handles to select your desired origin for the scaling.
- The selected handle is now highlighted in blue and the x/y position in the tool controls will adjust to the new origin.
- Now edit the x, y, width or height values to move and scale your object using the new origin (MR #2700)
- To reset the transformation origin, Shift + Click on the highlighted handle.
Changing the origin for scaling numerically
Changing the origin to move one corner to a specified coordinate


Text Tool

- Kerning options are now symbolized by a button between the subscript and text direction selectors. Clicking on it will open a so-called pop-over, where all previously available options can be found. This change saves space in the Text tool's toolbar.
- Negative kerning values can now take on values as small as
-1000(previously -100), making them symmetrical to their positive counterparts (MR #2569, MR #3434) - Padding: Text that is flowed into a shape and standard flowed text now has an additional square-shaped handle in the top right corner. Move the handle to adjust the text padding inside the frame (MR #2769)
- Exclusion zones: Text can now flow around one or more movable objects:
- Select all object(s) (use only shapes and paths on the same object hierarchy level as the text; no groups / clones / images supported) and the text.
- Set the exclusion zone by going to
Text → Set subtraction frames. - Now you can move the exclusion objects around or edit their shape, and the text will adjust automatically.
- If you want to change the exclusion zones again at a later point, repeat the process with all objects that the text should flow around.
Background info:
SVG 2.0 flowed text allows forshape-paddingandshape-subtractattributes.shape-paddinglets the text flow into a shape and leave some space between its edges and w where the text will start to flow.shape-subtractsubtracts shapes with margin, so text can flow around other objects in the scene. These attributes were supported in Inkscape 1.0, but not exposed to the user. This version of Inkscape includes both an adjustable on-canvas knot for changing the padding as well as a Text menu item for setting text subtraction properties with a further knot to adjust it's margins.

Path Operations
With Path → Split path, Inkscape now has functionality to separate a path object that consists of multiple subpaths into a set of path objects that 'belong together'. This means that parts of a path that have holes in them are kept as whole objects. The function works by splitting up a path into non-intersecting bits, keeping intersecting bits together.
Example: A path that consists of a word, like 'Inkscape' will be split into 8 parts, one for each letter. With the familiar 'Break apart' function, there would be 12 parts, because of the holes in the letters that would be split off as their own objects, too (MR #3738).

Bottom: Splitting a text into letters with the new 'Split path' operation
Dialogs

General Dialog Changes
- A mini-menu (downward pointing arrow symbol) was added into the title bar of every multi-dialog panel (also called 'notebook'). You can use it to close the current tab, to undock it, or to close the whole panel. It also shows a list of available dialogs, sorted by purpose, allowing you to open them with a click ((MR #3728)
- The right-click menu for tabs now contains a list of all open dialogs.
- Open dialogs are now less costly for performance, because they do not update when it's not needed (MR #3369), or when they are hidden (MR #3761)
- Docking zones now expand and flash slowly when a dialog is dragged close to them. This makes it easier to see where docking is possible (MR #3729)
- The text labels of docked dialogs are now more responsive to the width of dialog (MR #3627)
- A new option for text labels for docked dialogs has been added.
Edit → Preferences → Windows: Dialogs settings : Labels Behavior : Activereduces all except the active tabs' labels to icons. The option is no longer available from the right-click menu of the tabs (MR #3644)
About Screen
The 'About Inkscape' dialog uses the winner art from our Inkscape 1.2 About Screen Contest, "New discoveries await..." by Chris Hildenbrand.
Align and Distribute
- The formerly separate
Arrangedialog is now integrated with theAlign and Distributedialog. With its three tabs, more user-friendly names and some small visual tweaks, the dialog now holds everything that is needed for aligning, distributing and arranging objects in your drawing (MR #3382, MR #3667). - The icons inside this dialog are now smaller.

Document Properties

- The 'Snapping' tab was removed in favor of a global snapping preference, see Snapping section.
- The first tab of the Document properties dialog was refactored thoroughly to make it easier to use (MR #3700):
- It's now labelled 'Display' instead of 'Page'.
- The long list of different document formats is now available from a dropdown.
- There is a preview available of the page format and colors.
- The page area(s) in a document can now have a different color than the underlying 'desk' area.
- The other options have been rearranged to look tidier.
- Note: The option to add margins to a document when resizing it is currently unavailable
- Grid precision has been reduced to 3 decimal places (MR #2941)
Export
The former Export PNG image dialog was updated to a general Export dialog by 2021 GSOC student Anshudhar Kumar Singh with the mentors Michael Kowalski, Ted Gould and Tavmjong Bah, and finished by Martin Owens (MR #3825).
The new name reflects the increased range of functionality of the dialog.
General Export Dialog Changes
- the confusing number entry fields for export area coordinates have been hidden from all but the 'Custom' tab
- the dialog now features a preview that allows you to see what is going to be in the exported file(s). The preview can also be turned off when you do not need one, or in case performance suffers.
Available Export File Formats
- by default, the dialog allows you to export images to multiple raster and vector formats: – PNG, Optimized PNG, JPEG, WebP, Tiff, SVG, Inkscape SVG, PDF
- by activating
Edit → Preferences → Input/Output → Show all outputs in Export dialog, even more export formats, provided by Inkscape extensions, will become accessible from the dialog. By default, this includes a long list almost as high as your Inkscape window - ranging from 'Compressed Inkscape SVG with media' and .dxf to 'Scribus CMYK pdf' and 'Windows Metafile (.wmf)'. - third-party Inkscape Python extensions can be added to extend the dialog's functionality even further
Batch Export
In addition to exporting single images, one at a time, or simple batch export of objects in the selection to separate files, the dialog has gained the ability to:
- also batch export top level layers and pages
- to export to multiple image resolutions at once, by setting a different DPI value for each export format/size
- to export to multiple file formats at once
- to select objects, pages or top level layers to export (with preview)
- file names are constructed as
<filename>_<object id>_<suffix>.<extension>, where each export file format/size can have its own suffix
This functionality lives in the dialog's new second tab. To add another export file format or size, click on Add export, and a new line with selectable suffix, file format and dpi value settings becomes available. Layer export will include all objects in the layer (i.e. crop to content).
Hint: If you need a background for export that is the same over all layers (e.g. for a presentation or slideshow, or for an animation), you can move that background object into the root of the SVG file, by dragging it out of a layer and placing it below all layers with the Layers/Objects dialog in Objects mode. To have all layers exported at the same size, you'd still need an (invisible) object in each layer with the desired size.
Watch this video tutorial to see batch export in action (fr : export en masse | en : batch export)
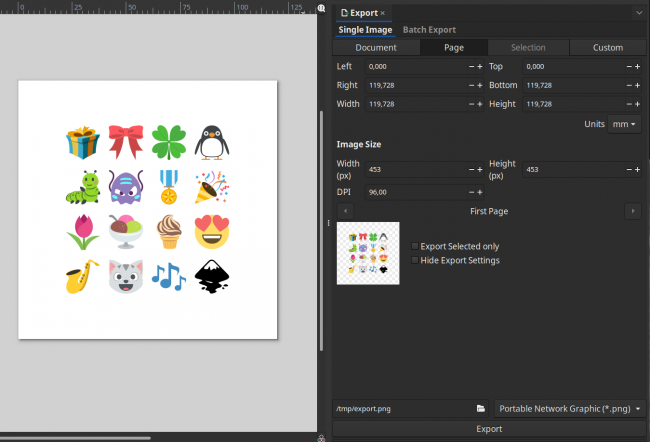
Exporting a single page with preview
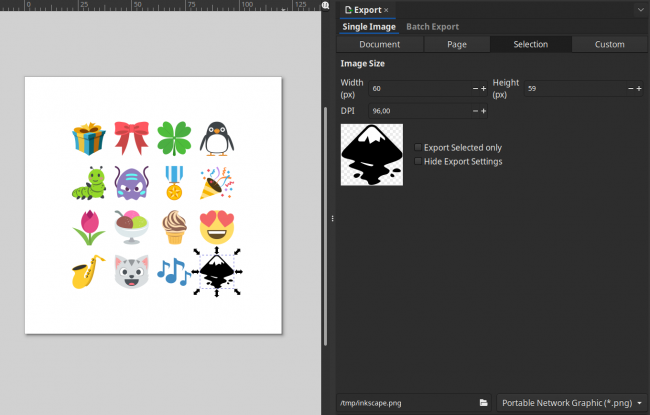
Exporting a single file from a selected object
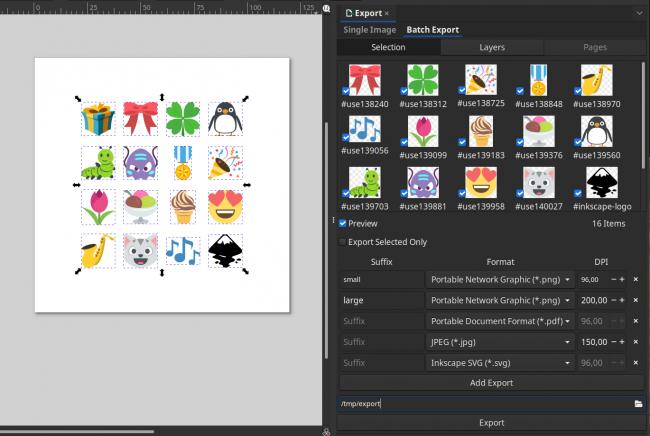
Exporting multiple selected objects to multiple formats and sizes at the same time
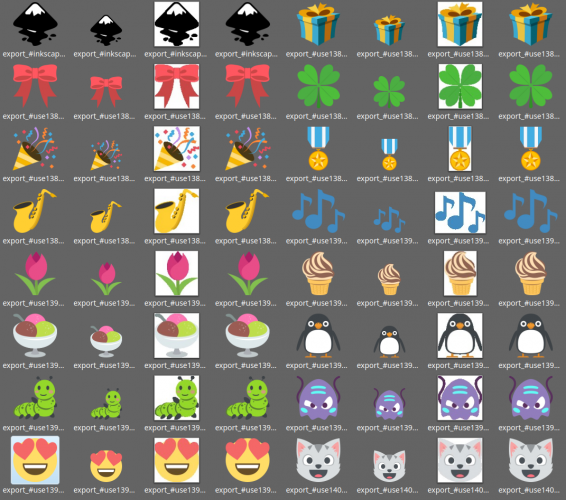
Resulting list of files in image viewer (does not show pdf)


Fill and Stroke dialog
Color selector

- The more intuitive HSL mode (hue, saturation, lightness) is now the default mode of the color selector.
- All color selection modes (e.g. HSL, HSV, RGB, CMYK, CMS, HSLuv) have been moved into a drop-down menu, with icons. You can get the old, tabbed look back by disabling the option in
Edit → Preferences → Interface: Use compact color selector mode switch(MR #3443). - New: HSLuv mode added for color picker. This mode lets you more intuitively select optically similar saturation of different hues (Wikipedia).
- A color wheel can now be used for HSL, HSV and HSLuv color selection modes (in previous Inkscape versions, it was its own mode). Activate it by clicking on 'Color Wheel' above the color sliders area.
Gradient Editor is back
A replacement for the gradient editor was added to the 'Fill and Stroke' dialog (MR #2688, Bug UX#67).
This allows you to add, edit and delete gradient stops directly in the 'Fill and Stroke' dialog again:
- to add a new stop, double click on the gradient preview
- to move a stop, click and drag it along the gradient preview or enter the stop offset value numerically for more precision after selecting one stop
- to remove a stop, click on it to select it, then press the
DelorBackspacekey - The Gradient tool's options `repeat mode`, `reverse gradient direction`, a gradient selection library and a list of all stops have been added here, too, so all the options pertaining to gradients are in easy reach.
Changing gradient stop color, moving it, adding a new stop
Inverting the gradient's direction and changing its repeat mode
Another way to add, edit and delete single stops is to use the list of gradient stops. Users can add stops by clicking on the
+button, and can delete them by clicking on the-button.
With the new gradient selection dropdown, users can duplicate gradients by clicking on the
+button.
Users can offset (move) the first and last stops of a gradient. The color beyond the last/first gradient stop is uniformly that of the last/first stop.


en : demo video of gradient editor | fr : video demo de l’éditeur de dégradé
Markers

The markers drop down list has been replaced by a little dialog that displays all available markers in a grid, and even allows you to edit the selected marker's size, distance from the line and orientation! This project was undertaken by GSOC student Rachana Podaralla with the mentors Michael Kowalski, Marc Jeanmougin and Martin Owens (MR #3394, MR #3420).
When clicking on the drop down for choosing the start, middle or end markers, you will see the following:
- a list of markers used in the current document at the top
- below that, a list of all default markers, which also contains some fun new markers!
- at the bottom, the 'Edit' section, with:
- A preview of how the marker will look
- some number fields to change the size of the marker (keep the lock on to scale proportionally)
- an option to scale the markers when the stroke width is changed
- options for switching the marker direction
- the option to change the marker's angle and to have that angle fixed
- marker offsetting options
- a button to enable editing of markers (rotate, scale, move) on the canvas


en : video of new markers in action | fr : video sur les nouvelles flèches en action
Custom Dash patterns
Inkscape comes with a big choice of dash patterns by default - from tightly spaced dots to widely spaced lines, and many options and combinations in between. Now it includes an option to make your own dash pattern, in addition to the stock patterns.
To create one:
- Select Custom in the dash pattern drop-down menu. This will make a new text field show up where you can add your new custom dash pattern.
- The field accepts numbers and spaces. Each number corresponds to the length of a dash or a gap. It always starts with a dash, and when it reaches the end, it will continue with the first number again, for the next gap or dash. So if you enter an even number of numbers, e.g. '1 1 4.5 4.5' the pattern will be 'dot - short gap - dash - long gap' and then repeat again, and for an uneven number of numbers, the pattern will be inverted when the first 'set' ends.
On the canvas, you can watch how your object changes while you change the custom dash pattern numbers.

en : custom dash use case video | fr : video de cas d’utilisation de pointillés personnalisés
Other small changes
Line cap and line join order buttons have been reordered, so they match vertically (MR #3402).

Layers and Objects dialog

A new dialog was created that merges the functionality of the familiar 'Layers' and 'Objects' dialogs, with better performance (MR #2466, MR #3635, MR #2466, MR #3741, MR #3597, MR #3645).
It is available from both the 'Layers' and the 'Objects' menu and offers the following functionality:
- a button to toggle between 'Layers' and 'Objects' view
- buttons to move objects up and down in the stack.
- a list of all layers and objects in the drawing, featuring new icons for the different object types
- 8 alternating default colors for layers and the objects in them:
- these colors are used for drawing the paths in the respective layers
- the colors can be set (in case they clash with your theme, or you cannot see the paths that you draw) in the file
share/inkscape/ui/highlight-colors.cssin your Inkscape directory
- layer and object colors can be customized for each layer/object on its own, by clicking on the vertical color bar at the end of each line
- tiny mask and scissor symbols indicate that a clip or mask is applied to an object
- object and layer names (label, not id) can be changed after a double-click on the current name
- icons for locking and hiding a layer/object light up when you hover over the layer's row (when not locked or hidden):
- click to hide/unhide or lock/unlock, Shift+click to hide/lock other items
- holding Alt while hovering over an object in the dialog will highlight that object on canvas
- layers as well as objects can be multi-selected
- the context (right-click) menu for layers provides options to move, delete, rename the current layer, to lock/hide all/other/the current layers, to add a new layer and to convert a layer to a group
- the context menu for objects provides the same options as it would when you right-click on the object on canvas directly
Note:
- the (hidden) setting for path colors in the preferences file and the path outline color (available in Node tool preferences section) are no longer respected. If you used those previously, adjust the style.css file as a workaround (see above).
- the dialog no longer offers the options to change opacity, blur or blend mode. Use the Fill and Stroke dialog as a workaround.
- the type-forward search to filter for objects is no longer available. For objects, use the Search and Replace dialog as a workaround, for layers there is currently no replacement.
- the buttons to move objects or layers to the bottom or to the top have been removed to improve the user interface. For both objects and layers, as a workaround you can use the buttons in the selector tool's tool controls. Home and End navigate in the dialog instead of changing positions, if the dialog has focus.
Preferences

- The preferences zoom ruler now respects your theme's look (MR #3450)
- An option to make
Select samebehave likeSelect allwith respect to whether it selects objects only in the current layer or in all layers was added toEdit → Preferences → Behavior → Selecting(MR #2832) - Preferences options that require restarting Inkscape to take effect now display an icon next to them
- A set of options to tweak rendering performance and to test run different render settings has been added to the
Renderingsection. It becomes visible when you activateEnable developer mode
SVG Font Editor
With lots of user feedback, the Font Editor workflow has been updated with better previews, better performance and a higher degree of organization (MR #3381, MR #3396, MR #3552, MR #3628 3916).
These changes result in a new recommended workflow:
- Open the SVG Font Editor dialog
- Select a name for your new font, using the
+icon in the top right corner of the dialog - Adjust the horizontal advance and the major font metrics to your liking
- Click on
Setup Canvasto change the document format to the font size and get some guides that help you draw your letters - Switch to the
Glyphstab of the dialog - Click
+to add your first letter/glyph/character to the list. You can also click the button repeatedly to automatically create a list of commonly used font characters, fromSpaceto common special characters, numbers and then upper case and lower case letters A to Z, and then even more special characters after that. - If you like to, switch from list preview to grid preview in the bottom right corner.
- Select one of the lines / blocks in the glyphs list.
- Click on
Edit. This will:- Create a new layer for the selected glyph (if there isn't one yet) and activate that layer.
- Hide all other layers
- Now draw your letter/number/… in the new layer
- Make sure it's a single path (e.g. do
Path > Union) - Keep it selected, and click on
Get curves. - Continue selecting glyphs from the list, adding / editing them and turning them into SVG font characters until your font is complete.
- In the last tab,
Kerning, you can select two different glyphs from the two dropdown lists, to adjust the default distance between them.- After you've selected them, click on
Add pair. - Now adjust the distance between them. In addition to the preview that shows just these two glyphs, you can also make use of the sample text to see how it will look in a sentence.
- Continue adjusting letter distances until you're happy with the result.
- After you've selected them, click on
- Save your file as Inkscape SVG, and open it with another program (e.g. FontForge) to be able to convert that SVG font into a ttf or otf font.
The workflow is based upon the following SVG Font Editor dialog improvements:
- speed improvements: Inkscape can now handle fonts with thousands of glyphs!
- automatic glyph generation: adding a new glyph creates a new entry and populates its unicode string, based upon the previously defined glyph (next in unicode order)
- glyph management: glyph editing action creates glyph-specific layers to keep glyphs organized
- grid glyph view: offers a larger preview than a list
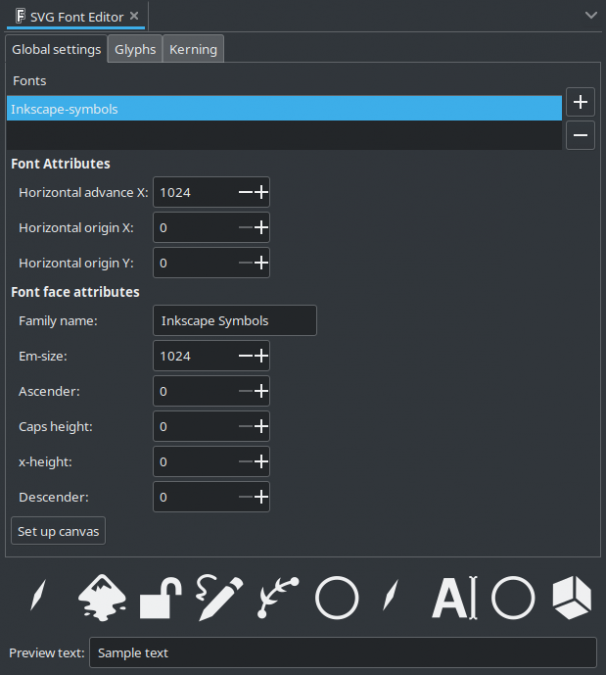
First tab of refactored SVG Font Editor dialog
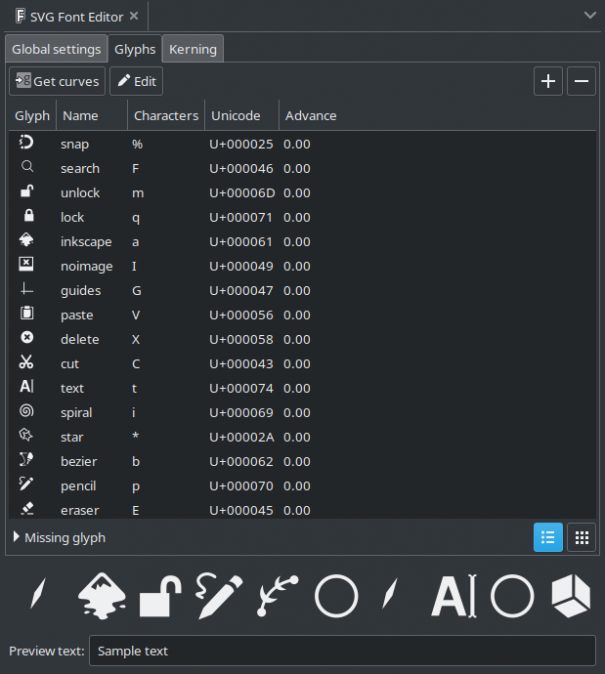
Second tab of SVG Font Editor, list view
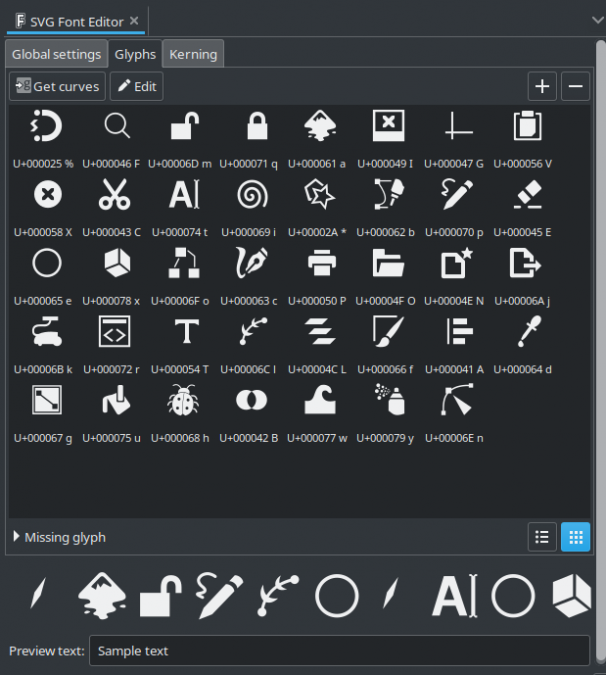
Second tab, grid view


Swatches
The Swatches dialog (View → Swatches) uses the same improved settings as the color palette (without the 'rows' setting).

Text and Font dialog
The dialog's width has been reduced, so it won't take up excessive amounts of space when docked (MR #3314).
Trace Bitmap
The Trace Bitmap dialog received a new, shiny interface (MR #3405):
- The tabs list and options have been detangled a bit, so you now have the following three tabs: Single scan, Multicolor, Pixel art
- The preview auto-updates more reliably and shows a better preview image.
- The preview location now adjusts to the dialog's format: if it is wider than tall, it moves to the right side, and if it is taller than wide, the preview appears at the bottom of the dialog.
- The number entry fields are now accompanied by draggable sliders for easier tweaking of values.
Draggable sliders
Self-adjusting preview location

.gif)
Transform dialog
The buttons for applying or resetting the transformation have been moved to the center, the dialog's width has been reduced, and a small visual explanation for matrix transformations has been added (MR #3363).
Welcome dialog
- The images have been updated with images from the About Screen Contest for Inkscape 1.2.
- A set of new icons for the web links in the second tab will hopefully help encourage user contributions to the project (MR #4309)
- There is a 'Close' button now in the top right corner of the dialog.
- An option to 'Browse for other files' has been added to the dialog, so you can finally open any file (not just templates and recent files) from the dialog (MR #4112)
Live path effects

Select Path Effect Parent Object
If you have an object selected that was created by the Live Path Effect of another object, you can now quickly find the responsible LPE object by clicking on the new button at the bottom of the 'Path Effects' dialog. This is very useful for all Live Path effects that create dependent objects which can be selected independently, like the new Copies LPE, the Boolean Operations LPE, the Rotate Copies LPE and many more (MR #3479).
Boolean Operations
- The mode 'division both' has been added. Its result only becomes visible when you convert the resulting object to a path, where then both objects will be cut along their intersection lines.
Offset
- Improved performance while editing an offset by mouse
Rotate copies
- New option to link styles for the case when you want a gradient or a pattern extend over all objects
Tiling

Internally, we call this the \'Tiled Clones dialog on steroids\'. This new LPE allows for interactive tiling, using a huge range of different tiling types, setting the distance between objects numerically, changing scale, location, rotation per row / column or adding more rows and columns on the fly. This can be used to quickly copy large numbers of objects non-destructively and to create interesting grids and patterns and variations quickly (MR #3814).
Features:
- Create identical copies of objects in a grid by indicating the number of rows and columns
- Change the horizontal and vertical spacing between copies by mouse or numerically, and choose the unit of those distances
- The gap size can also be randomized
- Offset every other row or column by a specified percentage of object width / height
- 16 different mirroring modes (requires the setting
Edit → Preferences → Behavior → Live Path Effects (LPE) → Tiling → Add advanced tiling optionsto be active!) - Scale interpolation (5 modes):
- Uniform scaling (no interpolation)
- Blend size from top to bottom
- Blend size from left to right
- Blend size diagonally (top left: original size – bottom right: new size)
- Random scaling
- Rotation interpolation with the same 5 modes
- Option to automatically minimize gaps between copies of different sizes (does not work with rotation or diagonal mode)
- Option to allow for independently styling and moving each copy ('Split elements', moving works when the object is grouped as a 1 object group)
- Option to link styles for the case when you want a gradient or a pattern extend over all objects
en : Tiling video demo | fr : video demo du pavage
Import / Export

SVG Import
When importing an SVG document, you can now also choose to open it in a new window ('Open SVG image directly using its path'). This option makes sense when using drag and drop to get Inkscape to open a new file (MR #4034)
Import Formats
- The DXF Import now supports more DXF features (MR extensions#357).
Linked Images
- The design of the placeholder for linked images was changed (MR #3842)
Export Formats
- The file format of the Synfig Export has been updated to > 1.4.0 (MR extensions#299).
Customization / Theming
Customizing the User Interface
- The overall font size of the user interface can be adjusted at
Edit → Preferences → Interface → Theming: Font scale(MR #3690) - The
+/-buttons for number entry fields are now smaller. If you prefer the old, wider buttons, they can be turned on again by disablingPreferences → Interface : Use narrow number entry boxes. (MR #3358) - Tool bar icon sizes can now be scaled on a continuous scale from 100% to 300% size in
Edit → Preferences → Interface → Toolbars: Toolbox icon size / Control bar icon size. Changing the size no longer requires a restart.
Cursors
- The drop shadow is now optional for mouse cursors. You can turn it off in
Edit → Preferences → Interface → Mouse cursors: Show drop shadow(MR #3352).
Icon Sets
- Multiple icons in the Multicolor icons set were tweaked to improve readability or contrast, e.g. the green color is now a little brighter when using a dark theme.
- Cursors and tool bar icons for the Bézier tool and the Calligraphy tool in the Multicolor icon theme now use the same imagery.
Themes
- The suggested default theme is now using the multicolor icons set (MR #4043)
- A contrast slider was added for fine tuning the selected theme's colors at
Edit → Preferences → Interface → Theming: Contrast(MR #906)
The contrast slider allows to fine-tune the theme's colors

Other
- The number of possible autosave files has been increased to 10000 (was 100) (MR #3582)
macOS-specific Changes
- The minimum operating system version supported is now macOS 10.13. (The prior version, Inkscape 1.1.x, supported macOS 10.11 and newer.)
- All special menu items in the application menu have been enabled and hidden from other menus, so Inkscape feels more integrated with macOS (MR #3767)
- Inkscape now provides a .dmg file for arm64 (M1) Apple computers
Windows-specific Changes
- Modifier keys now work with graphics tablet stylus input (Commit #46c12b)
- The Extension Manager is now an optional component in the installer for Windows (MR #3106)
Extensions
Features
General Extension Changes
- Extensions now better support documents with CSS styles and inherited styles.
New Extensions
- The Clipart Importer extension allows to search and download SVG resources from the Wikimedia, OpenClipart & other online sources. It is available from
File → Import Web Image. It helps you with licensing your work correctly by giving information on each image's license and its requirements for derivative works. (MR extensions#441). - The
Document → Process Illustrator SVG...extension assists with importing Adobe Illustrator documents with layers and the correct scale (MR extensions#351, MR extensions#414).
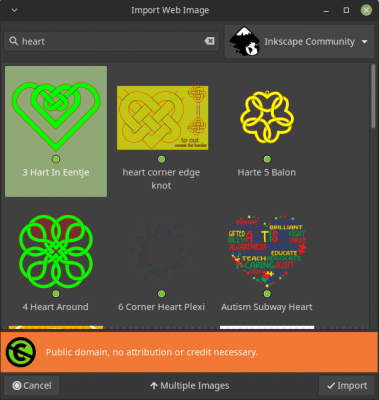
Import an image from the Inkscape website
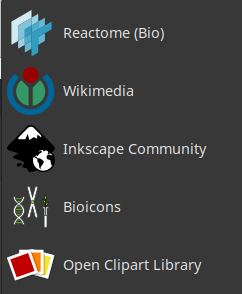
Currently available sources for importing SVG images


Particular extensions

- In the Add nodes extension, you can now choose the unit of the segment length (MR extensions#346, Issue extensions#127).
- The Color tab of the Calendar now uses a color chooser widget instead of asking for Hex values (MR extensions#355, Issue extensions#396).
- The Extrude extension has been rewritten (MR extensions#386). It includes a new mode, "Snug", where the boundary of the extruded rectangle follows the source paths. 'Extrude' now handles paths with multiple subpaths and doesn't require conversion of rectangles or circles to path anymore (Issue extensions#190). The extruded shapes are inserted in between the two selected elements in stacking order, which is more useful than the previous behavior (inserting after the first selected element).
- The Formula (pdflatex) equation has been made more user-friendly. It now features a font size selector, a field to specify preamble contents, better support for scaled documents and better error messages on compile errors (MR extensions#453).
- The Frame extension has been rewritten and now supports additional options, such as elliptical frames, offset frame and putting the fill below the object (MR extensions#430, Issue extensions#214).
- The Motion extension now has an option to take the extrusion color and opacity from the selected path (MR extensions#317).
- Document Info (MR extensions#401) and Guides creator (MR extensions#424) extensions were adjusted to work with multi-page documents
- The Guides Creator extension, now also features an option that avoids creating duplicate guides, and an option for alternating margins for even and odd pages (MR extensions#424) .
- The Split text extension has been rewritten and now supports manual kerning (Issue extensions#142) and SVG2 flowed text (Issue extensions#257) (MR extensions#326).
- QRCodes with a maximum size of 177x177 can now be created, which allows to encode up to about 2 standard pages of text. Instead of the well-known black rectangular tiles, the extension can now also tile clones of a selected object (MR extensions#394, Issue extensions#150).
Bugs fixed
All extensions
- Unit conversions are more consistent now (MR extensions#329), and several bugs pertaining to misinterpretation of units have been fixed.
- Extensions that query properties of paths with multiple subpaths now get more correct results if that path uses relative path commands (MR extensions#438, Issue extensions#450).
- When extensions set an element to "insensitive" (locked), this change is honored by Inkscape (commit extensions#d5282bd2)
- The defaults of parameters are now identical in inx files and in the command line interface of the extensions (MR extensions#325)
- Gradients whose stop positions are given in percentages are now handled (MR extensions#374)
- Hide the console window on Windows when calling external utilities (MR extensions#407, Issue extensions#244)
- The
BaseElement.duplicate()function now makes sure that the duplicated element and its children have unique IDs (MR extensions#426, Issue extensions#379). - The "Reverse Path" method now returns correct results for paths with multiple subpaths (MR extension#427, Issue extensions#445).
- A bug parsing color components of 1 (1.0, 100%) has been fixed.
"1.0",1.0and"100%"are treated as255, while"1"and1are treated as1(MR extensions#456, Issue extensions#402). - Several small fixes that make working with paths and clones more predictable and robust (MR extensions#433)
- Small changes improving parameter description (MR extensions#452, Issue extensions#452)
Particular extensions
- In the Add nodes extension, closed paths were previously changed to open paths, and an erroneous node was added. Other and third-party extension will probably profit from the underlying bugfix as well (MR extensions#336, Issue extensions#209).
- The live preview of the Calendar extension now works (MR extensions#394).
- Multiple bugs in the DXF import extension were fixed, such as a loss of layering information (MR extensions#410, Issue extensions#377), and import of inserted blocks that have been rotated and flipped (MR extensions#411), extruded elements and multiline text (MR extension#432, Issue extensions#286). An incorrect unit in the documentation has been exchanged (MR extensions #358).
- When using the DXF Outline (R12) export, elements in nested groups are now exported correctly (MR extensions#347, Issue extensions#382). It also doesn't include (invisible) paths contained in clips and masks anymore (MR extensions#440, Issue extensions#381) and documents are exported with the correct scale when scale is different than 1 (MR extensions#466, Issue extensions#443)
- The DXF14 export now shows a better error message in case of a very, very deeply nested SVG document (MR extensions#442, Issue extensions#360). Also a warning message regarding the Robo-Master spline option has been added (MR extensions#439, Issue extensions#225).
- A crash in the Embed image extension has been fixed, in which images were erroneously determined as missing by the extension (MR extensions#461, Issue extensions#441).
- The Extensions Manager is now shipped with Inkscape and doesn't download itself automatically anymore (MR extensions#421).
- On Windows, the Extract image extension now correctly links the extracted files (MR extensions#461).
- The slicing positions in the Guillotine extension are now correct, they were previously off following the flip of the y axis in Inkscape 1.0 (MR extensions#334, Issue extensions#269).
- In GCodetools, multiple crashes have been fixed (MR extensions#335, Issue extensions#312; MR extensions#307, Issue extensions#322; MR extensions#388, Issue extensions#276), however this module is currently unmaintained and in need of attention. Contributions are highly welcome! For this reason, the module has been given it's own repository (MR extensions#402).
- The Hue Level in the HSL Adjust extension now has a range of 360 (MR extensions#400)
- The HTML5 canvas export now works better with non-Inkscape SVG documents (MR extensions#467). Exported files also now have correct output for closed paths and objects with transparency (MR extensions#345, Issue extensions#332).
- The Interpolate extensions (Interpolate and interpolate attribute) have been completely rewritten and multiple issues have been fixed (MR extensions#240).
- The JPEG export previously converted a transparent background to black (Issue extensions#366). Now, the document background color is used (MR #3994). This also affects the other Raster export extensions. Additionally, the JPEG export now works with even larger resolutions (Issue inbox#6522, MR extensions#445).
- Several bugs in the Formula (pdflatex) extension have been fixed, such as incorrect insertion position (Issue extensions#339) and random character substitution in documents with many formulae (MR extensions#453). The extension now also works on Windows if the user name is longer than 8 characters (MR extensions#448, Issue extensions#287).
- A bug in the rotation sense of the Lindenmayer extension has been fixed (MR extensions#437, LP issue 1094627)
- The Motion extension now gives better results for paths with multiple closed subpaths (Issue extensions#266) and when the selected element is part of a transformed group. (MR extensions#317).
- The Optimized PNG export doesn't crash anymore when running it with default parameters (MR extensions#463, Issue extensions#395)
- A useless warning message when using Optimized SVG output was removed (MR extensions#368 , Issue extensions#428)
- The Pixel snap extension now aligns objects to the coordinate system starting at the top left of the page. The previous behavior, snapping them to a grid aligned with the page bottom, can be activated in the settings (MR extensions#429, Issue extensions#264). A bug related to inconsistent unit conversion has been fixed as well.
- Several bugs in the PostScript (PS) / EPS import have been adressed: It now handles file names with non-latin characters (MR extensions#408, Issue extensions#281) on Windows and doesn't rotate the image anymore if the majority of the text is not oriented left-to-right (MR extensions#457 and Issue extensions#258). Also a clearer error message is shown for invalid PS/EPS files (MR extensions#454, Issue extensions#404)
- In the Randomize Colors extension, shapes with unset opacity are not ignored anymore (MR extensions#331 Issue extensions#236).
- A crash in the Render Polyhedron extension when attempting to render a custom object defined by its edges has been fixed (MR extensions#390 , Issue extensions#408).
- The Replace Color extension now processes colors in RGBA space (Issue extensions#392, Issue extensions#419).
- The "Tangential Offset" parameter of the Scatter extension is now a percentage of the pattern width, and an issue with nested groups has been resolved (MR extensions#327). Another issue where the spacing was off when using the "stretch" mode has also been fixed (MR extensions#327).
- The Synfig export now exports objects that are not paths (such as rectangles, texts, circles) correctly again (Issue extensions#198); and paths with multiple subpaths are converted correctly (Issue extensions#197) (MR extensions#462).
- The TIFF export now also works on Linux (MR extensions#458, Issue extensions#422)
- In the Visualize Path extensions Measure Path and Number Nodes, the results are now correct also when the parent of the selected object is transformed (MR extensions#314, Issue extensions#171).
- A crash in the Voronoi Diagram extension when applied to non-Inkscape documents has been fixed (MR extensions#313, Issue extensions#222), and the output is now correct independent of the document unit (Issue extensions#403, MR extensions#382).
- The Webslicer extension now correctly cleans up its temporary files (MR extensions#436)
Extension Development
API Changes for Third-Party Extension Developers
Main Article: Updating your Extension for 1.2
A lot of additional features have been added to inkex, including a new Style API, a new Units API, support for multipage documents and more. Although there are no breaking changes in this release, some methods have been deprecated.
- The improved CSS style and style inheritance handling is enabled for all bundled extensions. If you want to use this functionality in an extension you maintain, see New Style API.
- A GUI API (based on gtkme) has been added, so extensions can now ship GTK-based user interfaces (MR extensions#421, MR extensions#450, MR extensions#465).
- Export extensions can specify that they are only to be listed in "Export as" (MR extensions#371, MR#3600).
- Color extensions can now process in RGBA space, previously only separate processing of color and opacity was possible (MR extensions#392).
- The path conversion for arcs and stars have been added, so when extensions create these objects, they are rendered in a browser as well and can be processed further by the same extension. (MR extensions#387, Issue extensions#240).
- API functions for the new multipage feature have been added (MR extensions#499).
Extension Development Documentation
- All the documentation from the Wiki and the Gitlab project wiki has been compiled in a single place. (MR extensions#443, MR extensions#451)
- The tutorials for extension authors have been improved. (MR extensions#443)
- Versioning information is now contained in the documentation. This shows extensions authors in which Inkscape version new API functionality was added or deprecated. (MR extensions#443)
- The API documentation has been updated into the familiar ReadTheDocs layout (MR extensions#310) and is now generated with a newer version of Sphinx (Commit extensions#edf23220).
- Fix some small mistakes in the documentation (MR extensions#324)
Under the hood
- Various upgrades to the testing library MR extensions#332, MR extensions#383 now make it easier to test extensions automatically. Our test suite is now continuously running on Python 3.7-3.10 (MR extensions#370) on Linux as well as Python 3.8 on Windows (MR extensions#404).
- Added issue template (MR extensions#377) and merge request template (MR extensions#416) to communicate more effectively.
- inkex can be installed via
pipby providing the url of a pipeline artifact, even in forks (MR extensions#353). - The code formatting of the extensions repository has been made consistent (MR extensions#418). This enables contributors to think less about formatting and more about what matters.
- Improvements to code quality (MR extensions#419, MR extensions#422, MR extensions#423, MR extensions#428) and clearer communication of it (MR extensions#420).
- A dependency management system, poetry, has been introduced (MR extensions#446). This provides packagers with the necessary information which versions of python modules the extensions are currently tested against.
- The deprecated
inkex.pyfile has been removed (MR extensions#460) since it's interfering with the new dependency manager. - The localization of the extensions has been improved (MR extensions#425).
- It is now possible to use ngettext and pgettext in extensions for better translations (MR extensions#459).
Command line
- 'verbs' have been removed. All verbs are available as 'actions' now (see below for more context) (MR #3884, MR #3880, MR #3874).
- A new action for scaling by a factor has been added, it replaces the previous one, which is now called 'grow' (MR #3880).
Behind the curtains
- Gio::Actions: The old 'verbs' were converted to 'actions'. This work was done to prepare for migrating to Gtk4. It also makes it possible to reach them all from the commands palette, to assign keyboard shortcuts them and to use them on the command line. A big part of this work was done by Google Summer of Code student SUSHANT A.A. with the mentors Alexander Valavanis, Ted Gould and Tavmjong Bah.
- Support for x, y, width and height SVG2 attributes on
<symbol>has been added. It follows the logic of the <svg> element, which already supported these attributes (MR #3828) - Continuous integration has been improved and maintained
- A whole lot of code cleanup and refactoring has been done to improve maintainability
- Many new tests were written to be able to detect breakages early
Notable bugfixes
Crash fixes
Fixed a crash that occurred …
- when closing Inkscape while drawing a 3D box (MR #4018, Bug #2390)
- when flipping a grouped 3D box (MR #3698)
- when using Undo after switching from the 3D box tool to another tool (MR #4192, Bug #2854)
- when pressing Backspace while using the Bézier tool (MR #3715, But #2764)
- when hatching with the Calligraphy tool (MR #3972, Bug #3173)
- using Document Properties dialog (MR #3400)
- when dragging and dropping SVG files from klatexformula into Inkscape (MR #3710)
- when using the Eraser tool (five different crashes fixed) (MR #4079, MR #4008)
- when drawing a rectangle after closing the Icon Preview dialog (MR #3439)
- when copying/cutting/stamping various Live Path Effects (multiple crash and bug fixes) (MR #3479)
- when copying a path with the 'Attach path' Live Path Effect (Commit 8fd705, Bug #626)
- when selecting an object with the 'Power Stroke' Live Path Effect after reopening a file (MR #3546, Bug #2716)
- when editing a shape with an inverse mask applied to it with the Node tool (MR #4080, Bug #3286)
- when trying to open an SVG file with invalid CSS pseudoclasses (Bug #3358, MR #4219)
- when changing the pattern back in the Paint Servers dialog ([1], Bug #3327)
- when quitting Inkscape (MR #3681)
- when using the Spray tool to spray multiple items in single path mode (MR #3470)
- when clicking on a color after reopening the Swatches dialog (Bug #3221, MR #3991)
- when trying to add a Live Path Effect to a symbol (MR #3520)
- when scrolling quickly through line height units in the the Text tool's tool controls bar (MR #3541)
Other bug fixes
- The Align and Distribute dialog no longer starts out with node alignment options, this is strictly limited to when the Node tool is in use.
- Improved Boolean Operation algorithm (MR #3724)
- The Calligraphy tool no longer inverts the tilt direction (MR #3782, Bug #1692)
- the Calligraphy tool no longer leaves any blots on locked layers when trying to draw on them (MR #3882, Bug #3154)
- There's no longer a grey line present that starts on the top left page corner when holding Ctrl and drawing with the Calligraphy tool (MR #3174, Bug #2203)
- Cloning objects that do not have an ID works now (MR #3180, Bug #2389)
- macOS users can now close Inkscape from the Welcome screen (MR #2762)
- The Zoom buttons are back in the Commands bar:
Zoom to fit selection in window,Zoom to fit drawing in window,Zoom to fit page in windowandCenter page in window(Bug #1910, MR #3638) - The search results in the Commands palette are now ordered in a more helpful way ([2])
- Copy-pasting groups using CSS classes for objects inside them no longer turns them all black (MR #3656)
- Dialogs that have just been opened receive focus again, so they can be used with a keyboard, too (Bug #3482, MR #4381)
- When the canvas has the focus, open dialogs do not steal keyboard shortcuts from it anymore (Bug #2409, MR #3176)
- Document properties dialog and menu agree about whether guides are visible and/or locked now (Bug #663, MR #4346)
- Inkscape no longer slows down when using grids and having the Document Properties dialog open on macOS
- Units in the Document Properties dialog now adjust properly when scaling the document (MR #3403)
- For files without a viewbox, the Document properties dialog no longer refuses to change the Display unit (MR #3866, Bug #872)
- The Eraser tool no longer leaves red traces when it cannot erase (MR #4079, Bug #540)
- The Eraser tool now even cuts paths with only two nodes or arcs and clones (unlinking them) ([3], MR #4008)
- Export file names are now saved relative to the file's location (previously, we were saving absolute paths in the SVG document) (MR #4166, Bug #804)
- Exported raster images without alpha layer (no transparency) such as RGB and Greyscale PNGs, or JPG now use the page background color for export instead of black (MR #3994, Bug #1357)
- running extensions no longer fails when you've run them many times already (MR #3871, Bug #2861)
- the Extension Manager now works on macOS (MR #3579)
- Scaling a stroke by percentage in the Fill and Stroke dialog no longer changes the stroke pattern and no longer shrinks instead of growing (MR #4189, Bugs #792, #793, #1238)
- The long lost 'Burnt Edges' filter has returned (MR #3567)
- It is no longer possible to create invalid filters using a non-existing feComposite operator (Bug #1647, MR #2766)
- The default value for 'saturate' in the color matrix filter has been fixed (MR #3626)
- Find and Replace now works better if a text has a description and nested tspans (MR #3551)
- Find and Replace now more reliably finds all occurrances of a string (MR #2999, MR #4352)
- Editing fonts with the Font Editor dialog now also works for SVG fonts without a label (as created by FontForge)
- Guides do not move around anymore when resizing the document (MR #4127, Bug #1230)
- Guide handles are always correctly centered on the guide line. This change also fixes a similar positioning error that affected node handles (Bug #2022, Bug #2604, MR #3870).
- When a linked image can not be found, Inkscape now no longer uses (and saves the file with) altered image sizes (Bug #3115, MR #3842)
- Imported images are now rotated according to their metadata (MR #3587, Bug inbox#4235)
- Embedded SVG images with markers or their own CSS styles are now displayed properly (Bug #1757, MR #3147)
- Imported .cdr files will now use correct measurements (MR #3879, Bug #2983)
- The Measure tool handles angles close to 180° better now (MR #2918)
- Node tool handles for smooth and symmetrical nodes now scale along with the other handles, according to the preferences setting (MR #3679, MR #3699)
- Opening a file without a file extension now only gives a warning when the file contents is not valid SVG (MR #3500)]
- Perspective/envelope LPE now works on objects with 0 width or height . (edge cases for single line stroke) (MR #2712)
- The Preferences option to 'enable dynamic relayout for incomplete sections' has been removed, because it has started to break the interface (MR #3887)
- The Preferences options for the dockbar style have been removed as they were no longer in use (MR #3660)
- When a search term can not be found in the Preferences, the whole Preferences tree stays available now (MR #2636)
- Preferences now store more exact numbers, and these numbers are also more exact when given to extensions (MR #3340)
- SVG files can now be saved without file extension again (MR #3500)
- Saving to .odg format works again (Bug #3385, MR #4316)
- When scaling and snapping with the Selector tool, the snapping now uses the correct location when geometrical bounding box is being used (MR #3990, Bug #2212)
- When clicking and dragging an object with the Selector tool, the correct object is now always dragged (affected Windows) (MR #3735)
- Improvements to snapping with the node tool (performance, add useful snap targets, remove useless snap targets) (MR #3890, more info in MR #3889)
- Text tool is more verbose again in the status bar when editing flowed texts (MR #4201, Bug inbox#4449)
- Transform handle keyboard shortcuts are now displayed in the status bar (MR #3809)
- A small margin was added on the right end of the status bar, to prevent canvas rotation when the user's intention was to resize the Inkscape window (MR #3824, Bug #918)
- Symbols from custom symbol libraries created with Inkscape are now inserted in the correct size (MR #4228, Bug #1319)
- The last line in a flowed text paragraph is not justified anymore (MR #3780)
- When moving a flowed text and its flow shape together, the flowed text now stays where it belongs (MR #3695)
- Multiline vertical texts in legacy Inkscape documents that have been edited in current Inkscape now are placed correctly in browsers (MR #3537)
- The preview in the Text and Font dialog no longer contains tofu (ugly placeholder character) where there is a linebreak (Bug #2577, MR #3359)
- Tracing Pixel Art can now warn users again when the image they're trying to trace is too large (Bug #2455, MR #3306)
- Zoom shortcuts from the numpad work again (MR #3773)
- Multiple memory leak fixes and reductions (MR #3508, MR #3058, Commit 51f3bb4, Commit 74bfe1, and many more)
- Lots of spelling, phrasing and translatability fixes
- Lots of large or small performance improvements (e.g. MR #3838)
Even more bug fixes
There were even more issues fixed than those listed above, but these probably only affect a small portion of users, or are relevant for development and packaging only.
For a complete list, visit our GitLab issue tracker and see the commit history.
Translations
The following UI translations received updates:
- Brazilian Portuguese
- Catalan
- Croatian
- Czech
- Dutch
- Farsi
- French
- German
- Hebrew
- Hungarian
- Icelandic
- Irish
- Italian
- Japanese
- Korean
- Polish
- Portuguese
- Romanian
- Russian
- Simplified Chinese
- Slovenian
- Spanish
- Traditional Chinese
- Turkish
- Ukrainian
The following documentation translations received updates:
- German
- Simplified Chinese
Contributing to interface translations
Want to help with translations? Learn how to help!
Documentation
- Adjusted font sizes for Eastern languages (MR docs#269, Bug docs#59)
- Updated keyboard shortcut list with new node tool shortcuts (Commit docs#03541f)
Contributing to documentation and documentation translation
Contributions to the documentation translations, as well as improvements to its contents, are welcome at the inkscape-docs repository.
Website
The inkscape.org website was updated from Django 1.1 to Django 2.x by Google Summer of Code student Ishaan Arora with the mentors Thomas Holder and Martin Owens. This was in preparation for the goal of updating Django to 3.x, which Ishaan Arora is currently working on.
Important changes for packagers
- Dithering for gradients (see Dithering section) is available with a build flag (
-DWITH_INTERNAL_CAIRO=ON), which causes Cairo to be patched for dithering during the build process. Please find more information in MR #3812. - New dependency on
python-cssselectadded which is required for usage of Inkscape extensions (MR #3239) - Added Python
appdirsdependency (MR #3568) - As Python
distutilsare now deprecated, they have been replaced bypython3-packaging(MR extensions#368) - The extension that imports images from the internet requires the Python
cachecontrolmodule - gcodetools (
gcodetools), extension manager (inkman) and clipart importer (clipart) are now all submodules of the extensions submodule. Make sure to update submodules recursively with--recurse-submoduleswhen updating your git branches! - Inkscape now builds without X11 (cmake option) (MR #3208)
Known issues
- Please check your command line scripts. It is probable that they need to be updated after all verbs have been converted to actions.
- Some custom keyboard shortcuts that were set with older Inkscape versions may cease to work and need to be set again when their functionality has been touched in the conversion from 'verb' to 'action'.
- Gradient editing:
- If you convert your gradient to swatch, the gradient editor cannot be used for editing it anymore.
- Canvas stops and gradient editor stops highlighting will stop working in some cases.
- If you want to print a specific range of pages / a specific page, you can select page numbers in the print dialog. However, this only prints the first page currently.
- The option to specify a margin when resizing the page to the selection is currently not available (formerly available in Document Properties dialog, in the future planned for the Page tool).
- Spellchecking is not available on macOS
- Menus on M1 (ARM) architecture Apple computers do not display arrows for expandable menu items
- The 'Render LaTeX' extension is disabled in the snap packages of Inkscape 1.2
- Circles that were resized and then the action was reverted with 'Undo' may sometimes lose their radius and can't be copy-pasted anymore, files don't show up correctly in browsers (also the case in 1.1.2 - Bug #2879)
- Clipart Import and Extension Manager do not work in the Linux AppImage package (Bug inbox#6787)
Other releases
- Inkscape 1.4 — development branch
- Inkscape 1.3 — current stable release branch (1.3.1, 1.3.2 next bugfix release)
- Inkscape 1.2 (1.2.1, 1.2.2)
- Inkscape 1.1 (1.1.1, 1.1.2)
- Inkscape 1.0 (1.0.1, 1.0.2)
- Inkscape 0.92 (0.92.1, 0.92.2, 0.92.3, 0.92.4, 0.92.5)
- Inkscape 0.91
- Inkscape 0.48 (0.48.1, 0.48.2, 0.48.3, 0.48.4, 0.48.5)
- Inkscape 0.47
- Inkscape 0.46
- Inkscape 0.45
- Inkscape 0.44
- Inkscape 0.43
- Inkscape 0.42
- Inkscape 0.41
- Inkscape 0.40
- Inkscape 0.39
- Inkscape 0.38
- Inkscape 0.37
- Inkscape 0.36
- Inkscape 0.35