Release notes/1.4

|
These Release Notes are in Draft Status.
Note: Not all animations work, due to Wiki bugs with resizing images. Release notes will be transferred to website, there animations will be working. Important Links:
|

|
Pending questions:
|
Release highlights
- Filter Gallery: it has never been so easy to find the best filter for your needs! This new dialog features previews, categories and search.
- Modular grids & improved axonometric grids: set the grid angle by ratio for isometric designs and use modular grids to plan layouts and make icons!
- Swatches dialog and palette file handling improved: quick access to dialog layout controls, search for colors, and open different palette file formats!
- Unified font browser preview: when activated in the preferences, use it to quickly browse through your font collection. Try it out and give your feedback!
- Customizable handles: Power users with CSS knowledge can now customize the styling and basic shape of all the handles!
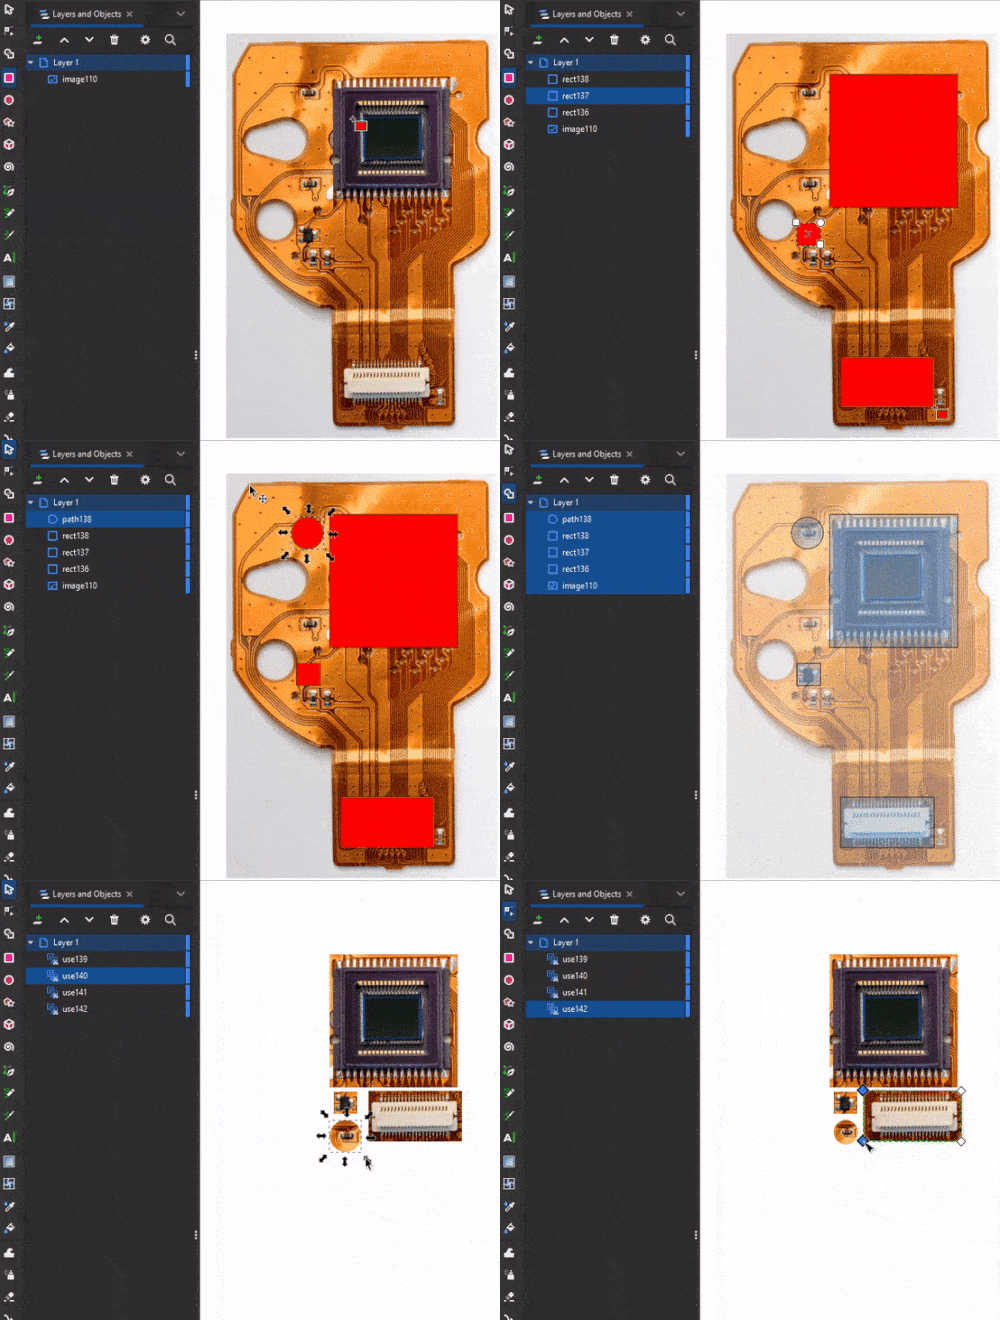
- Fast image clipping with the Shape Builder: raster graphics can now be clipped into multiple sections using the Shape Builder.
- There's even more: new templates for folding booklets, additional options in Ruler and Taper Stroke LPE, preview in Spray tool, many new command line options, updated translations and hundreds of bug fixes.
Canvas
Guides
When creating a new guide, all guides are now unlocked, so the new guide can be moved and adjusted freely (MR #5814).
Tools
Node Tool
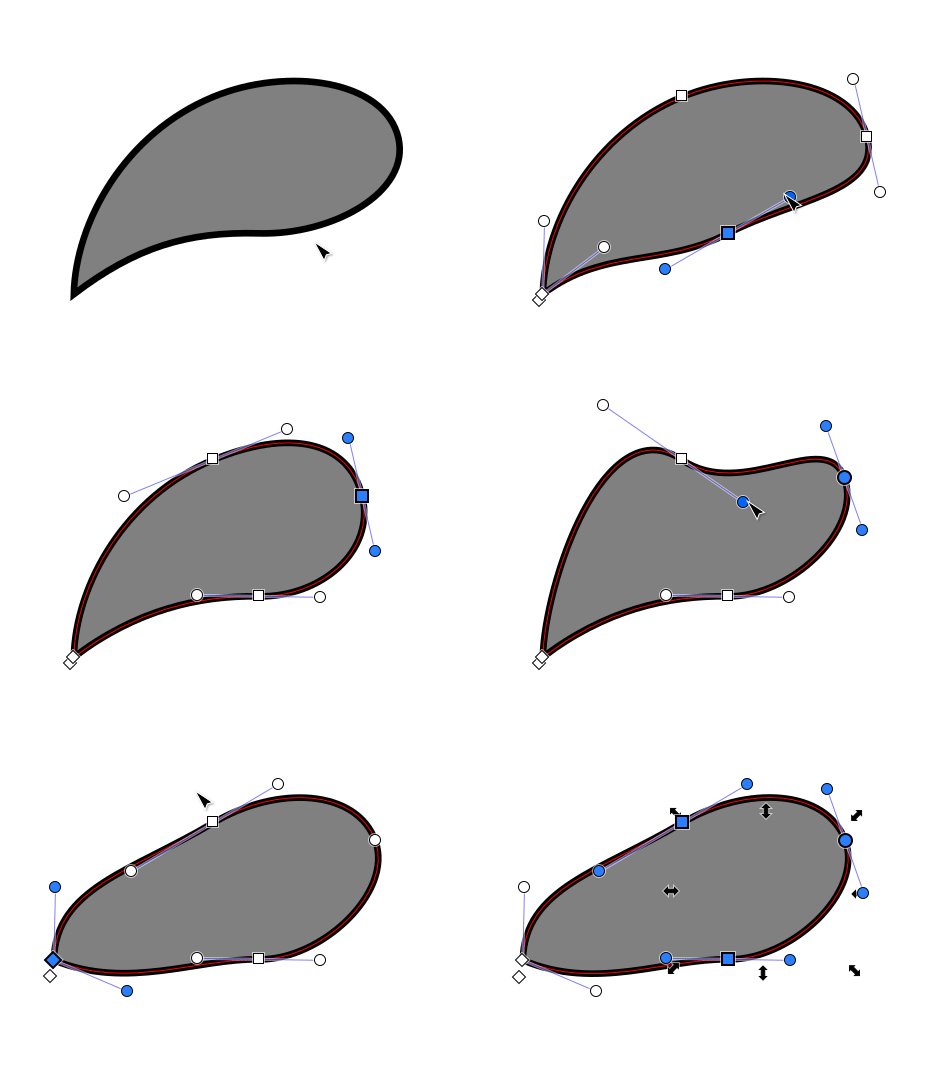
- Deleting a node now preserves the handles of adjacent nodes in more cases. Straight lines are now only produced when there were straight lines to begin with, in certain cases also when the option to 'Preserve Shape' is active (MR #6285).
Pen Tool
A new option has been added to automatically convert the currently drawn shape to guides, allowing users to 'draw' guides instead of dragging them out of the rulers. It comes without a keyboard shortcut, but you can set one in the preferences (MR #6308).
Rectangle Tool
A new mode to only draw squares with Alt + Ctrl has been added to the tool (MR #6199).
Selector Tool & Node Tool
- In Edit > Preferences > Behavior > Steps, an option has been added to change how moving selected objects / nodes with the arrow keys works when the canvas is rotated (Arrow keys move object relative to screen). If you're working with a rotated canvas, now, by default, the arrow keys will move the selection horizontally and vertically relative to the screen, not to the rotated document. This allows to work more intuitively while the canvas is rotated. Disabling the option will restore the previous behavior (MR #5031).
- In the preferences settings for both tools, options for changing the active layer and active page when using the tool to select an object have been added. The Selector tool will change both active layer and active page, while the Node tool will change neither, by default. Other tools (Text tool, Rectangle tool, …) do not change either layer or page when being used (but they can, if you edit the preferences.xml file in a text editor, MR #5257).
Shape Builder Tool
Several improvements were made to the Shape Builder (MR #5428):
- The Shape Builder tool can now make use of raster graphics, too. Any paths selected together with a raster (pixel) graphic will now function as clipping paths, their colors are not preserved - unlike when you have only paths in the selection. The resulting image parts use clipped clones of the image, to keep the file size small and improve performance. If you want to edit them, you need to unlink the clones.
- An option for the transparency level of the original drawing has been added (the eye icon opens a popup slider).
- Optionally, it is now possible to keep a copy of the original objects after the Shape Builder's operation. This option is deactivated by default.
Spray Tool
- The Spray Tool now shows an outline preview of the next item that it is going to spray, including its shape, rotation and size. The preview is only visible when the tool is not currently spraying. That way, you can choose where to place the next item (with a single click instead of holding the mouse button down). It is possible to change the previewed (soon-to-be-sprayed) item by right-clicking and then moving the mouse by a tiny amount (MR #5375).
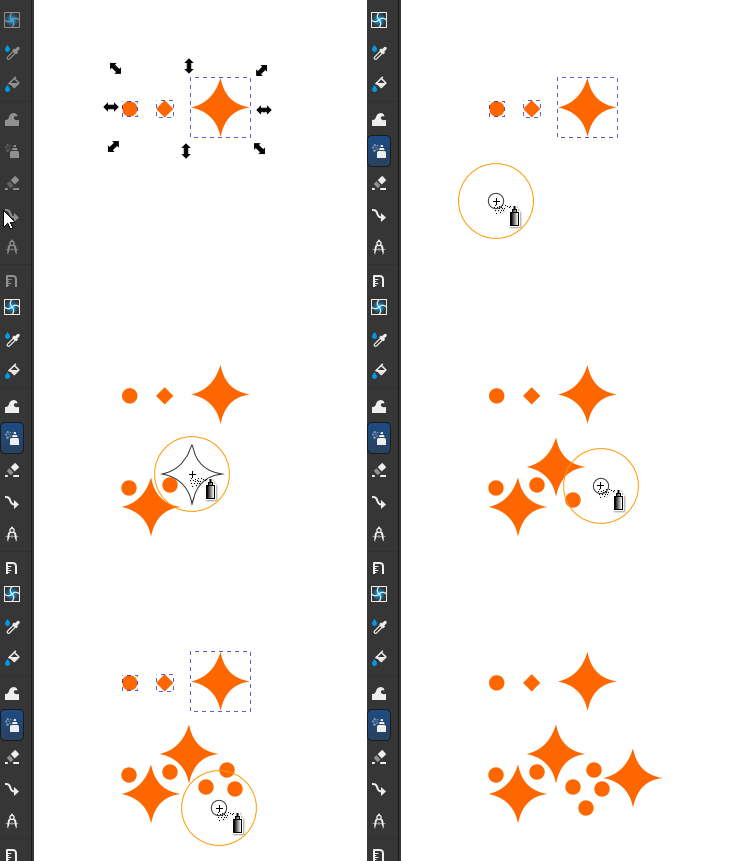
- The option to only spray non-overlapping objects now yields faster results through an updated spraying algorithm (MR #5766).
Import / Export
PDF Export
PDF export now supports internal links (going from one part of the file to another part of the same file, weblinks were supported since Inkscape 1.0). This can be used for creating Tables of Contents, for example (MR #5237).
Dialogs
About Inkscape
- Inkscape's About Screen Contest for this version … [TODO]
- The About Screen dialog now has the ability to display multiple drawings as a slideshow (MR #5559).
- The dialog can now be closed by pressing Esc (MR #5860).
Add Layer
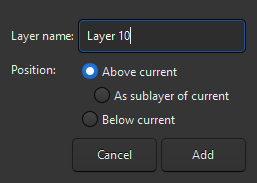
The 'Add Layer' dialog now shows the three available options all written out directly as radio buttons, instead of hiding them behind a drop-down selection (MR #5074).
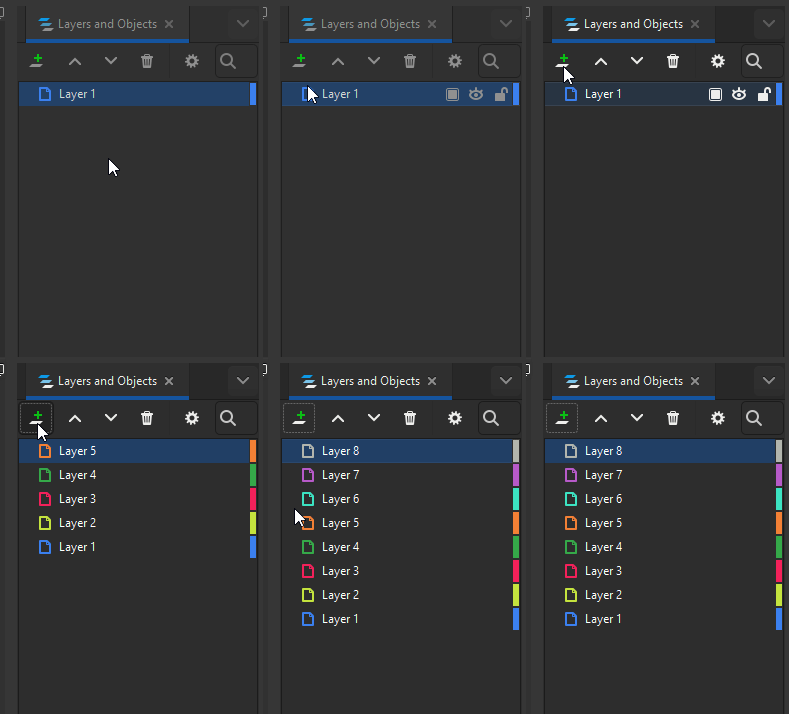
Add button from dialog always add it above selected (MR #5074).
Align and Distribute
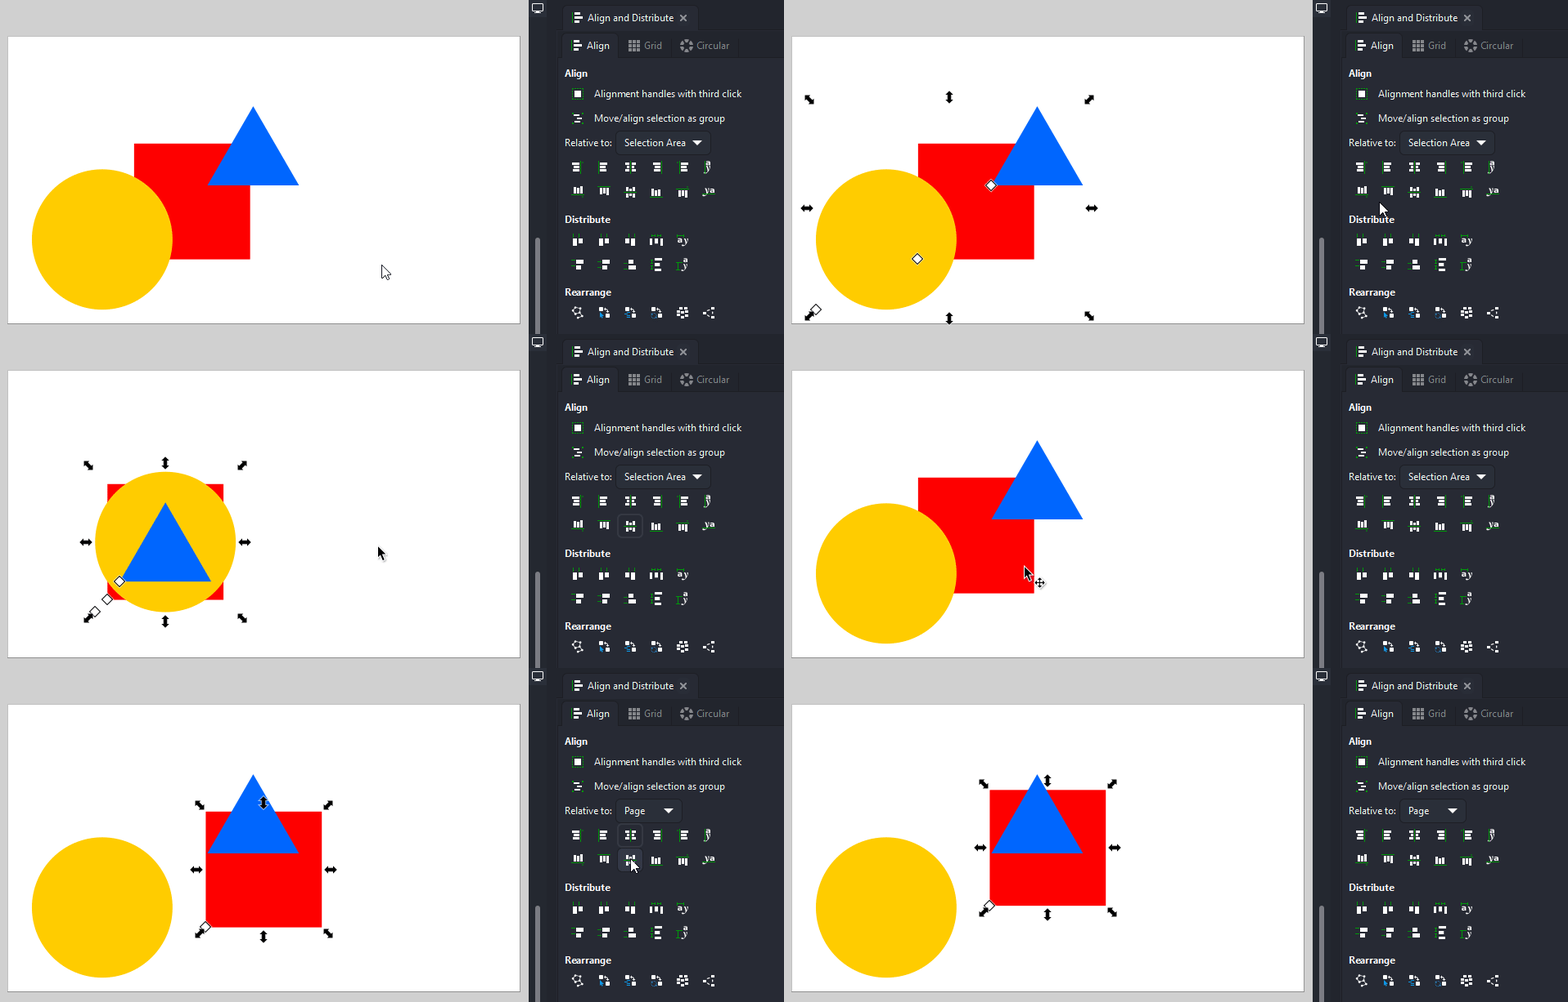
The alignment options field "Relative to" now hides irrelevant options when only a single item is selected, with 'Page' being the default (MR #6510).
Create Anchor (Hyperlink) / Object Properties
To make it easier to select an element in the drawing to link to, a button has been added to the side of the field where the target object's id or the external link must be inserted (Href).
When you click on that button, your mouse cursor will transform into a little hand icon. When the hand hovers over any object or over an empty area of the page, a small indicator text will tell you the id of that object or page. Clicking on the object will automatically insert that object's id into the href field. That way, you do not need to use the Objects or XML dialog to look up the internal identifier of the object you want to link to (MR #5221)
Document properties
Scale lock
A new toggle button that allows you to change the document's viewbox scale without changing the physical size of its contents has been added (MR #5993).
[needs image, and a description of why that is useful]
Grids
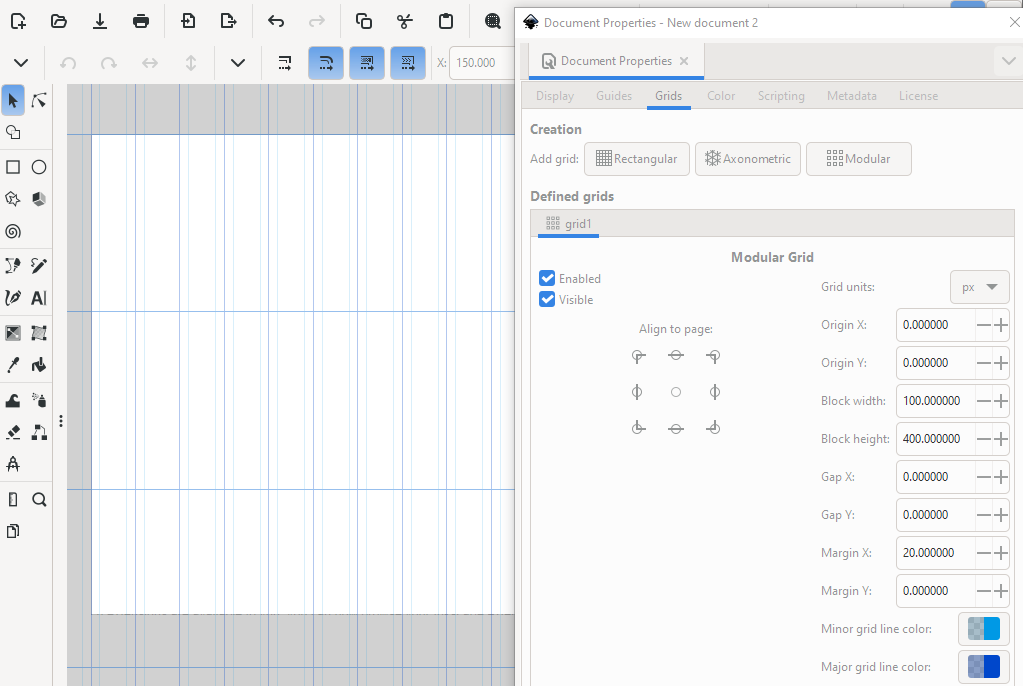
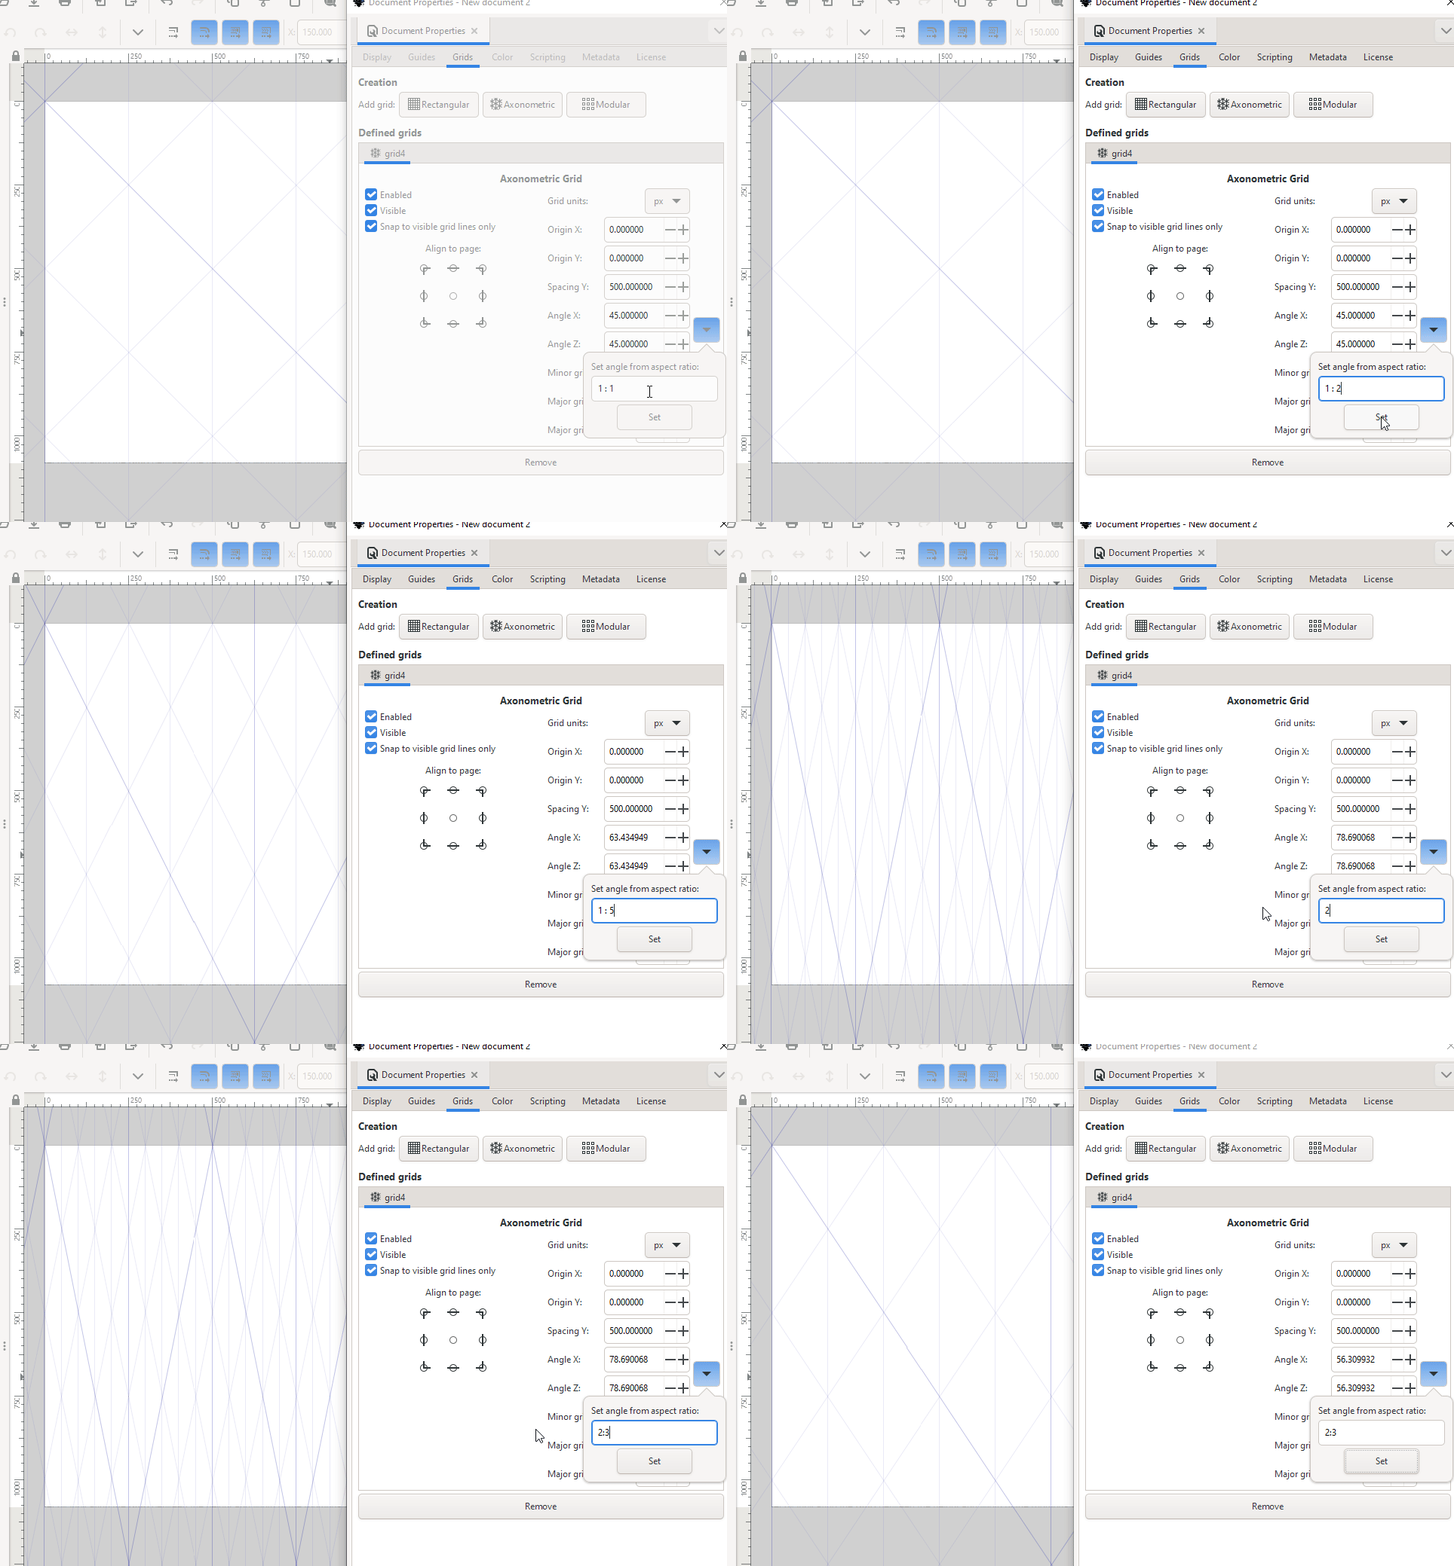
The grids subsection in the Document Properties dialog has been overhauled with new grid selector buttons, which automatically add the selected type of grid to the drawing when pressed.
Modular Grids
A new grid type was added that consists of rectangles with optional gaps in between.
Height, width, horizontal and vertical gap (also negative for overlapping modules) can be adjusted separately. Each grid module (rectangle) can have its own margin set (negative values for inside margin, positive values for outside margin).
Axonometric grids
The angles of axonometric grids can now also be set by indicating the ratio between the height and width of the rhombus shape that is formed by it. A common angle for isometric games, for example, is 2:1, corresponding to angles like 26,565051 which are difficult to set exactly without the ratio option (MR #6132).
Export Dialog
- If you enter a file system path to a save location that does not exist, Inkscape now tries to create folders instead of warning the user. Only if that fails, it will give a warning now (MR #5169).
- Each of the two tabs of the dialog (single file, batch export) now features a little icon in addition to the text (Bug #4338, MR #6166).
[needs screenshot]
Extension Gallery
When you want to quickly get an overview which extensions are available to you, you can now browse your Inkscape extensions in a gallery similar to the one for filters.
You can use the search field to quickly find the extension you need. The size of the icons is adjustable. They are currently all still identical placeholders, and we invite you to join us if you'd like to help. The menu categories can be hidden if you do not need them.
When you hover over an extension, the dialog shows you a small info text with either the menu path to the extension, or a description (MR #5448).
[needs image / video]
Fill and Stroke
Gradient Editor
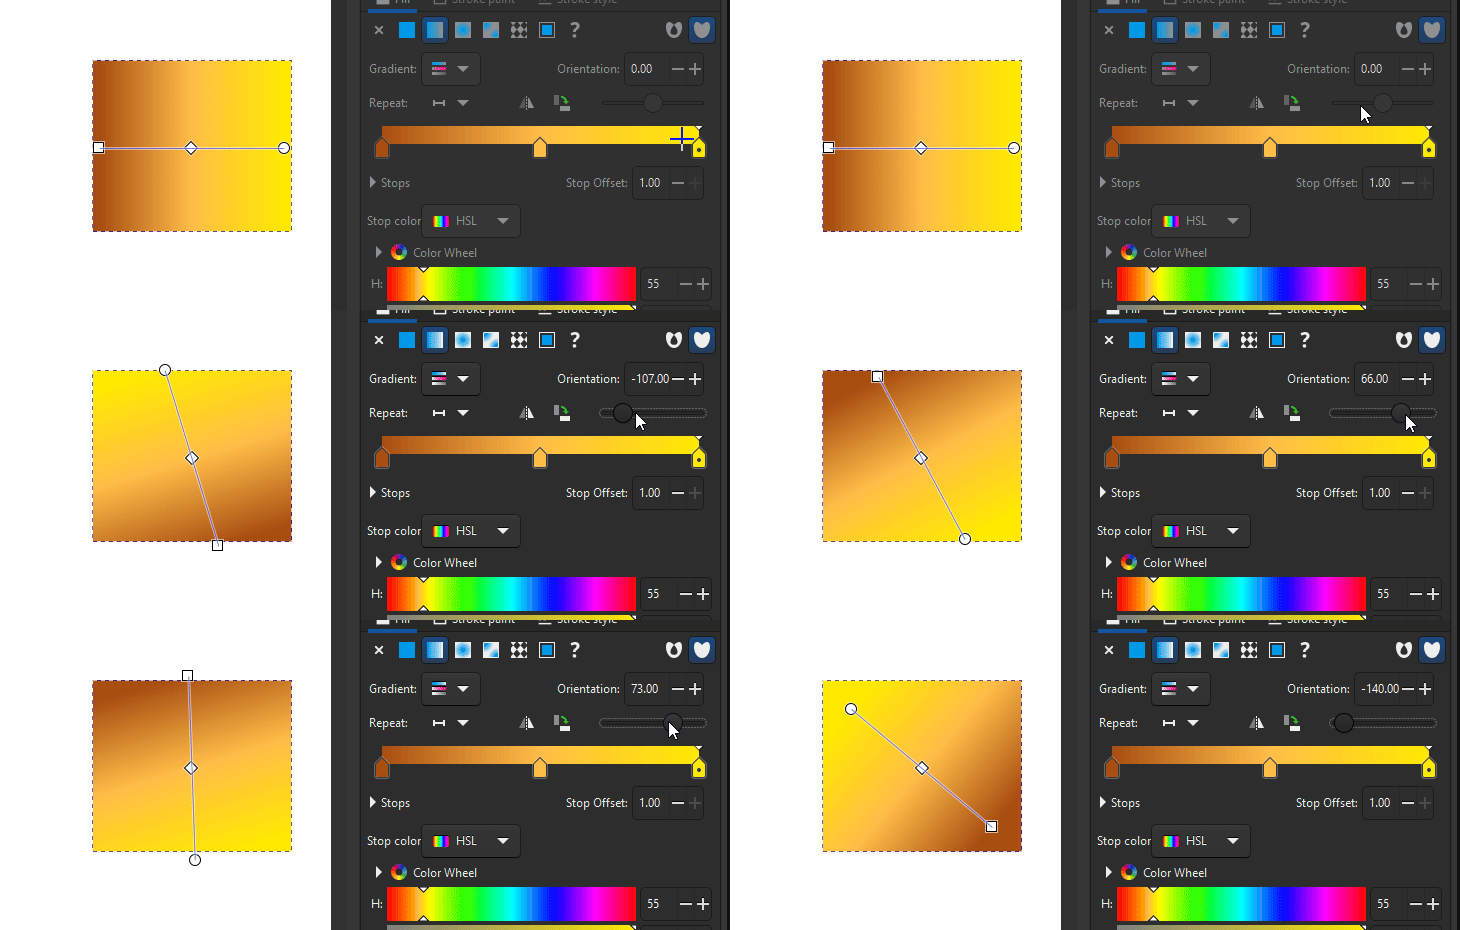
It is now possible to control the gradient's angle numerically from the Gradient Editor section of the Fill and Stroke dialog. An additional slider allows for changing the angle by simply dragging. A button to rotate the gradient by 90° completes the new angle controls (MR #5413).
Pattern Editor
For users who prefer to have more control when setting the gap between pattern elements, an option has been added to use numerical entry fields (Gap control: precise) instead of the sliders (Gap control: mouse friendly). This allows to add gaps smaller than 20% of the pattern width, in 0.1% steps (and also values larger than 32040%, in case you ever need that pattern rarity! MR #5484).
[needs image]
Filter Gallery
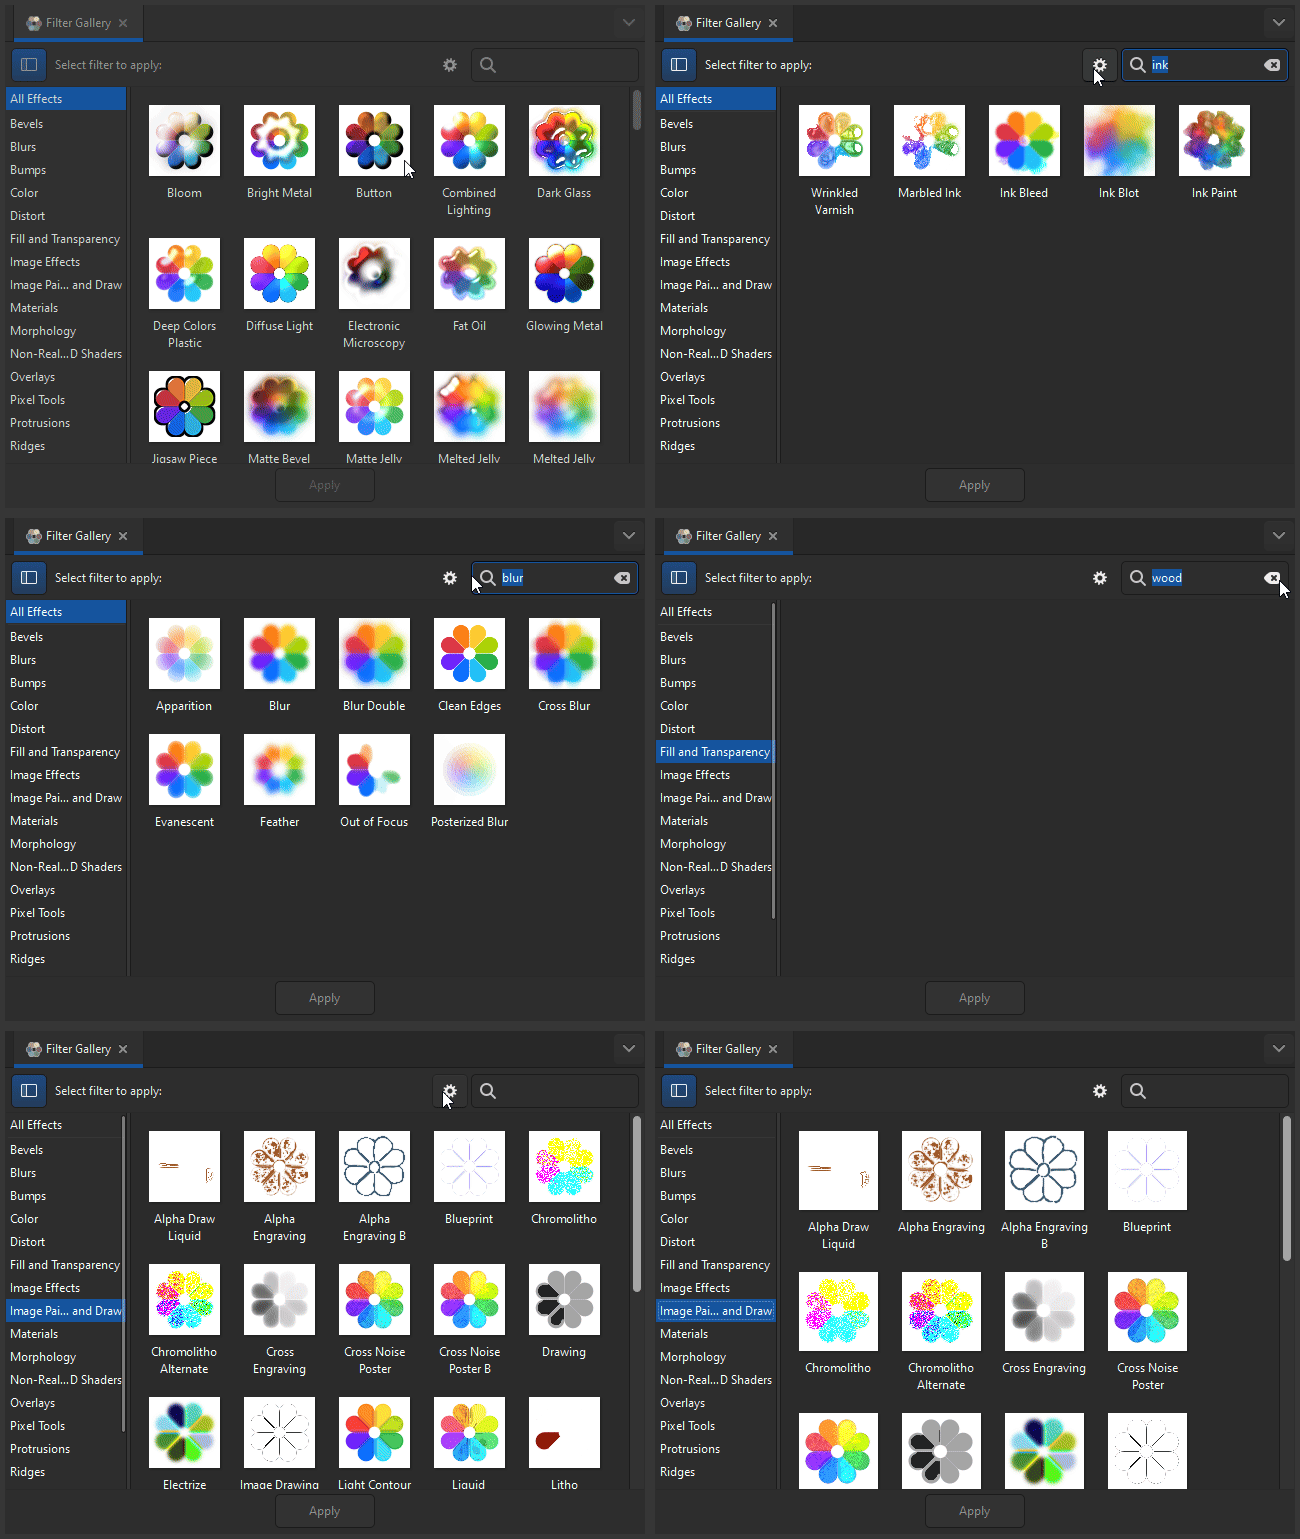
The Filter Gallery can be found in the Filters menu. It shows a scrollable (and hideable) list of all filter categories, and a preview image for each filter, applied to a colorful flower image. Your own filters will appear in the category indicated in your filter file, or, if there isn't any, in the Personal category. Inkscape looks for them in a folder named filters in the folder indicated at Edit ➞ Preferences ➞ System: User config. Some community-contributed files for trying this out can be found in our website's gallery (Bug UX#208, MR #5448).
Object Attributes
This dialog has been removed. Its contents is now available in the Object Properties dialog.
Object Properties
This dialog has been merged with the Object Attributes dialog.
It now holds the following information:
- Some properties specific to the selected object type (e.g. rounded corners / width / height for rectangles, number of tips for stars etc.)
- Object ID, label, description, title, highlight color, checkboxes for lock and hide status
- Interactivity (scriptable) properties, such as OnClick, OnMouseOver (input JavaScript)
- When the selected object is enclosed by a hyperlink (added with 'Add hyperlink (anchor)' in right-click menu), the hyperlink's properties (e.g. href, title, role, target) can be edited in this dialog.
Path Effects
The (optional) button for displaying the older Live Path Effects gallery dialog has been removed along with the dialog. LPEs can now only be selected from the search field / drop down field combination in the Path Effects dialog (MR #5760).
Preferences
Snapping
More options for finetuning snapping preference between grid and guidelines vs. objects and alignment/distribution have been added at Edit > Preferences > Behavior > Snapping.
[needs screenshot or a video that demonstrates it - but that could be hard, it's rather 'felt' than visual]
SVG Font Editor
The context (right-click) menu entry to 'Sort glyphs' and 'Remove pair' (referring to a kerning pair) have been moved to more discoverable buttons (MR #5421).
Swatches
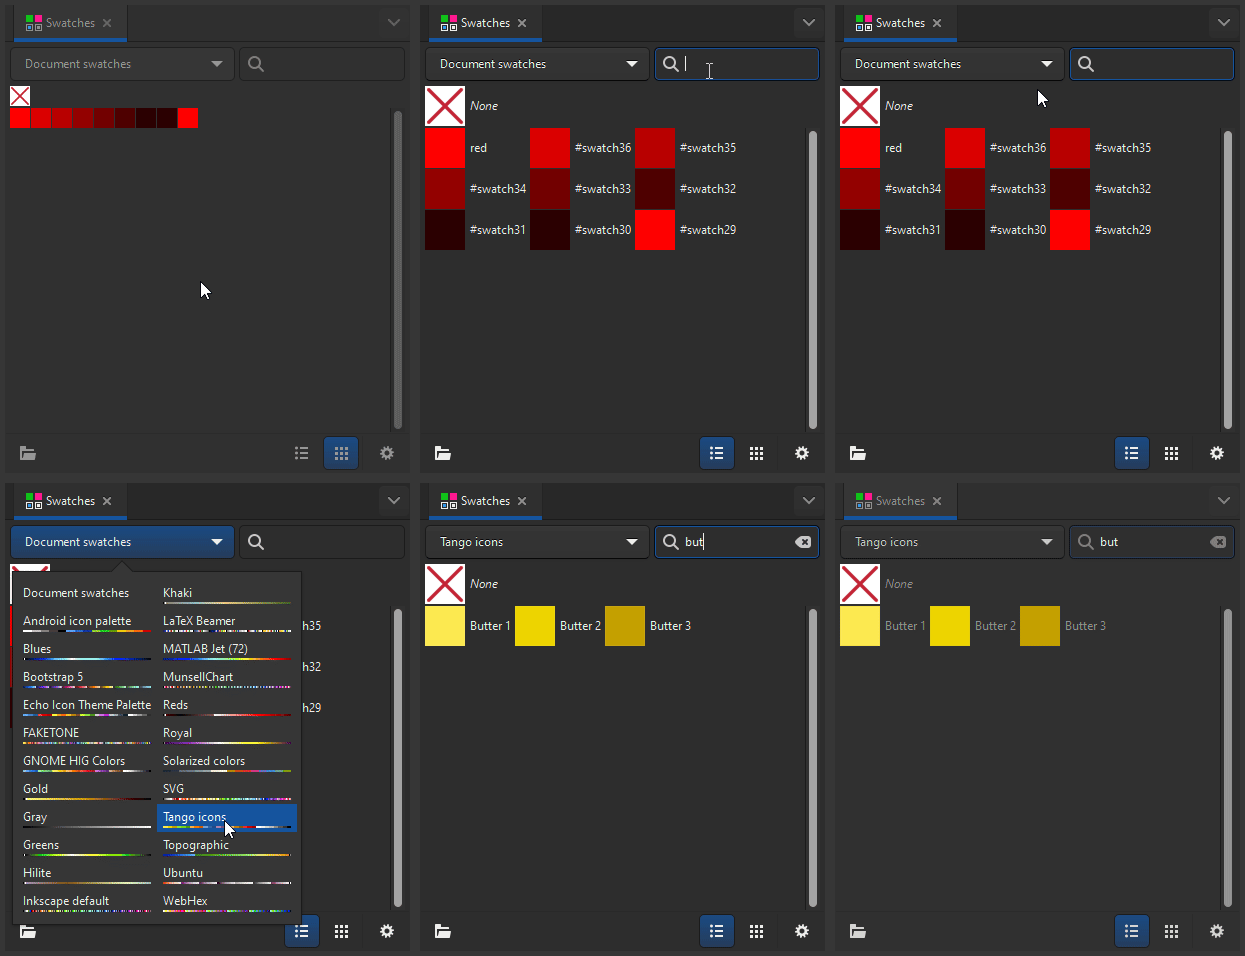
The Swatches (Palettes) dialog has been overhauled (MR #5606). It now:
- Color palettes are now selected from a dropdown at the top, instead of a small icon at the bottom.
- Colors can be searched by their name.
- Color palettes can be loaded from a file.
- In addition to Gimp Color Palette files, now 'Adobe Color Book' and 'Adobe Swatch Exchange' files are also supported.
- Support for columns: When a palette file defines 'Columns' (in .gpl files, this is indicated by a line like
Columns: 9following the name line), the blocks of colors that belong together will stay together (no 'linebreaks' will be added inside any of the blocks), both in the swatches dialog as well as in the palette at the bottom of the Inkscape window. - A button for accessing the settings, and two buttons for switching between the grid and row view make it easier to adjust the dialog's layout.
- Support for color palettes with CIELAB colors has been added.
- Limited support for color palettes with CMYK colors has been added.
- The transformation from CMYK to RGB has been improved, even without a proper ICC profile.
[needs image(s)]
Text and Font
General
Freshly installed fonts can now be used in Inkscape on Linux, without needing to restart the application. macOS and Windows could not be moved to provide Inkscape with the necessary information (MR #5240).
Experimental Alternative User Interface
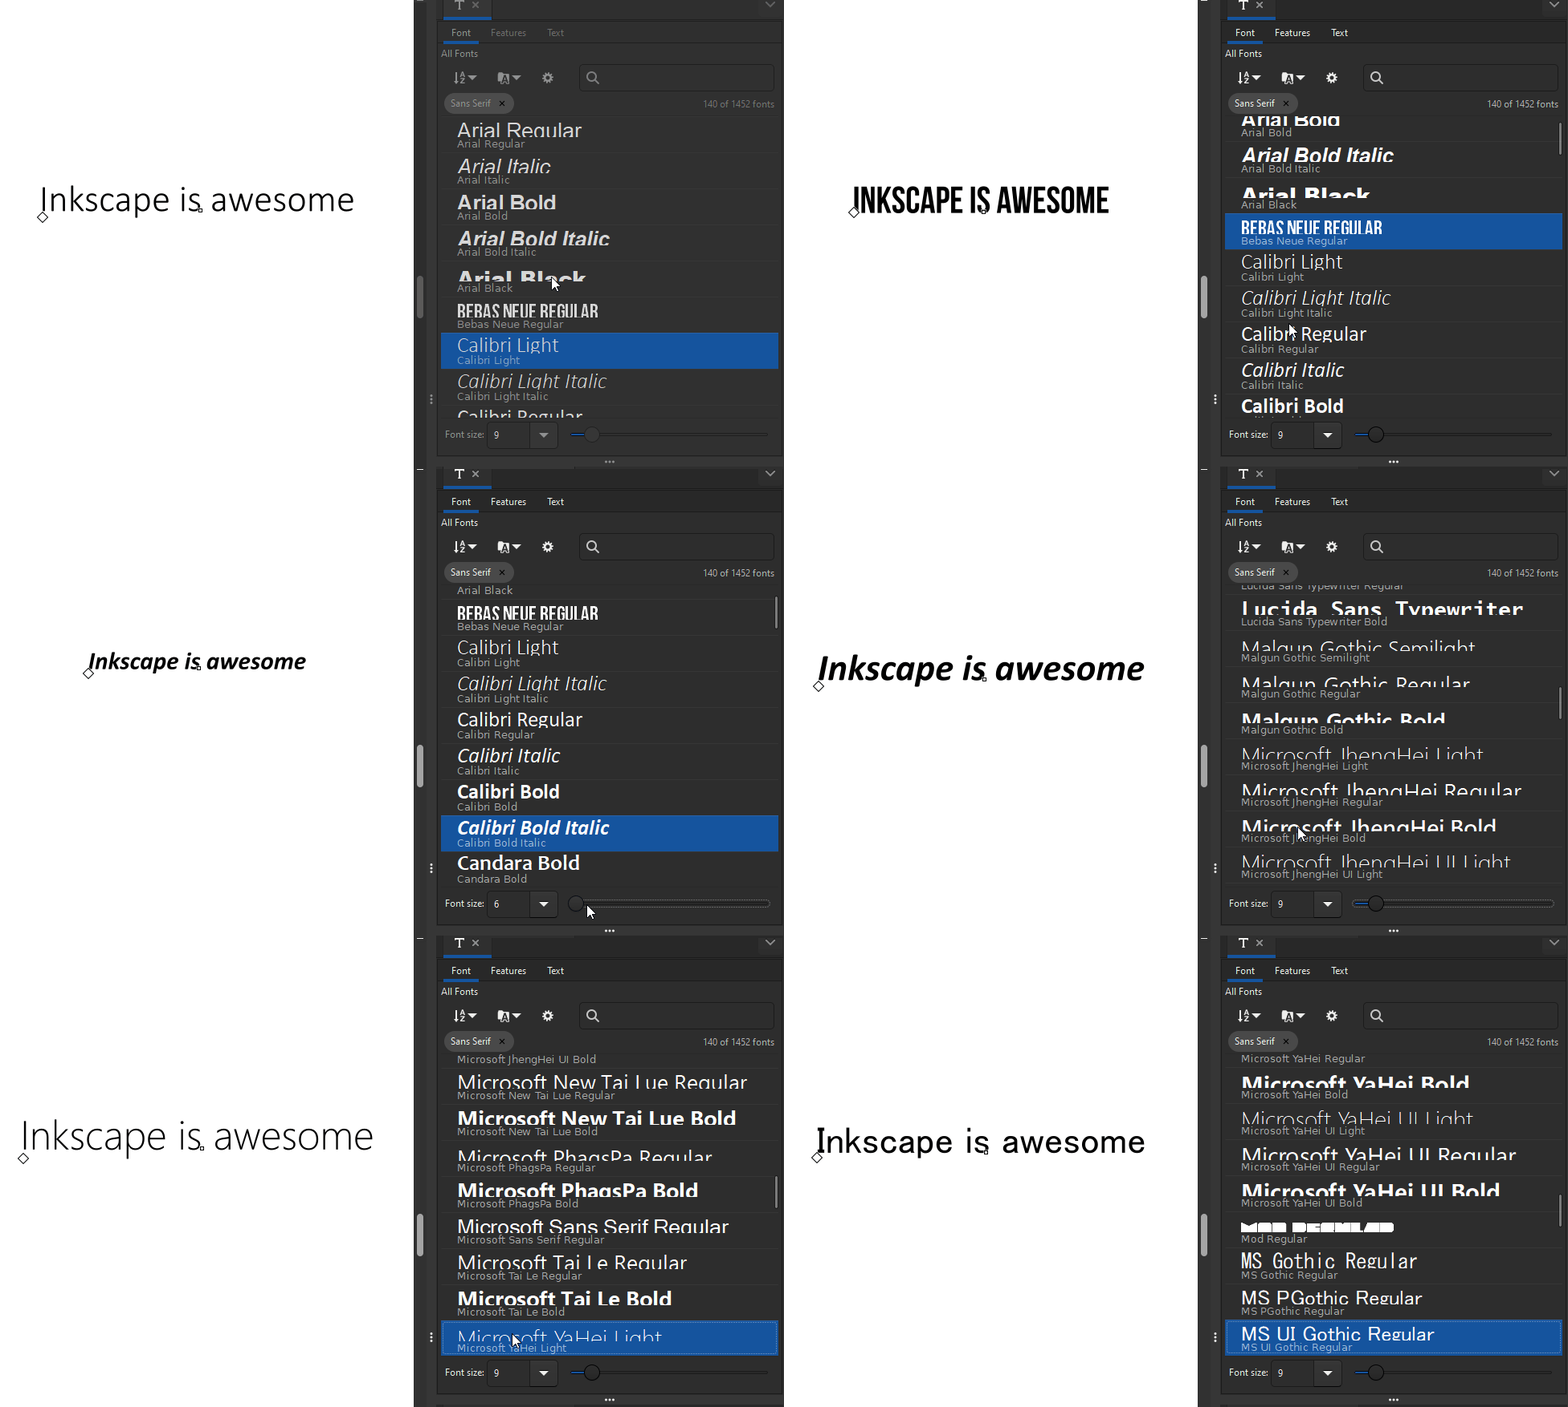
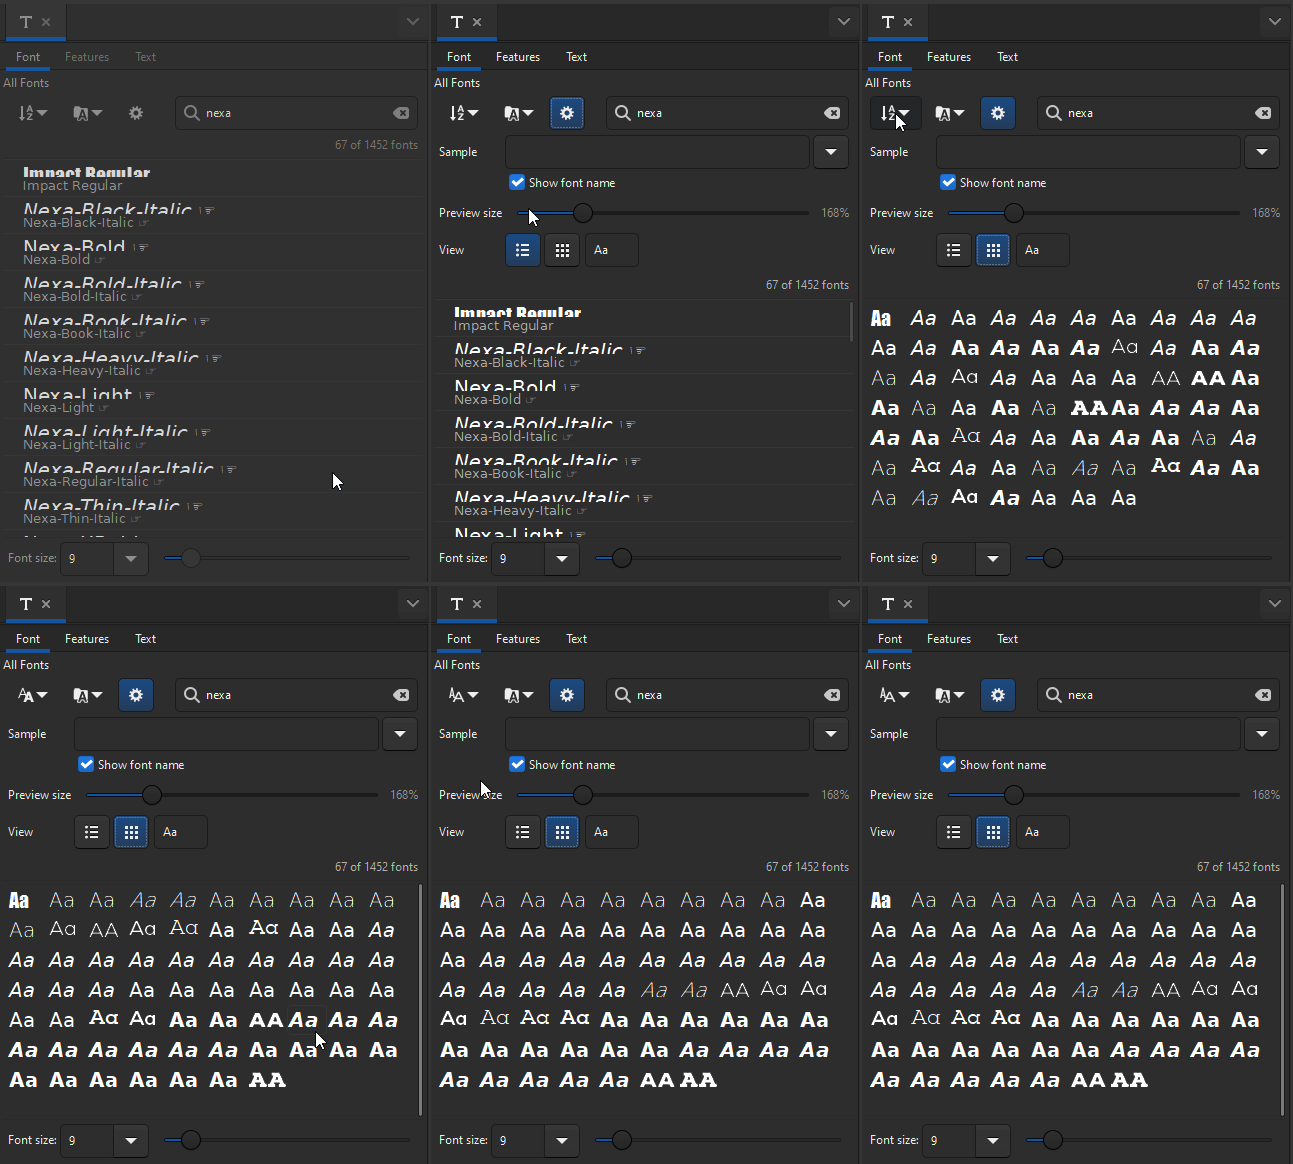
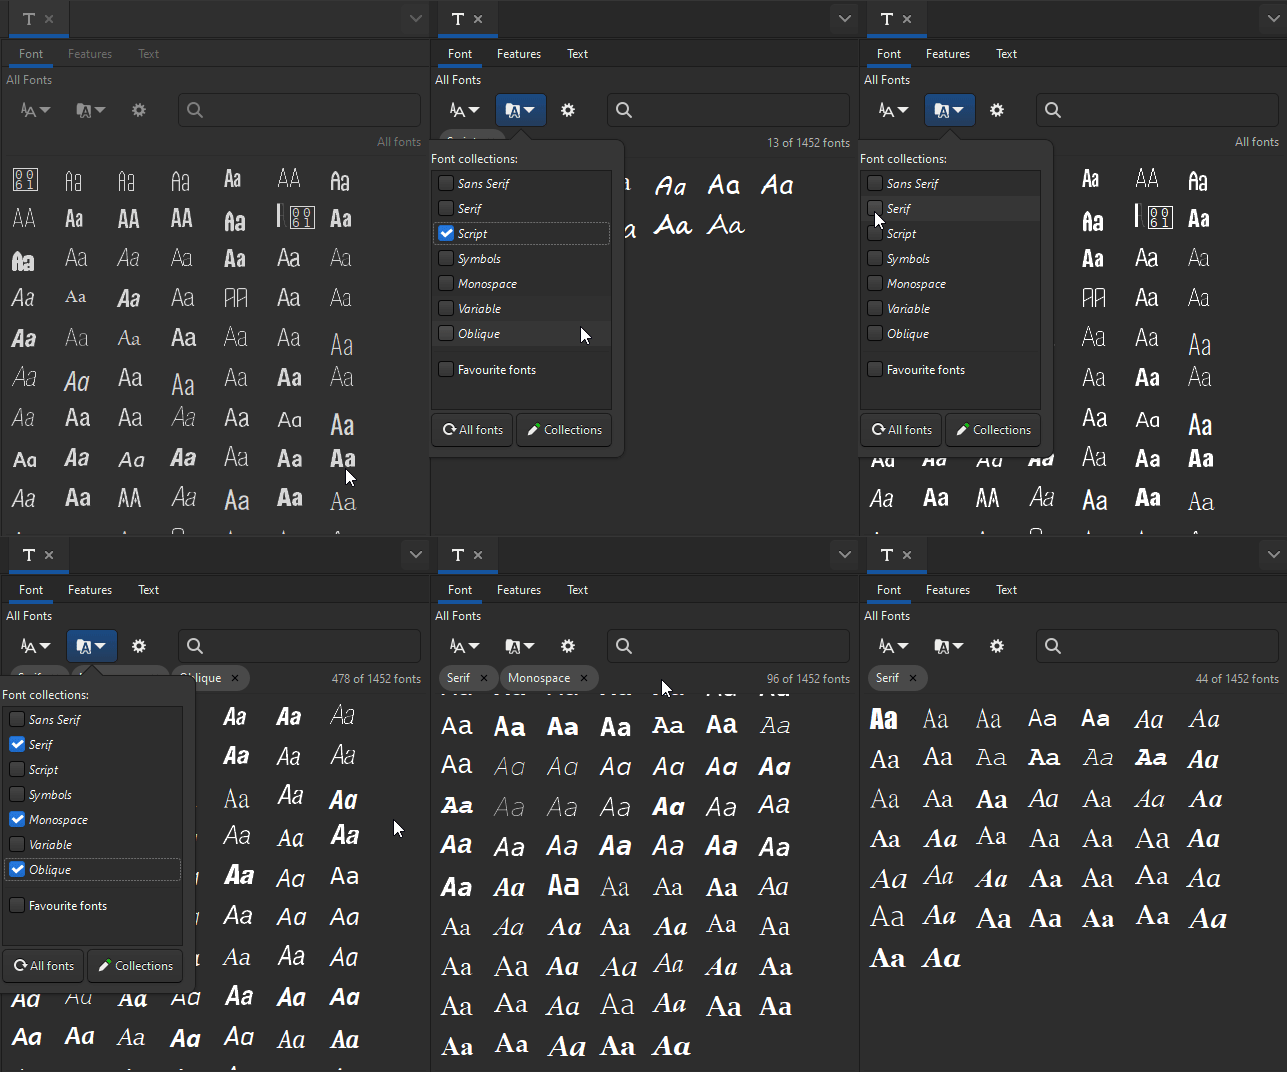
An experimental 'Unified font browser' has been added. If it is activated under Edit > Preferences > Interface > Dialogs : Text and Font dialog, it will replace the Text and Font dialog with a sortable, filterable, searchable and adjustable list of font previews.
It supports live applying of fonts.That means any font you select will be applied immediately. The 'Font Attributes' tab and 'Text' tab are available, too MR #4578.
Specifically, these settings are customizable:
- type of preview (rows or grid)
- sort order: alphabetical, font weight, font width (condensed - wide)
- limit list of fonts to selected font collections
- scaling of preview
- preview text (choice between some presets, custom text entry for the long (row view) sample and the short (grid view) sample)
- whether to show the font name below the preview
- in the preferences, the height of the preview lines can be adjusted, as in some cases, fonts look cut off in the list preview
[Needs new screenshot with size factor correctly set in text tool prefs]
Live Path Effects
Ruler
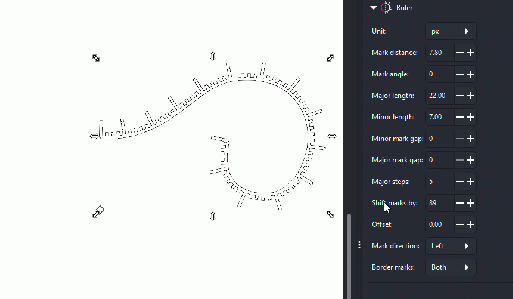
The Ruler Live Path Effect now features several new options:
- Ruler marks can start from the path at an angle (in degrees, MR #5749).
- The marks can start at a distance from the path (in percentage of overall mark length, marks are shortened by this amount, MR #5751).
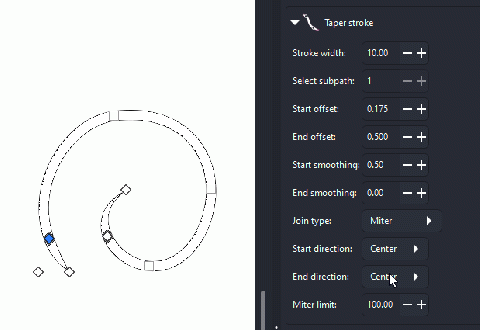
Taper Stroke
A new option to 'clamp' (cut off) the path's tip instead of tapering it on the selected end of the path has been added. It's available in the 'Start direction' dropdown in the LPE's settings (MR #5701).
Palettes
- Multiple palettes were updated to contain information about the number of columns for optimal display of the palette (MR #5647).
- The 'Web Safe' palette has been removed because of the dust that had already settled on it. Its colors were already included with the 'Web Hex' palette, where they now feature an addition ('(Web-safe)') to their label (MR #5653).
- The 'Windows XP' palette has been removed because of its age ([1]).
Templates
- Folding book templates in A4 and Letter format have been added (MR #5996).
- Custom templates can now make use of a category and a label (MR #5996).
[needs screenshot]
Symbols
- Added two new symbol sets, with Sci-Fi and Nature symbols (MR #4792)
Customization / Theming
Customizable Handles
The size, color, stroke-width, outline and opacity of on-canvas handles can now be customized, and their shape can be selected from a set of available handle shapes, by copying the CSS file at inkscape/share/ui/node-handles.css into the folder indicated at Edit ➞ Preferences ➞ System: User UI and modifying it. Handles will be updated live in Inkscape as when the file has been saved (MR #5624).
Icons
A new icon set called is now available for you to select. This new theme, called "Dash" is aimed at covering all of Inkscape's existing features, and reducing complexity on some of the existing icons, while still being explanatory. It also borrows some concepts from industry standard apps. It has 500+ icons, with cursors, scalable and symbolic versions and works on dark and light themes (MR #6115).
Keyboard Shortcuts
- The shortcuts for "Quick Preview" (F), "Quick Zoom" (Q), panning (Space), "Pen Segment To Line" (Shift + L), "Pen Segment To Curve" (Shift + U) and "Pen Segments To Guides" (Shift + G) are now customizable (MR #6308).
- The macOS-specific carbon.xml keyboard shortcuts file has been removed, as it hasn't been kept up to date for years (MR #6522).
- Some existing commands that did not have a default shortcut now have one. Note that these will only be available to you if you install Inkscape for the first time, not when upgrading an existing installation. In that case, you can set these manually in
Edit > Preferences > Interface > Keyboard, or you can reset your keyboard shortcuts by replacing the filedefault.xmlin your Inkscape user configuration director with a copy of the fileinkscape.xmlfrom thekeysdirectory of your Inkscape installation'ssharedirectory (MR #6462):
| Command | Shortcut |
|---|---|
| Apply clipping mask | Ctrl+M |
| Release clipping mask | Alt+M |
| Apply inverted clipping mask | Ctrl+Alt+M |
| Swap fill and stroke colors | Shift+X |
Windows-specific Changes
macOS-specific Changes
Extensions
- Extensions that use a custom GUI can now retrieve information from stderr with the attribute
show-stderrMR #6124. - Some improvements to memory management were made in the extension system (MR #6109)
Command line
- Many new actions have been added to allow editing SVG files and customizing export files (MR #5381). These are also available from the Command palette:
- Set the document's SVG version to 1.1
- Set the document's SVG version to 2.0
- Remove any Inkscape-specific SVG data
- Remove any known proprietary SVG data
- Remove auto start positions from markers
- Remove all transforms from all shapes
- Remove context paints from markers
- Replace SVG2 text with SVG1.1 text
- Insert JavaScript for rendering meshes (polyfill)
- Insert JavaScript for rendering hatches (polyfill)
- Recursively unlink all clones and symbols
- Turn all shapes recursively into
pathelements - Turn all strokes recursively into fill-only paths
- Make all paths absolute and predictable
- Add bounding box information to all shapes: adds
inkscape:visualboxandinkscape:geometricboxattributes (only current bounding box, not updated when shape changes) - Add shape path information to all shapes: adds
inkscape:dattribute (only currentd, not updated when path is changed) - Remove unused definitions (gradients, etc.)
- A new option to print a list of all available input file extensions
list-input-typeshas been added. This includes input file names for extensions, and it is also used for filename completion on the command line (MR #6126). - Options for setting the compression (export-png-compression, values 0–9) and antialiasing (export-png-antialias, values 0–3) level have been added (MR #5167).
- An option to rotate the page by 90° (page-rotate) has been added (MR #5594).
Inkview
The Inkscape SVG image viewer Inkview now makes use of a (customizable) .ui file instead of a hardcoded GUI (MR #5899).
Bugfixes
- The snap indicator text no longer flickers when object bounding box and path are in the same location (e.g. borders of a rectangular path) (Bug #4399, MR #6157).
- Clones no longer vanish when their original path is being edited with the Shape Builder Tool (Bug #4682, MR #6131).
- Bump filters and Bevels filters (about 25 different filters) now look again as they were intended, with banding and artifacts much reduced (MR #6190, MR #6162).
- The settings 'Better' and 'Best' for rendering filters now are different again, and 'Better' is a bit faster now (Bug #4722, MR #6133).
- Improvement on internal LPE handling (MR #6100)
- Stroke to Path no longer results in misplacement of the first node when applied to paths with multiple subpaths (Bug #4709, MR #6122).
- When editing text imported from a PDF, letters before and after your cursor move as expected instead of new text and old text being stacked on top of each other (Bug #297, MR #6414).
- Right-clicking on selected objects no longer deselects them (MR #6489, Bug #5047).
- Pressing the + button to add a new gradient stop now also works when the last gradient stop is selected (Bug #1261, MR #6358).
- Gradient tool regression fixes (since Inkscape 1.0.x, MR #6361):
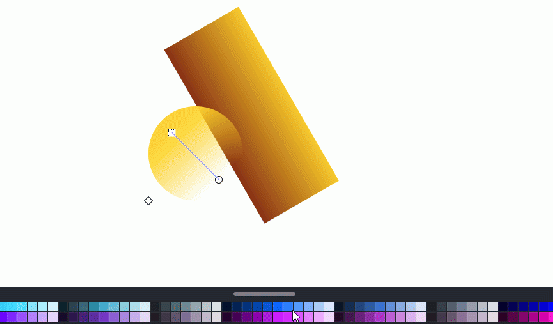
- The tool now again allows to add gradient stops by dragging a color from the palette onto the gradient line (Bug #3472).
- Dragging a color from the color palette to a gradient object will now respect all the selected gradient nodes irrespective of the drop location.
- Dropping a color on a gradient object when no gradient nodes are selected will automatically determine the closest gradient node to the mouse and apply the color to it (Bug #4466).
- Selecting a color from the color palette when no gradient node of the selected object is selected will automatically apply the color to the first gradient node of the selected object.
Behind the Curtains
These are changes that are not visible to the end user, but make development easier, maintain operating system compatibility and help to future-proof Inkscape:
- Lots and lots of changes have been made to prepare Inkscape for the updated user interface framework GTK 4. Those changes should not be noticeable in Inkscape 1.4, but will help us with fixing bugs in multiple branches of Inkscape simultaneously (Inkscape 1.4.x and master/1.5.x).
- Many parts of the code have been refactored, code has been simplified and modernized.
- The code was adjusted to stay compatible with newer versions of third-party libraries.
- Our automatic builds and dependency lists have been updated and changed many times, continuously adjusting to currently available packages for various operating systems and compilation frameworks.
Translations
The following languages have been updated for this version:
- Basque
- Belarusian
- British English
- Catalan
- German
- Hebrew
- Icelandic
Contributing to interface translations
Want to help with translations? Learn how to help!
Documentation
Documentation translations were updated in:
- Hungarian
Website
Important Inkscape Project Milestones
Important Changes for Packagers
- The compile flag
WITH_INTERNAL_CAIROhas been removed (MR #6093).
Known issues
Other releases
- Inkscape 1.5 — development branch
- Inkscape 1.4 — current stable release branch (1.4.1, 1.4.2 next bugfix release)
- Inkscape 1.3 (1.3.1, 1.3.2)
- Inkscape 1.2 (1.2.1, 1.2.2)
- Inkscape 1.1 (1.1.1, 1.1.2)
- Inkscape 1.0 (1.0.1, 1.0.2)
- Inkscape 0.92 (0.92.1, 0.92.2, 0.92.3, 0.92.4, 0.92.5)
- Inkscape 0.91
- Inkscape 0.48 (0.48.1, 0.48.2, 0.48.3, 0.48.4, 0.48.5)
- Inkscape 0.47
- Inkscape 0.46
- Inkscape 0.45
- Inkscape 0.44
- Inkscape 0.43
- Inkscape 0.42
- Inkscape 0.41
- Inkscape 0.40
- Inkscape 0.39
- Inkscape 0.38
- Inkscape 0.37
- Inkscape 0.36
- Inkscape 0.35
