Difference between revisions of "Release notes/1.3"
m (→Live path effects: Formatting, fleshing out.) |
|||
| Line 602: | Line 602: | ||
=== Corners (Fillet/Chamfer) LPE === | === Corners (Fillet/Chamfer) LPE === | ||
* The '''handles''' of the effect have been changed to '''little triangles''', which allows you to position them more precisely ([ | * The '''handles''' of the effect have been changed to '''little triangles''', which allows you to position them more precisely ([https://gitlab.com/inkscape/inkscape/-/merge_requests/5164 MR #5164]). | ||
https://gitlab.com/inkscape/inkscape/-/merge_requests/5164 MR #5164]). | |||
* You can now assign a '''shortcut''' to the LPE to be able to quickly use it on any path without opening the <code>Path Effects</code> dialog. | * You can now assign a '''shortcut''' to the LPE to be able to quickly use it on any path without opening the <code>Path Effects</code> dialog. | ||
Revision as of 23:23, 17 July 2023

|
These Release Notes are in Draft Status.
Note: Not all animations work, due to Wiki bugs with resizing images. Release notes will be transferred to website, there animations will be working. Important Links:
|

|
Pending questions:
|
Release highlights
Definitely not released yet.
The highlights of this major Inkscape version are:
- Shape Builder Tool for building up shapes on canvas (Boolean tool)
- Font Collections
- Pattern Editor
- Document Resources Dialog
- Improved performance thanks to fully asynchronous, multithreaded rendering
- LPE dialog redesigned
- Improved On-Canvas Pattern Editing
- Better PDF import
- Page margins & bleed
- Return of Search, opacity & blend modes in Layers & Objects dialog and of an optional persistent snap bar
- Syntax highlighting in XML Editor
- And so much more!
Performance
A lot of effort has gone into improving the performance and speed of all aspects of Inkscape. This involved the refactoring of inefficient code, rewriting how Inkscape works with patterns, moving bitmap tracing into a separate thread and so much more.
Canvas rendering is now both multithreaded, and done outside of Inkscape's main process thread.
If your computer's processor has more than one core (which it most likely does), this can result in a 2–4× speedup while zooming / panning / transforming objects.
The number of processor cores used for rendering can be adjusted in Edit ➞ Preferences ➞ Rendering ➞ Number of Threads. By default, Inkscape tries to be as fast as possible by using as many cores as possible.
(Multithreading MRs, MR #4760).
General user interface
Color Palette
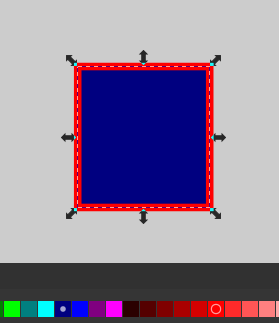
- Color palette fields now have little indicators that show which color is used for the stroke and fill of a selected object.
- Color pinning (MR #4957):
- Colors from the palette that you use frequently can be 'pinned' to the start of the palette, for faster access. By default, these 4 colors are 'Unset', black, grey and white, but you can choose any other color. These fields can be made larger, so they can be easily clicked on.
- To add a color to the pinned colors array, right-click on its palette field and select 'Pin color'. The color will then be moved away from its original location in the palette to the palette start.
- To 'unpin' a color, right-click on the pinned color's field and select 'Unpin color'.
- To choose the pinned colors' size, click on the palette bar's hamburger menu icon and select to 'Configure' it, and check / uncheck the option 'Enlarge pinned colors'.
- Note: Pinned colors only show up if the current palette contains them. So when you switch the palette, some colors may be dropped, and when you switch back to a palette that contains them, they will show again.
Color Pickers
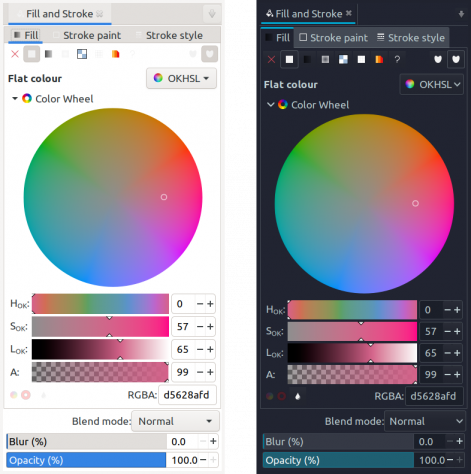
Color pickers in Inkscape now support choosing colors in the OKLch color space, which has just been adopted into the CSS Color Module Level 4 draft recommendation. For those who would like to learn more, OKLch and OKLab are described in detail by its creator in a blog post.
This additional option is disabled by default. It can be enabled in Edit ➞ Preferences ➞ Interface ➞ Color Selector as "OKHSL", and will then be available in any color picker's dropdown. Note that color values will still be written as RGB hex codes in the SVG source, and Inkscape also does not support reading colors that are defined in that color space. This change is purely adding a new convenient option for choosing colors.
Command Palette
It is no longer necessary to scroll horizontally in the Command Palette (shortcut: ?), as entries are now nicely arranged and formatted and make use of linebreaks. Now all the info for an entry is directly visible (MR #4988)
For clipped images, there is now an option in the context menu to crop them to their clipping path. This destructive operation can be used to reduce the file size of an SVG file, removing unneeded parts. The function automatically embeds any linked images, leaving the original image untouched. For any areas outside an irregular-shaped clip, but inside the rectangular region of the bounding box, the new image will use transparency. The status bar will show a message telling you by how many bytes the cropping made your file lighter.
Copy-pasting Styles
A new preference option in Edit ➞ Preferences ➞ Behavior ➞ Clipboard now allows you to choose whether you want to replace the CSS rules (new option) for an object with those of the other object, or whether you want to always just paste the resulting style attributes (old behavior), without any CSS classes, when you copy-paste the style of one object onto another one. This will help with (colorable) icon creation and web development tasks. The option defaults to the old behavior, so unless the old style pasting behavior bothered you, you do not need to change anything.
Crash dialog
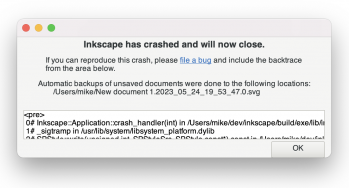
When Inkscape crashes, it will now ask you to create a bug report, and will provide information that can help developers to fix the crash.
Keyboard shortcuts
The keyboard shortcuts for aligning objects vertically and horizontally have been moved to the numeric keypad, where the other alignment shortcuts are, too:
- Vertical alignment has been moved from Ctrl+Alt+T to Ctrl+Alt+Numpad 1
- Horizontal alignment has been moved from Ctrl+Alt+H to Ctrl+Alt+Numpad 7
If you find yourself unable to reach the new shortcuts (for example, because your laptop does not have a keypad, or because the shortcuts do not work - may be the case on Linux with Xfce), you can set them to something else by changing both the alignment shortcut and the function that now uses that shortcut (if any). Use the search in Edit ➞ Preferences ➞ Interface ➞ Keyboard – it also allows searching for shortcuts, not only for their name (e.g. search for ctrl+alt+t to find the new default action that is executed when that combo is pressed).
Origin on current page
In Edit ➞ Preferences ➞ Interface, there is an option now to use the current page's corner as the coordinate system origin for placing objects, for the rulers, and for any tools.
Pasting Options Renamed, and Paste on Page
The Paste size entry in the Edit menu has been renamed to Paste…, to hold all 'special' pasting operations that you may need.
A new pasting feature called On Page has been added to this renamed menu. You can use it to paste the copied object(s) into the same position on a different page (MR #4695).
For this to work correctly, you must first select the page to paste on by either:
- selecting an object on that page before pasting
- selecting the page with the page tool
- changing the current page using the buttons in the status bar
Rulers
Inkscape's rulers on the top and left side of the canvas now feature two new indicator areas:
- Page: the part of the ruler that corresponds to the current page's location is now colored in a different tone, so you can always see where your page ends.
- Selection: a thin blue line indicates and follows the current selection. This line can be turned off in
Edit ➞ Preferences ➞ Interface: Show selection in ruler.
Ruler performance has been improved along with these changes.
Selecting
- Functionality to save and restore the current selection (i.e. which items are currently selected) and to delete the saved status has been added. It is accessible from the
Commands bar(?, search for 'set selection backup') or by setting a keyboard shortcut for it in the preferences. You can use it to quickly save which objects or which nodes in a path you currently have selected, and to later get back to work with that selection. - An option to select invisible (transparent) items by clicking on them has been added to the preferences in
Edit ➞ Preferences ➞ Behavior ➞ Selecting.
Snap toolbar
An option was added in Edit ➞ Preferences ➞ Interface ➞ Toolbars to show snapping options permanently in a dedicated toolbar, similar to Inkscape version 1.1 and earlier.
Canvas
Views and Display Modes
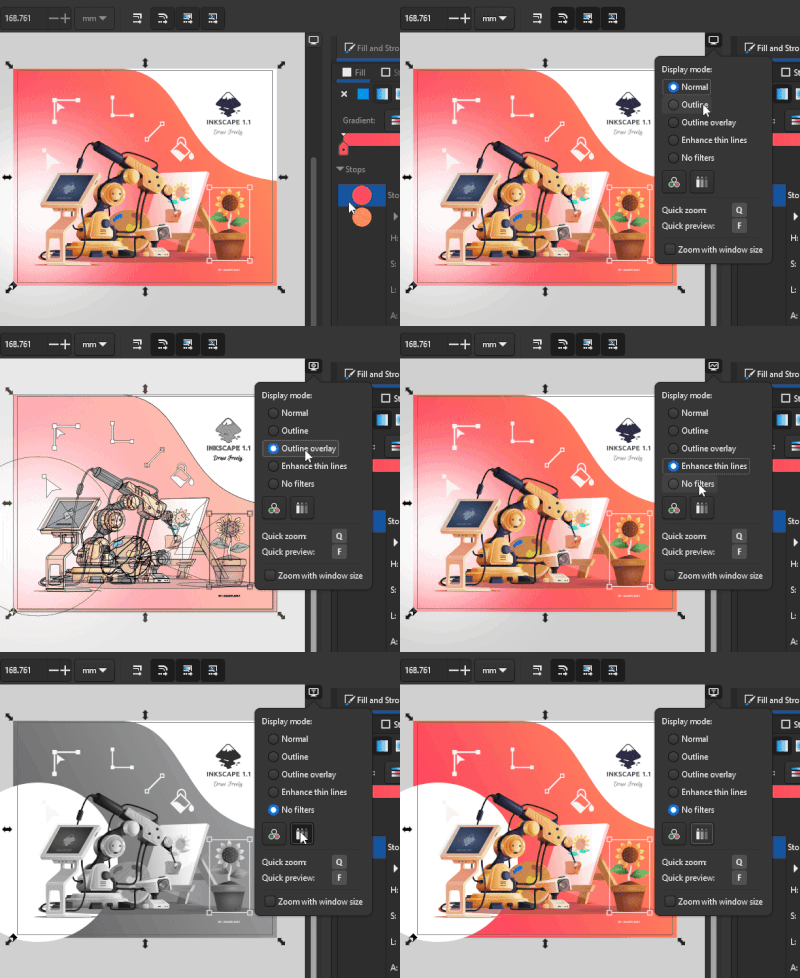
- Quick Preview: Pressing
Ftemporarily hides on-canvas overlays (transformation handles, grids, guides...). This allows quick preview of final artwork without any distractions. (MR #4395) - Display mode and overlay controls are now accessible quickly from the top right corner of the canvas. Scrollbars must be enabled to see it (CTRL+B).
- Clip object rendering to page: For a more permanent preview, you can choose whether to not display any objects outside the page area in the
Document Properties dialog. A keyboard shortcut to toggle this feature can be set in theKeyboard Shortcutslist in the preferences.
Experimental OpenGL (GPU) Accelerated Canvas Rendering
An OpenGL-accelerated display mode was added to the canvas to speed up panning, zooming and rotating (MR #4133).
This is NOT a fully GPU-based renderer; content is still rendered on the CPU in exactly the same way as before, so large performance improvements are not to be expected. It does, however, result in a smoother display and lower CPU usage, especially on HiDPI screens.
OpenGL mode is highly experimental and is turned off by default. It can be turned on at
Preferences ➞ Rendering ➞ Enable OpenGL
Note however the following caveats:
- Due to packaging problems, when using the Linux AppImage, OpenGL support either does not work (on X11) or crashes (on Wayland).
- Due to GTK3 bugs, OpenGL mode crashes on Windows, blacks out the screen on MacOS, is slower than software rendering on Linux X11, and is only really usable on Wayland.
For these reasons, it is not expected to be useful until we migrate to GTK4, where we hope that at least some of these bugs will have been fixed.
Smooth auto-scrolling
When dragging an object off the edge of the canvas, the view of the canvas automatically scrolls, so you can still see your object. Auto-scrolling is much smoother now than it was in previous Inkscape versions (MR #5027)
Tools
Toolbar
Right-clicking on any tool icon now gives you a context menu for opening that tool's preferences (MR #4982).
3D Box Tool
This tool had to sacrifice its shortcut x, which is now used for the Shape Builder Tool. The shortcut Shift+F4 still works for making 3D boxes.
Gradient Tool
- When multiple gradients are selected (MR #4339):
- the
repeatsetting can now be changed for all of them at once. - the stop list now reads
Multiple gradients(instead of a random stop).
- the
- Offsets of the start/end stops can be adjusted in the tool controls bar (consistent with the option in the Fill and Stroke dialog).
- The stop stays selected after its offset is changed in the toolbar (instead of selecting the first stop of the gradient).
Node Tool
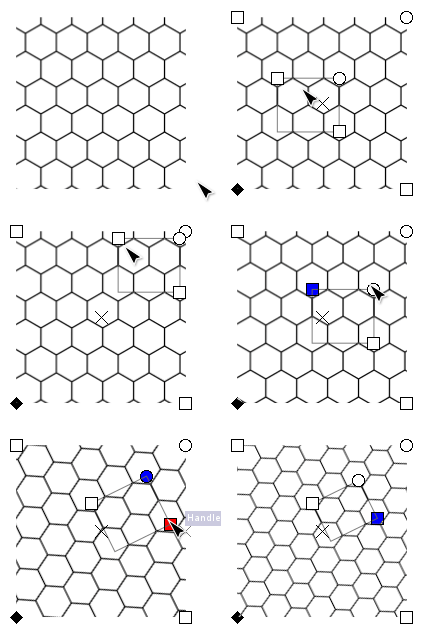
On-Canvas Pattern Editing
Pattern editing on canvas is now much easier! No more searching for the pattern controls - as now, you can click on any part of a pattern and it will show you controls at that position:
- the top left square handle controls the pattern position
- the circular handle controls rotation
- and the bottom right square controls the pattern's size
Hold down Shift to constrain proportions.
An additional outline shows you the edges of the pattern. We also fixed performance problems with patterns, so now you can have smaller patterns in project and zoom in on them without worrying about Inkscape eating up all your RAM. This should also fix or at least improve issues with patterns not rendering / only partially rendering in exported files or when zoomed out very far.
Draw around Selection
We added a new selection mode for nodes. Hold down Alt and draw with the Node tool around the nodes that you want to select. This saves a lot of time compared to previous versions, where you needed to add new nodes to the selection by dragging small rectangles while holding Shift, whenever nodes were not located together in a convenient rectangular area (MR #4747).
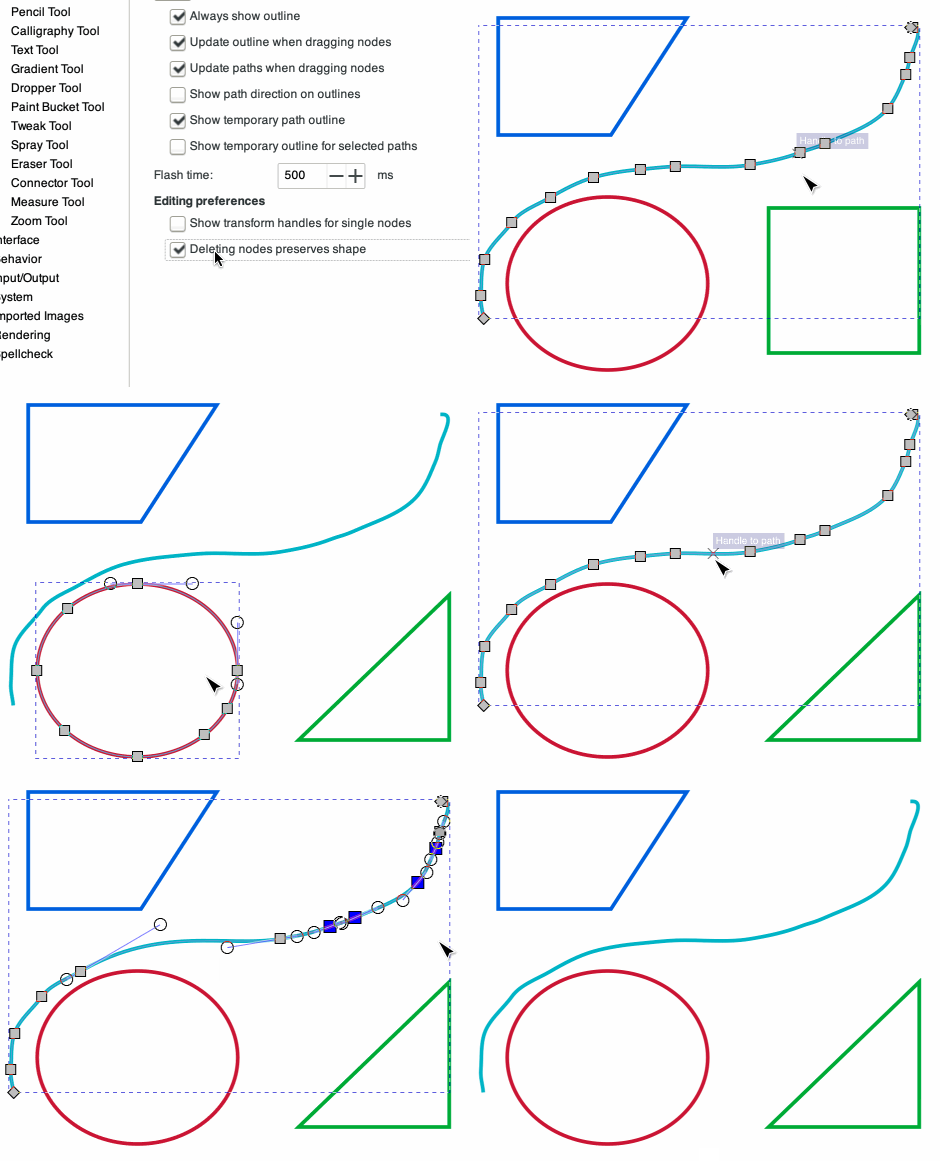
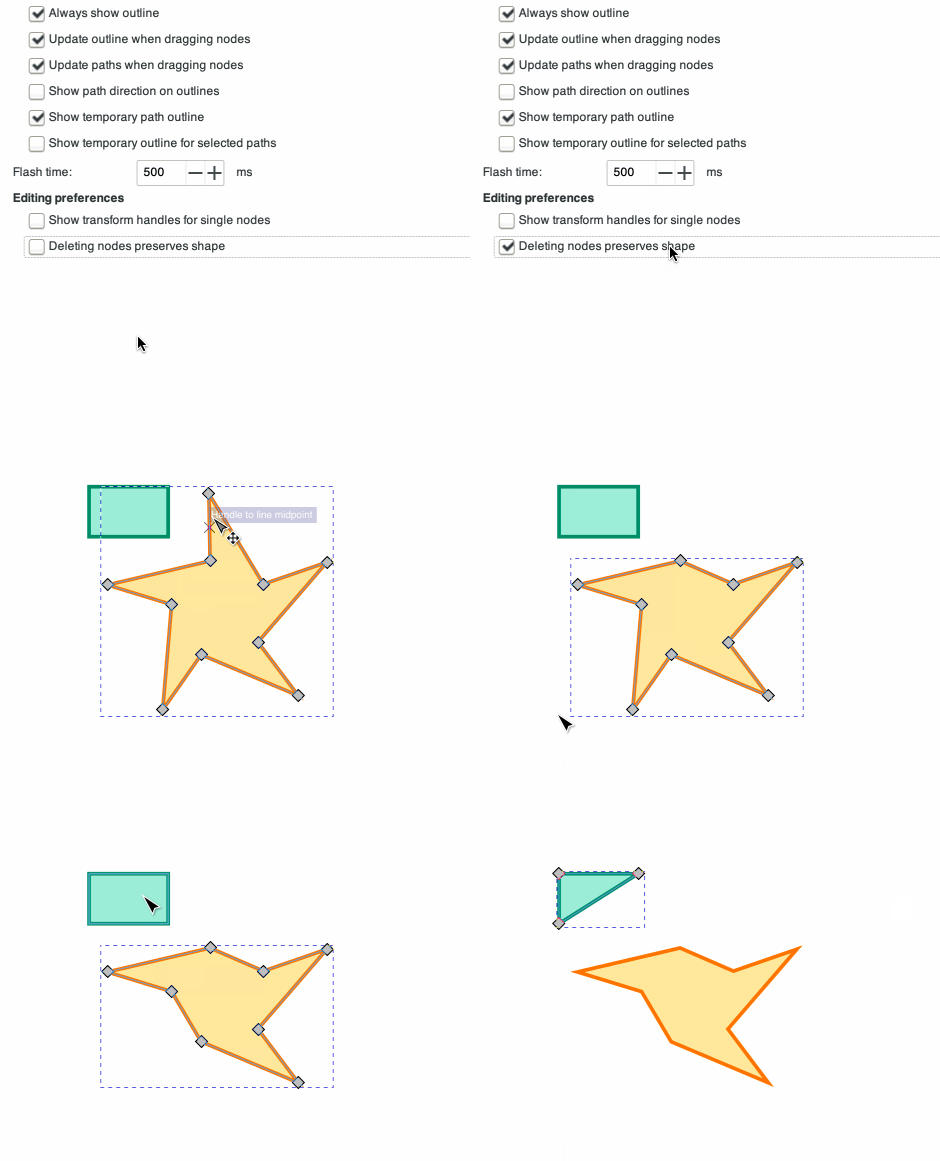
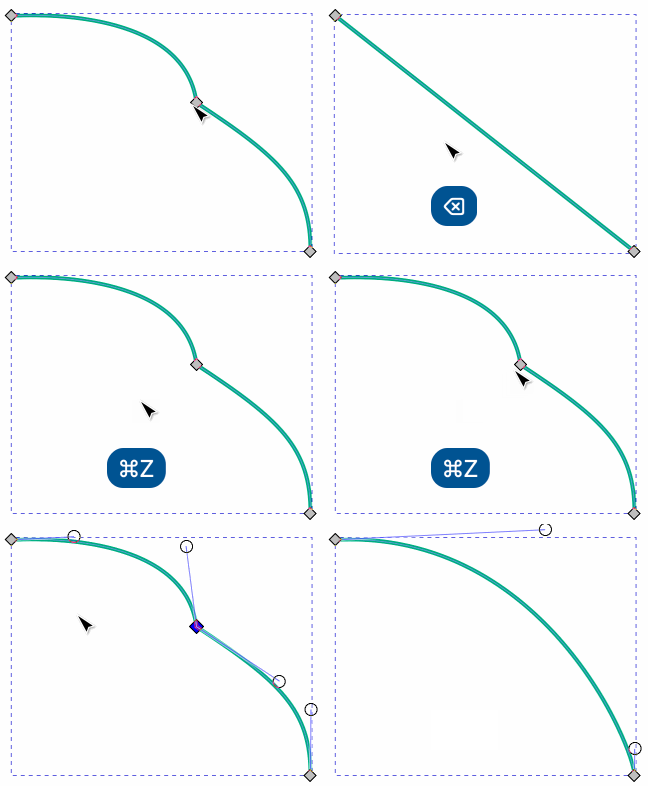
Better shape preservation when deleting nodes
When deleting nodes, a new, improved curve fitting algorithm, adopted from FontForge, is now used on a "smooth" path (rather than corners) (MR #5082).
It will attempt to preserve the shape only when selected nodes define a relatively smooth path. Trying to preserve the shape when deleting corner nodes is rarely what's desirable, so the algorithm will not do that:
With the "preserve shape" option ON, the algorithm may still decide to insert line segments if it detects what it thinks are corners. Holding Ctrl key while deleting inverts this decision:
Edit Blur on Canvas
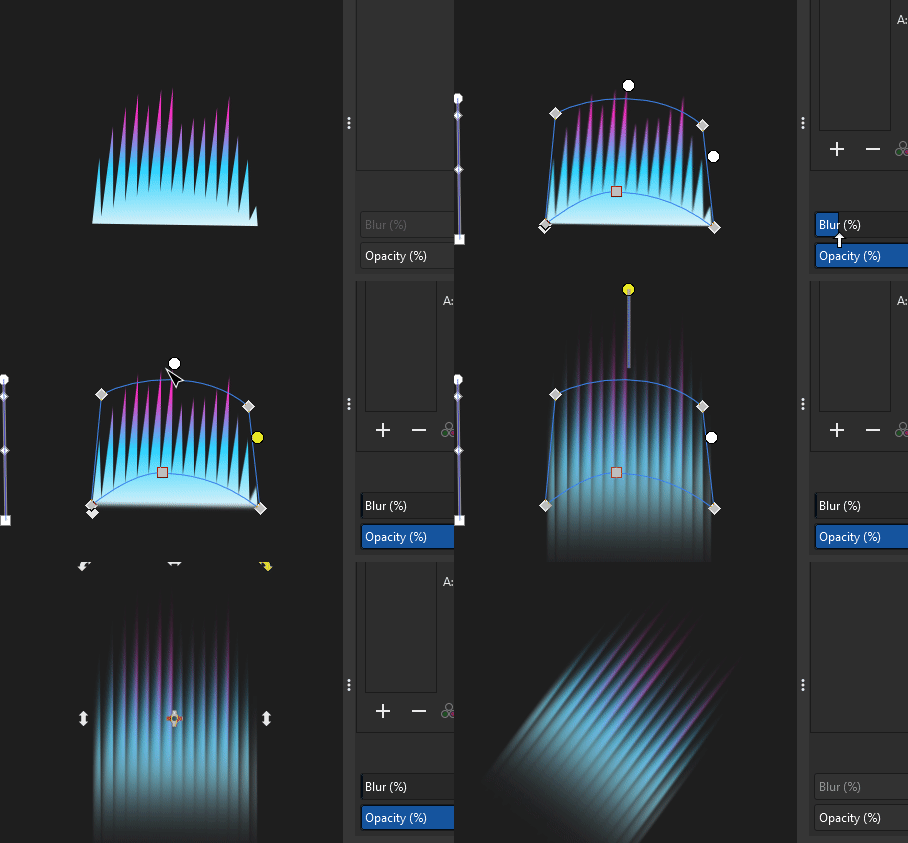
If your object has a Blur filter (from the Fill and Stroke dialog) applied to it, or any composed filter that uses a Blur filter as one of its components, you will see a set of new on-canvas blur controls when the object is selected with the node tool, or with the selection tool when the filter is first applied (MR #4867)
The ratio of the blur controls is not locked by default, so only dragging on one of them will change horizontal or vertical blur separately.
If you hold CTRL and click-drag on one of the handles, the blur will be reset back to be the same amount for both directions, and both will change by the same amount when you move the handle.
You can select an arbitrary blur angle by rotating your object after setting its blur, or when applying it to a rotated shape, group, clone, symbol or other object that features a transform matrix. If this is not desired, ungroup and regroup or convert to path to apply the matrix before attempting to create an uneven blur.
On-canvas Corners Editing
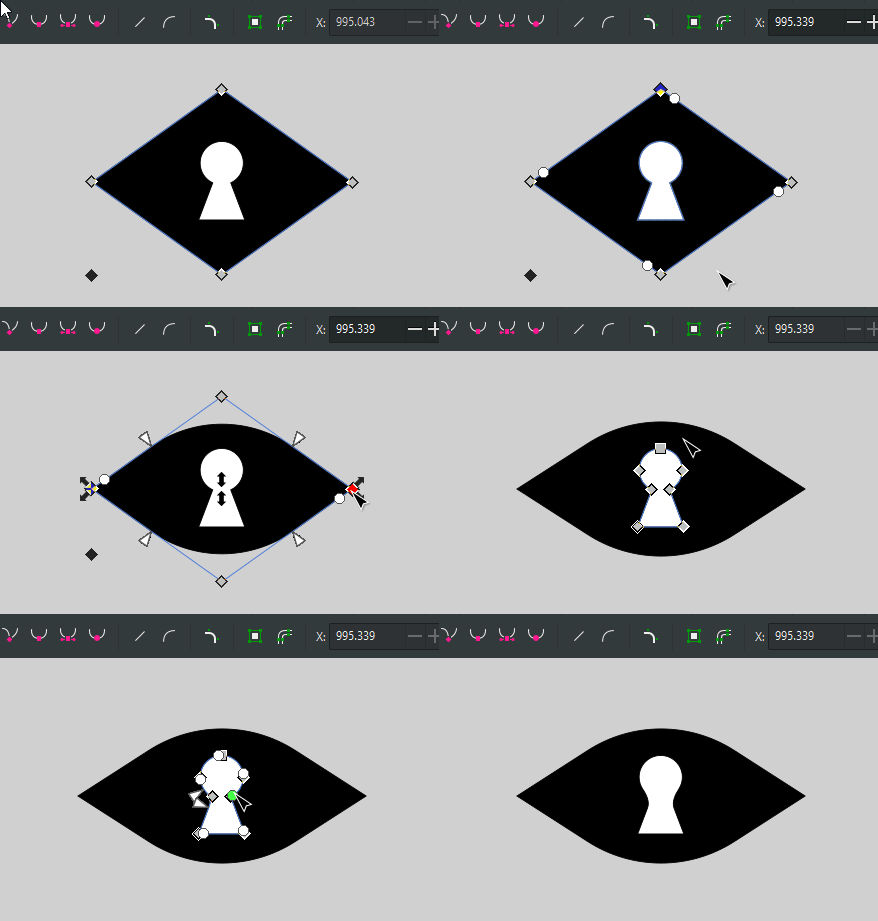
In the Tool Controls Bar, a new button allows you to add the Corners Live Path Effect to the currently selected path, to round corners by a specified amount, or to add chamfers/fillets. Click the button again to remove the effect.
Page Tool
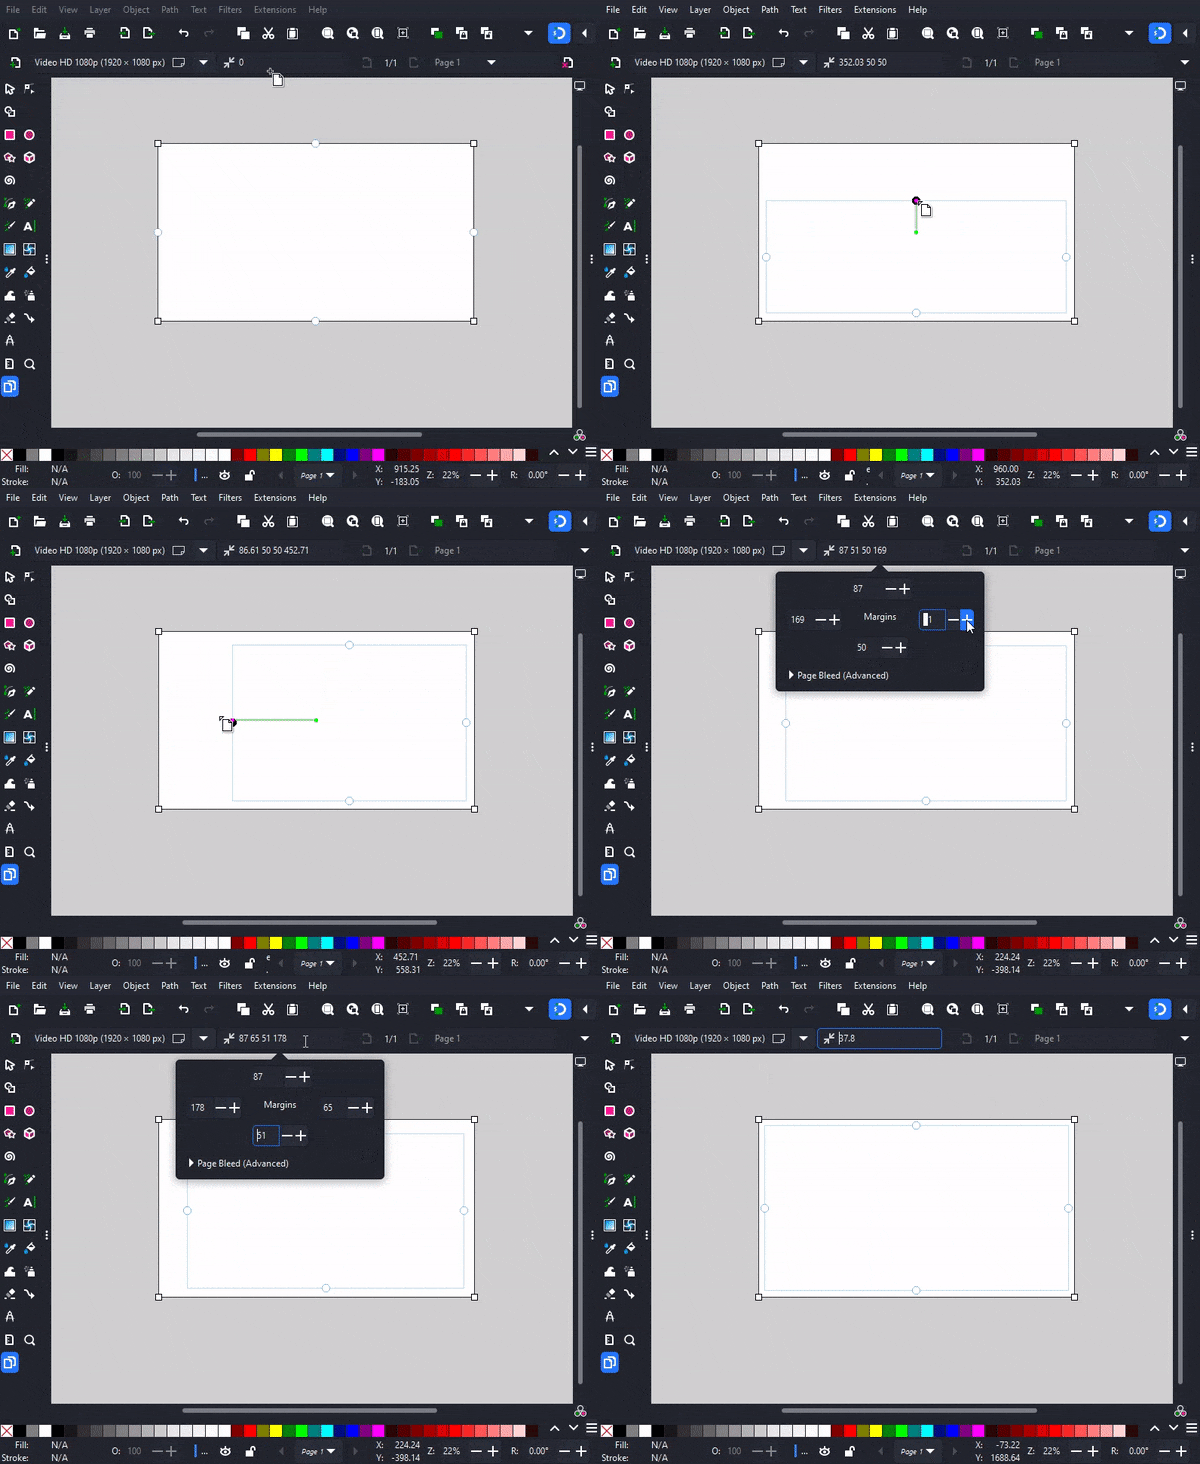
The Page tool now offers controls for page margins and bleeds for printing (MR #4532):
- In its
Tool Controls Bar, there is a field where you can enter the margin numerically, including the unit (if no unit is given, the Display unit from the Document Properties dialog is used), like this '3mm'. - You can set the margin widths for all sides separately:
- by filling out the form that opens when you click on the double-arrow icon in front of the number field
- on the canvas by using the blue circle-shaped handles – to adjust all page margins of equal value simultaneously, use ctrl.
- or by entering them as follows into the number field:
top right bottom left(e.g. '3mm 5mm 7mm 10mm', ortop/bottom left/right(e.g. '10mm 20mm'), ortop left/right bottom(e.g. '10mm 20mm 30mm').
- You can set the bleed width by first clicking on the double-arrow, and then expanding the dialog at the bottom, then you can use the same syntax as for the other number field above.
- Page margins and bleeds are available as snapping targets, and can be de-/activated with the 'page borders' snap control.
- Bleeds will be used for PDF export.
Selector Tool
The Selector Tool features three new keyboard shortcuts:
- Reapply transform: Ctrl+Alt+T - This allows you to perform the last applied transformation multiple times.
Usage example: Rotate an object by 20°, then double the rotation by using the shortcut.
Note: on Linux, the shortcut will usually open a terminal, so you will probably want to assign a different shortcut. This shortcut was previously used for alignment, see #Keyboard_shortcuts for more info. - Duplicate and transform: Ctrl+Alt+D - This performs a duplication and then reapplies the previous transform to the duplicate, so it is moved / rotated / etc. by the same amount. You could, for example, use it to quickly create a sequence of evenly spaced objects.
Note: On Linux, this shortcut usually minimizes the window, so you will want to assign a different shortcut. (MR #4506) - Clone while dragging: drag object + C - Drag and object and press C to clone it in the current position (this is similar to 'stamping' by pressing Space to create a copy when dragging an object) (MR #4752).
Shape Builder Tool
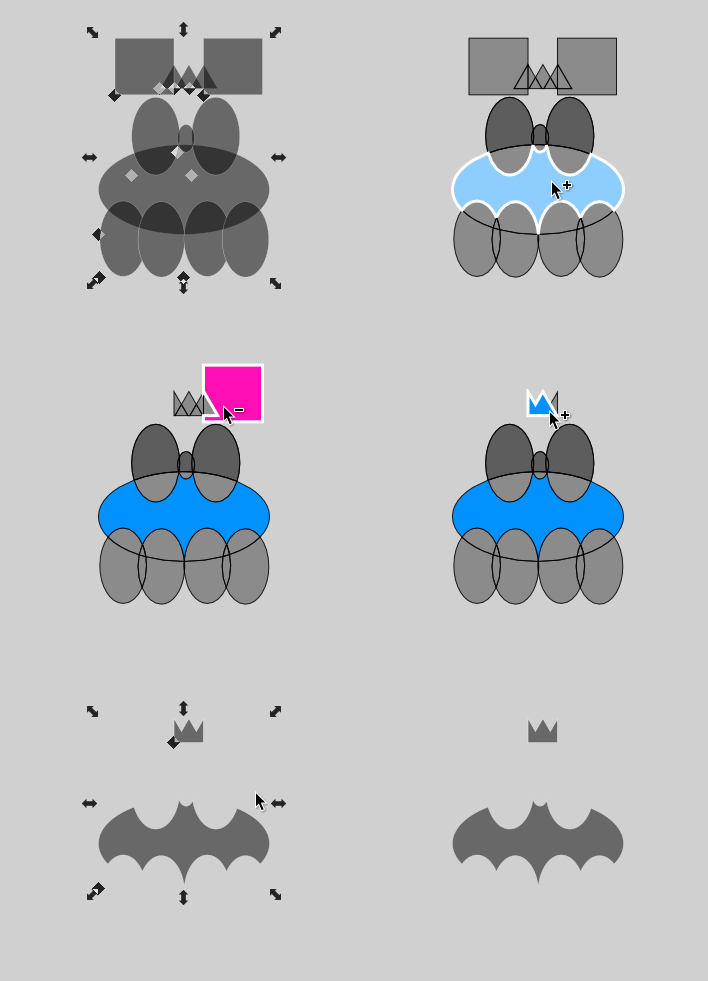
This is a new tool for building shapes from intersecting objects, to make Boolean operations more accessible (MR #4709).
It can be activated by clicking on the third button from the top in the Tool bar, after the Selector and Node tools.
Its keyboard shortcut is X (previously the shortcut for the 3D Box tool, see 3D_Box_Tool).
Usage
- Select multiple overlapping shapes, or one self-intersecting path, with the Selector or Node tool.
- Switch to Shape Builder tool.
- The view of the canvas will now change, and show all paths/outlines of all selected objects. Everything else will be hidden until you leave the Shape Builder tool. You can see whether the current mode/key combination will add or subtract by color: Adding is represented by a blue color, removing by pink.
- In default (Addition) mode, click on any segment to add it to the result as separate object.
- Shift + click on any segment to remove it from the result.
- Click and drag over segment boundaries to union all touched segments.
- Shift + click and drag over segment boundaries to remove all touched segments.
- Use Escape or the corresponding tool controls bar button to cancel
- or use Enter, the corresponding button, or just switch to a different tool to accept the result.
Result
- Any segments that have not been touched with the tool will be gone.
- All other segments will now be available as unioned or separate objects, depending on your actions.
- These objects will keep their style, if not unioned with an object that has a different style. In that case, the first object will determine the style of the result.
Path Operations
Object to Path
Path ➞ Object to Path now behaves differently for texts. In recent Inkscape versions, a text was converted into a group of letters, where each letter was a single path. Now, the whole text is converted to a single path (if you need individual letters, with Path ➞ Split Path, many texts can almost be split into letters again - or you can use the extension Text ➞ Split Text to split the text into single letters first).
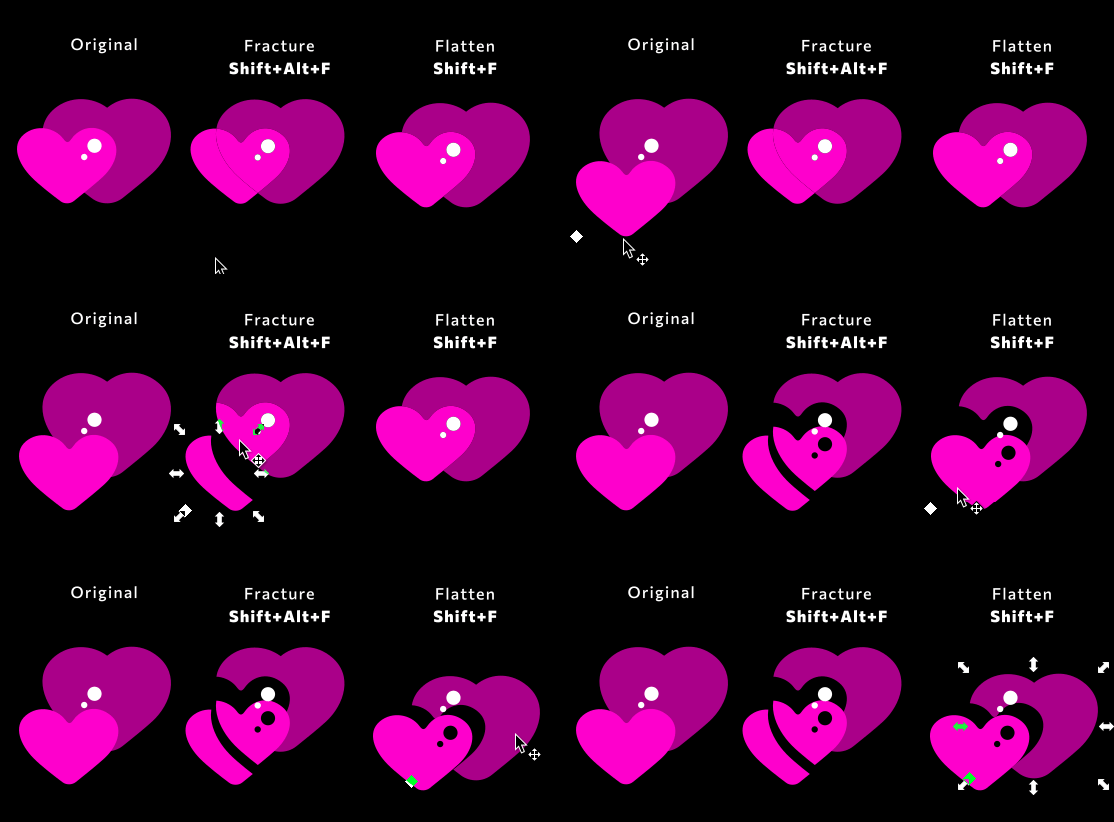
Fracture Paths
Path ➞ Fracture - every overlapping region of a set of paths will be split into a separate object. The resulting objects do not overlap anymore.
Corresponds to the following sequence of Boolean operations that were previously necessary to achieve the same result:
Duplicate ➞ Union ➞ push down in stacking order ➞ select other set of duplicates ➞ Combine ➞ select both resulting objects ➞ Division, but keeps the color/style of the visible areas.
Flatten Paths
Path ➞ Flatten - overlapping objects will be flattened visually (it will delete paths that are hidden behind a top path). Useful for separating colors for Screen printing and offset printing as well as for doing any kind of plotting.
This could previously only be done by repeatedly subtracting duplicated and unioned stacks of objects.
Clones
A new preference option is now available in Edit ➞ Preferences ➞ Behavior ➞ Clone that allows you to decide whether you really want to convert a clone in the selection to a path when you use the command Path ➞ Object to Path. Otherwise, the clones will only be unlinked, but keep their path effects and editable shapes.
Masking / Clipping
A new option to preserve clips / masks when ungrouping objects has been added (Edit ➞ Preferences ➞ Behavior ➞ Clippaths and masks: When ungroup, clip/mask is preserved in children). The option is active by default. This means that when you now ungroup a group that has been clipped, the elements inside it will inherit the clip. Previously, the clip was removed and everything became un-clipped.
If you're one of those who have used ungrouping as a fast and convenient way to remove all clips and masks in imported PDF files, to go back to previous default behavior, deactivate this new option (MR #3564).
Dialogs
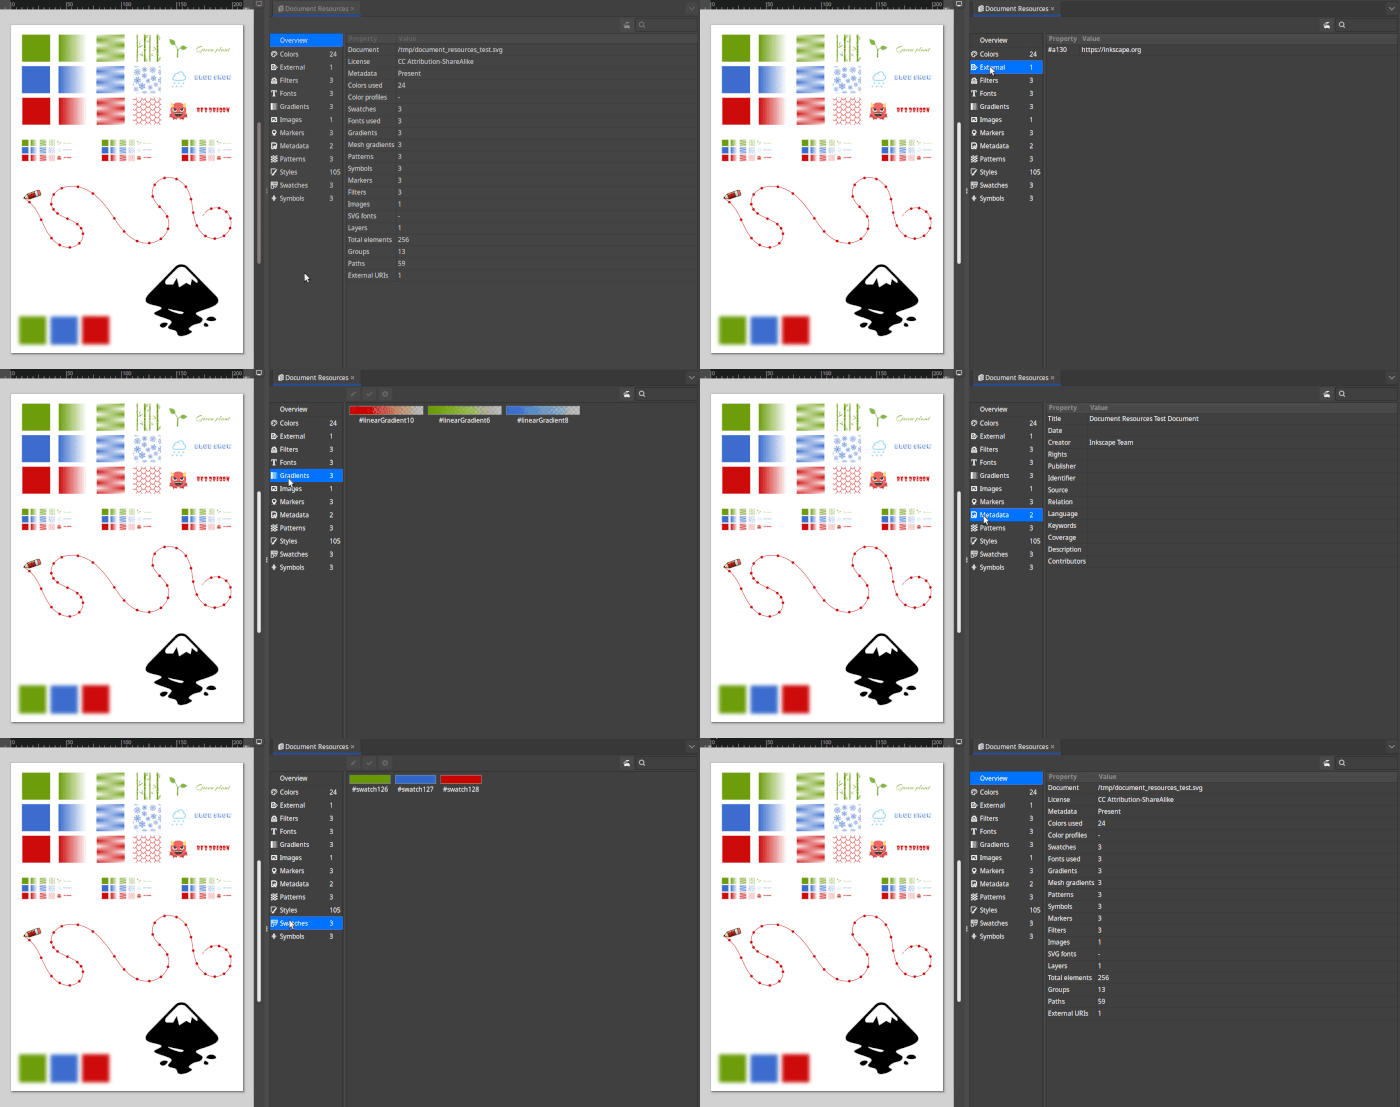
Document Resources Dialog
This new dialog shows an overview of the assets currently used inside your document. Names can be edited here, and some of the resources can even be exported from this dialog (MR #5003).
It presents the following document assets:
- fonts
- styles
- colors
- swatches
- gradients
- filters
- patterns
- symbols
- markers
- images
- external references
Export Dialog
- When the PDF file format is selected, you can now choose which pages to export into a single multipage PDF file, instead of only being able to export a single page to PDF from this dialog.
- Choosing the correct page to export has become much easier, as pages are now ordered correctly by their page number (MR #5002).
Fill and Stroke Dialog
Markers
Inkscape's markers now use more human-friendly (and better translatable) names.
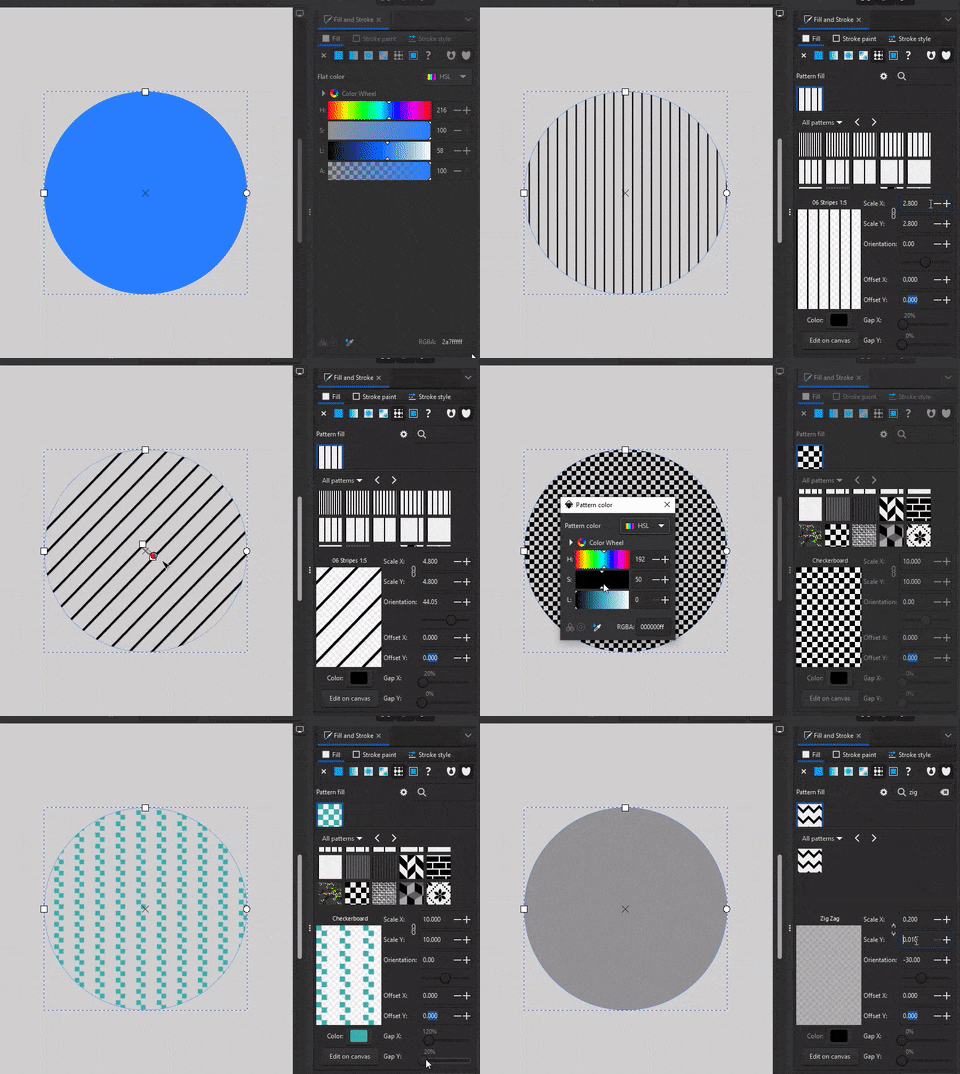
Pattern Editor
- When choosing to use a pattern for your object, you are now presented with a new subdialog that allows you to edit may pattern parameters numerically.
- You can preview patterns, change their name, size, rotation angle, offset, the size of gaps between the pattern tiles, and even pattern colors for many of the stock patterns.
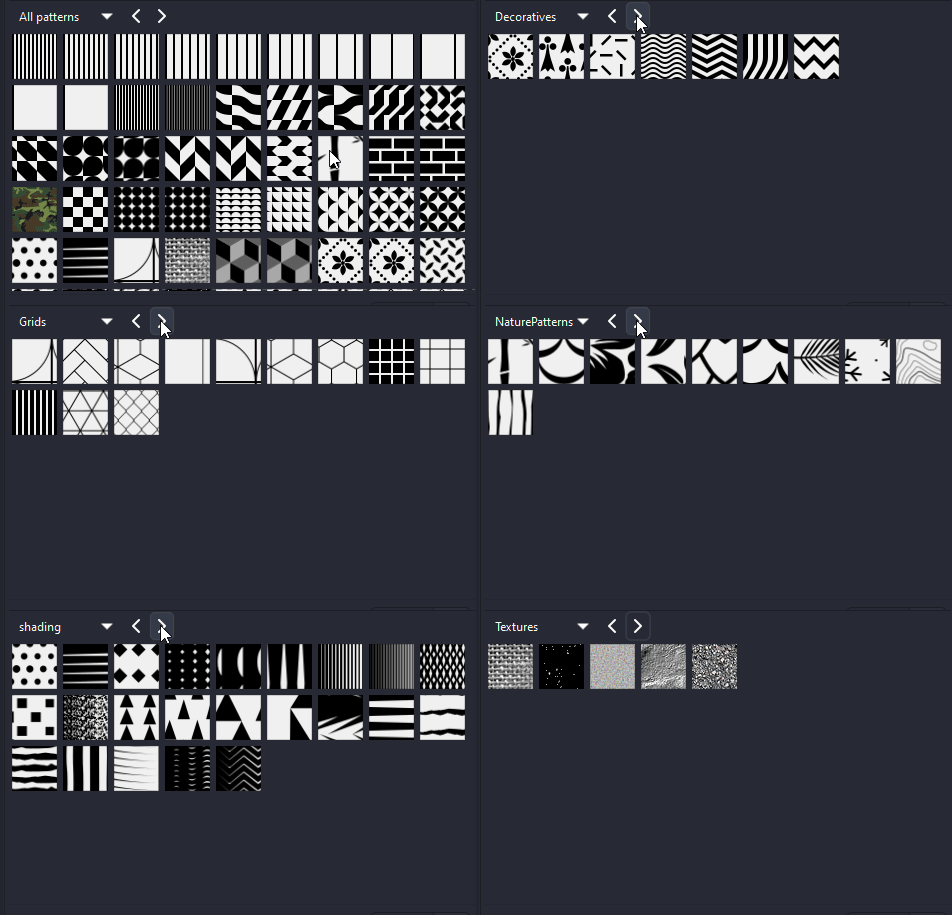
- Patterns are now grouped by category, which are represented by separate files in the
paint/directory in the Inkscape installation (and in your personal preferences directory, too), so it's easier to be organized. - Since this categorization allows having many more patterns preinstalled without losing sight of what you're looking for, we also added a search function and a few new stock patterns (MR #4938).
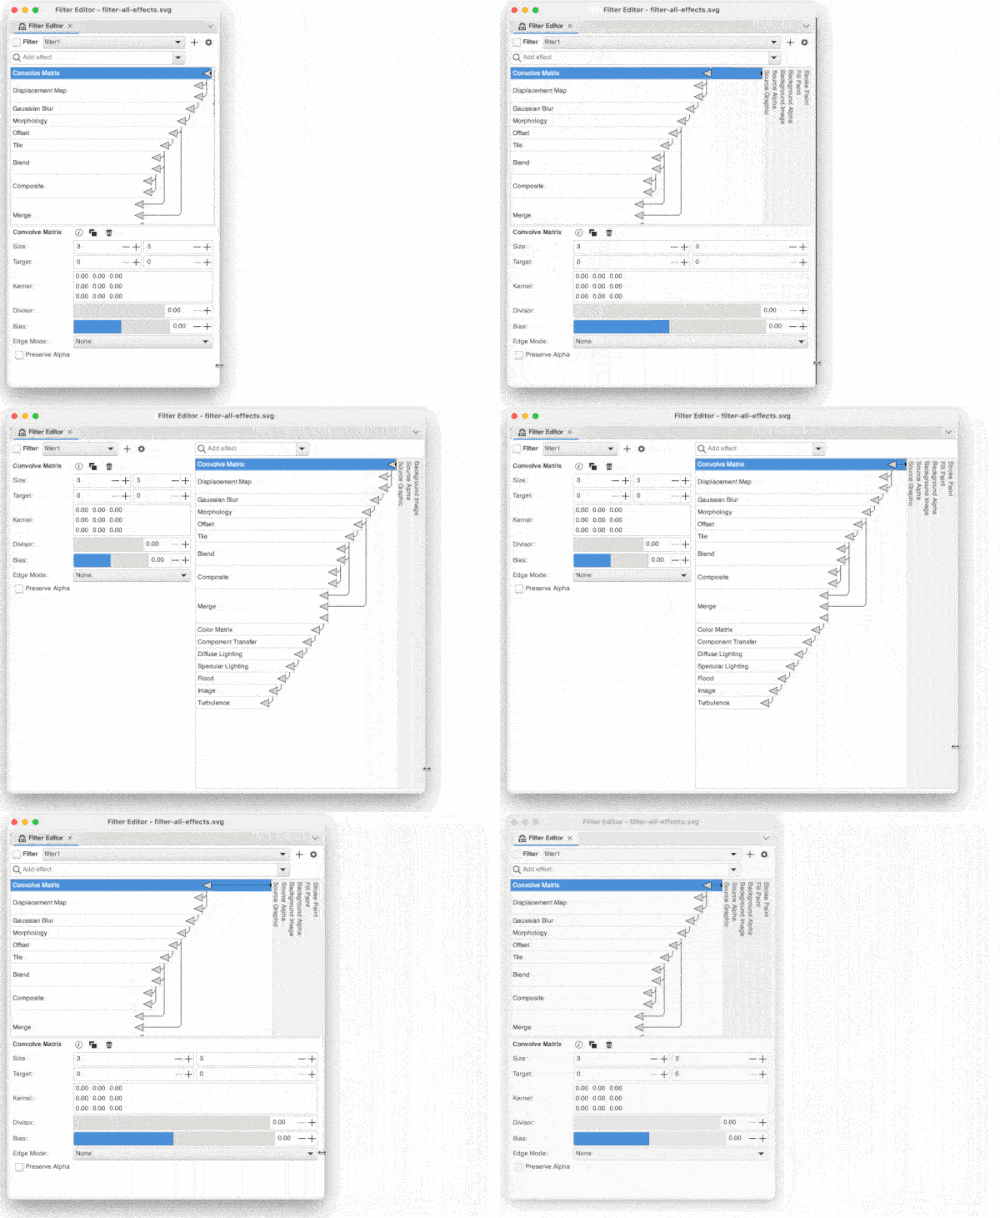
Filter Editor
The Filter Editor has been overhauled and is now easier to use! (MR #4720)
- Filter selection has been moved to a popover-type dialog.
- Effects are listed in a popup menu and can be selected by searching (by name).
- Connector sizes were adjusted to make them more compact.
- The minimum size of the parameters panel was adjusted to make it fit in a narrow docked dialog.
- The layout adjusts to accommodate a very wide dialog.
- Added primitive filter attributes to
fe-imageandfe-tile. - The GTK color picker has been replaced with Inkscape's own color picker.
- Sources can now be hidden (for most use cases only the source graphic is useful; other inputs are broken or need UX work).
Layers and Objects Dialog
Usability Improvements
- Click and drag eye or lock icon vertically to (un)lock/(un)hide all touched objects
- Selecting a group does not auto expand anymore.
- Selecting multiple objects and and changing visibility/lock status applies to all selected.
- The Search field is back! While it's a limited implementation - it does not auto-apply search and you need to search for more than 3 characters - it is still a very useful addition.
- We added a hover indicator for rows and layer colors.
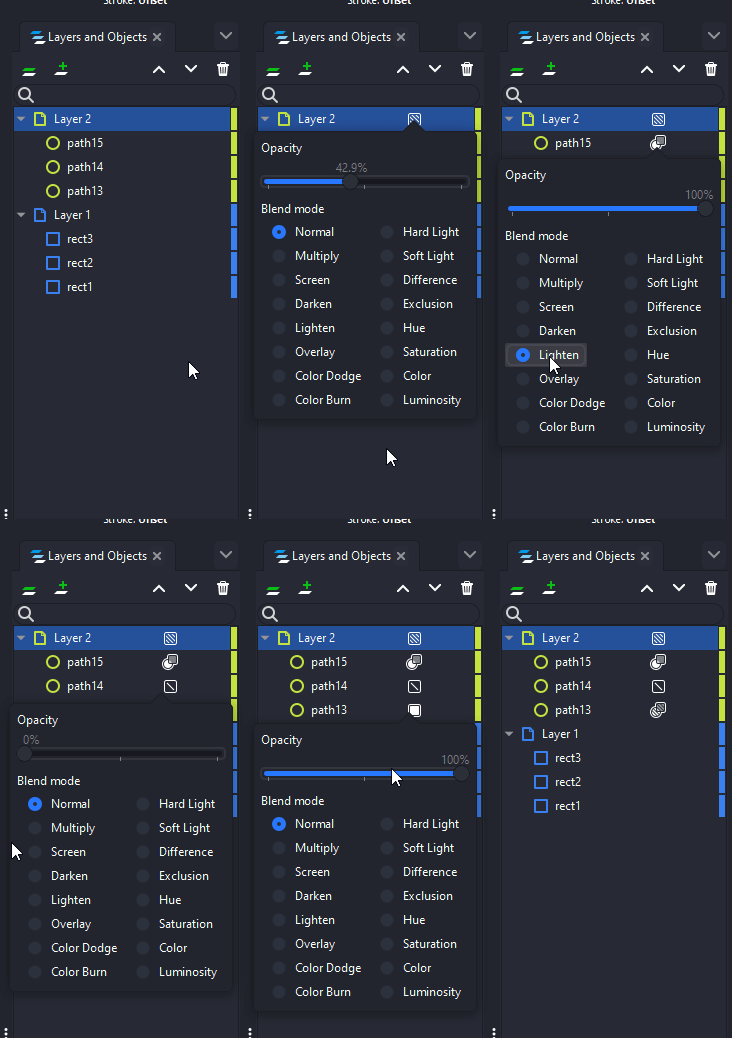
- Opacity and blend mode can be adjusted in the Layers dialog again! Clicking on the square-shaped icon (right before the eye icon) will open a popover dialog where you can adjust opacity with a slider and choose from the 16 different blend modes.
- Improved performance for editing of many objects at once.
Keyboard Shortcuts
- Use the arrow keys to navigate rows and columns
- Space bar confirms (select, apply, open)
- Shift+→ and Shift+← to expand/contract group or layer
- Shift+↑ and Shift+↓ to move in stacking order
[(https://gitlab.com/inkscape/inkscape/-/merge_requests/5183 MR #5183)]
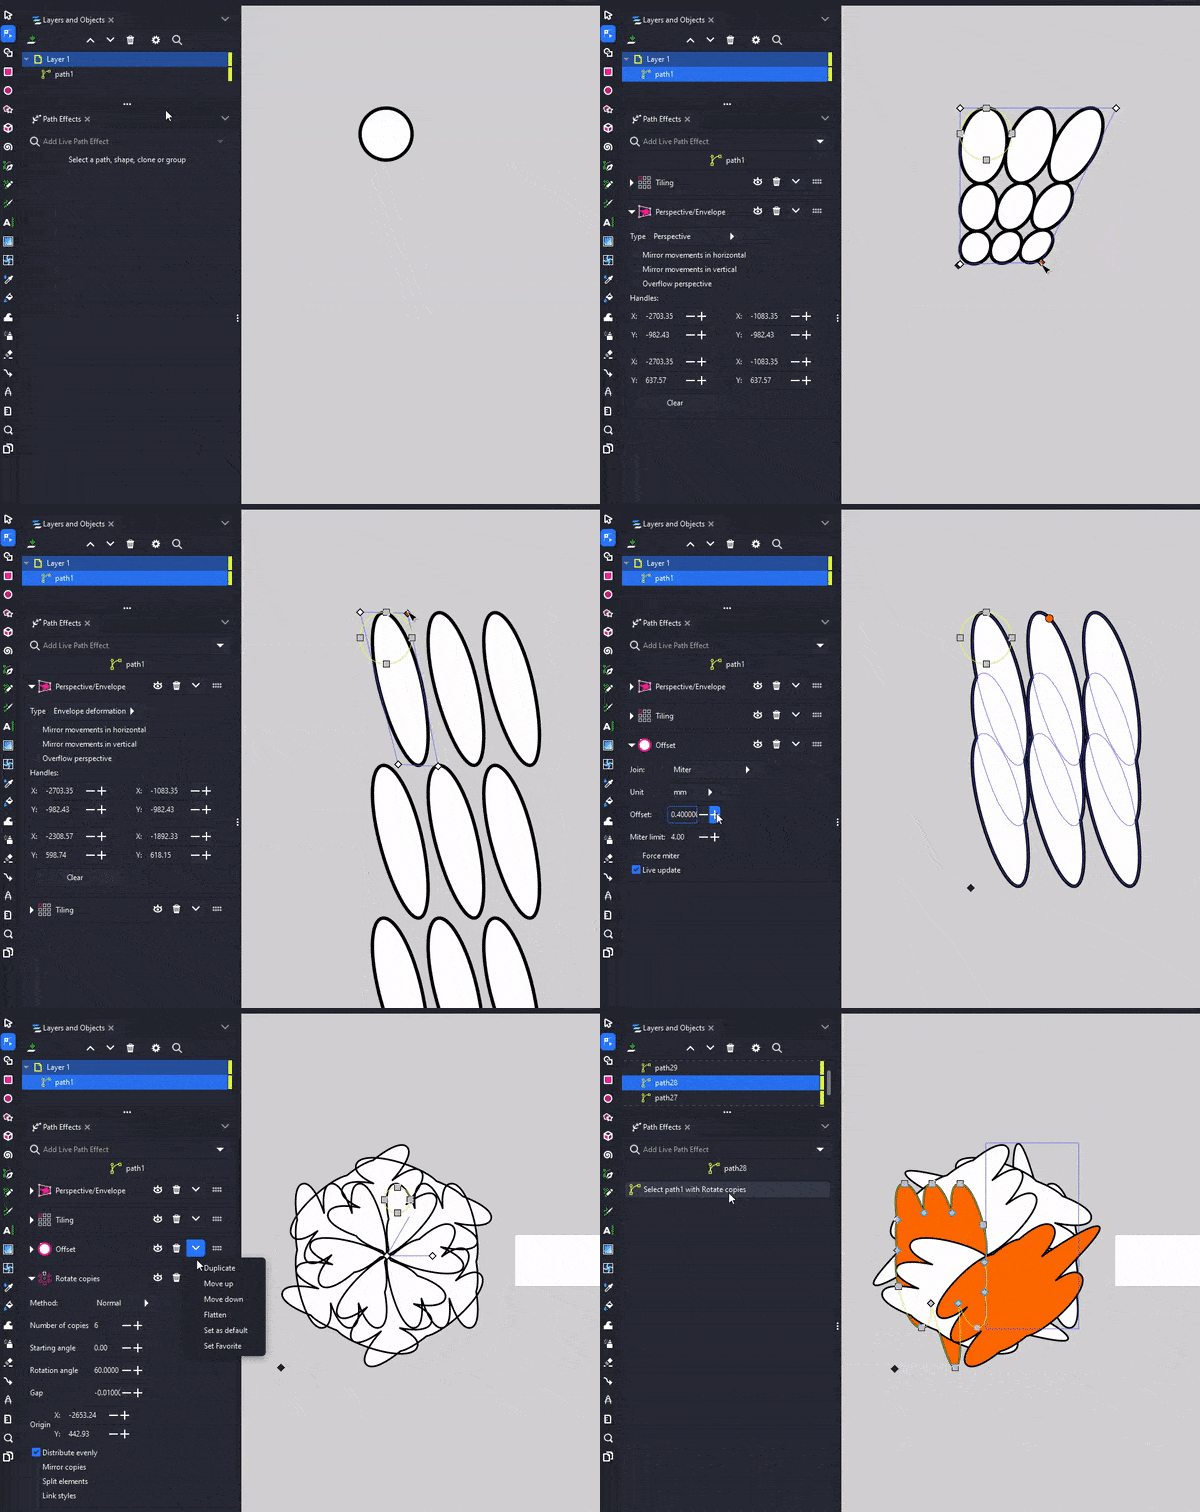
Live Path Effects Dialog
The compact new design merges the two steps of choosing an LPE and adjusting it into one single dialog ([ https://gitlab.com/inkscape/inkscape/-/merge_requests/4677 MR #4677]).
Choosing an LPE now works by either:
- starting to type its name into the search box and selecting a suggestion
- clicking on the arrow behind the search box to reveal a dropdown catalog of all available path effects
Since this design asked for a more compact way to show all LPEs, we decided on sorting the effects into these categories for the dropdown:
- Favorites (hidden if you don't have any yet)
- Edit/Tools
- Distort
- Generate
- Convert
- Experimental (hidden by default)
Each LPE features the following controls:
- on the left side of the icon: expand/contract LPE settings
- on the other side, after the label:
- Show/hide effect
- Delete effect
- Context menu
- Duplicate
- Move up/down
- Flatten: This will apply the effect stack, starting from the first up to the selected LPE, to the object's geometry (i.e. it will convert that part of the LPE stack to a path). Effects that come after the selected LPE will stay editable as LPEs.
- Set custom defaults: to set the current parameters as defaults for this path effect
- Set Favorite
- Drag and drop handles
- below this line, when expanded, the actual LPE parameters (different for each LPE)
Other changes:
- The LPE gallery overview has moved into an optional button, deactivated by default. It can be enabled in the preferences at
Preferences ➞ Behavior ➞ LPE). This adds a button on the right side of the search field. Clicking on it opens the old LPE chooser dialog, where you can read everything about the LPEs in a quick overview. - To see experimental LPEs you need to enable the option in the preferences at
Edit ➞ Preferences ➞ Behavior ➞ LPE. - An indicator now shows the id or label (if set) of the selected object.
- When a text object is selected, the dialog offers to convert the text to a path, or to a clone – since text does not support LPEs, a conversion is necessary.
- If you select an object that is associated with an LPE (Clone, Boolean operations, Bend, Fill between many, etc…) you will see a button in the dialog that will take you to the linked geometry/controls.
- Labels inside effects are aligned nicely.
Object Attributes Dialog
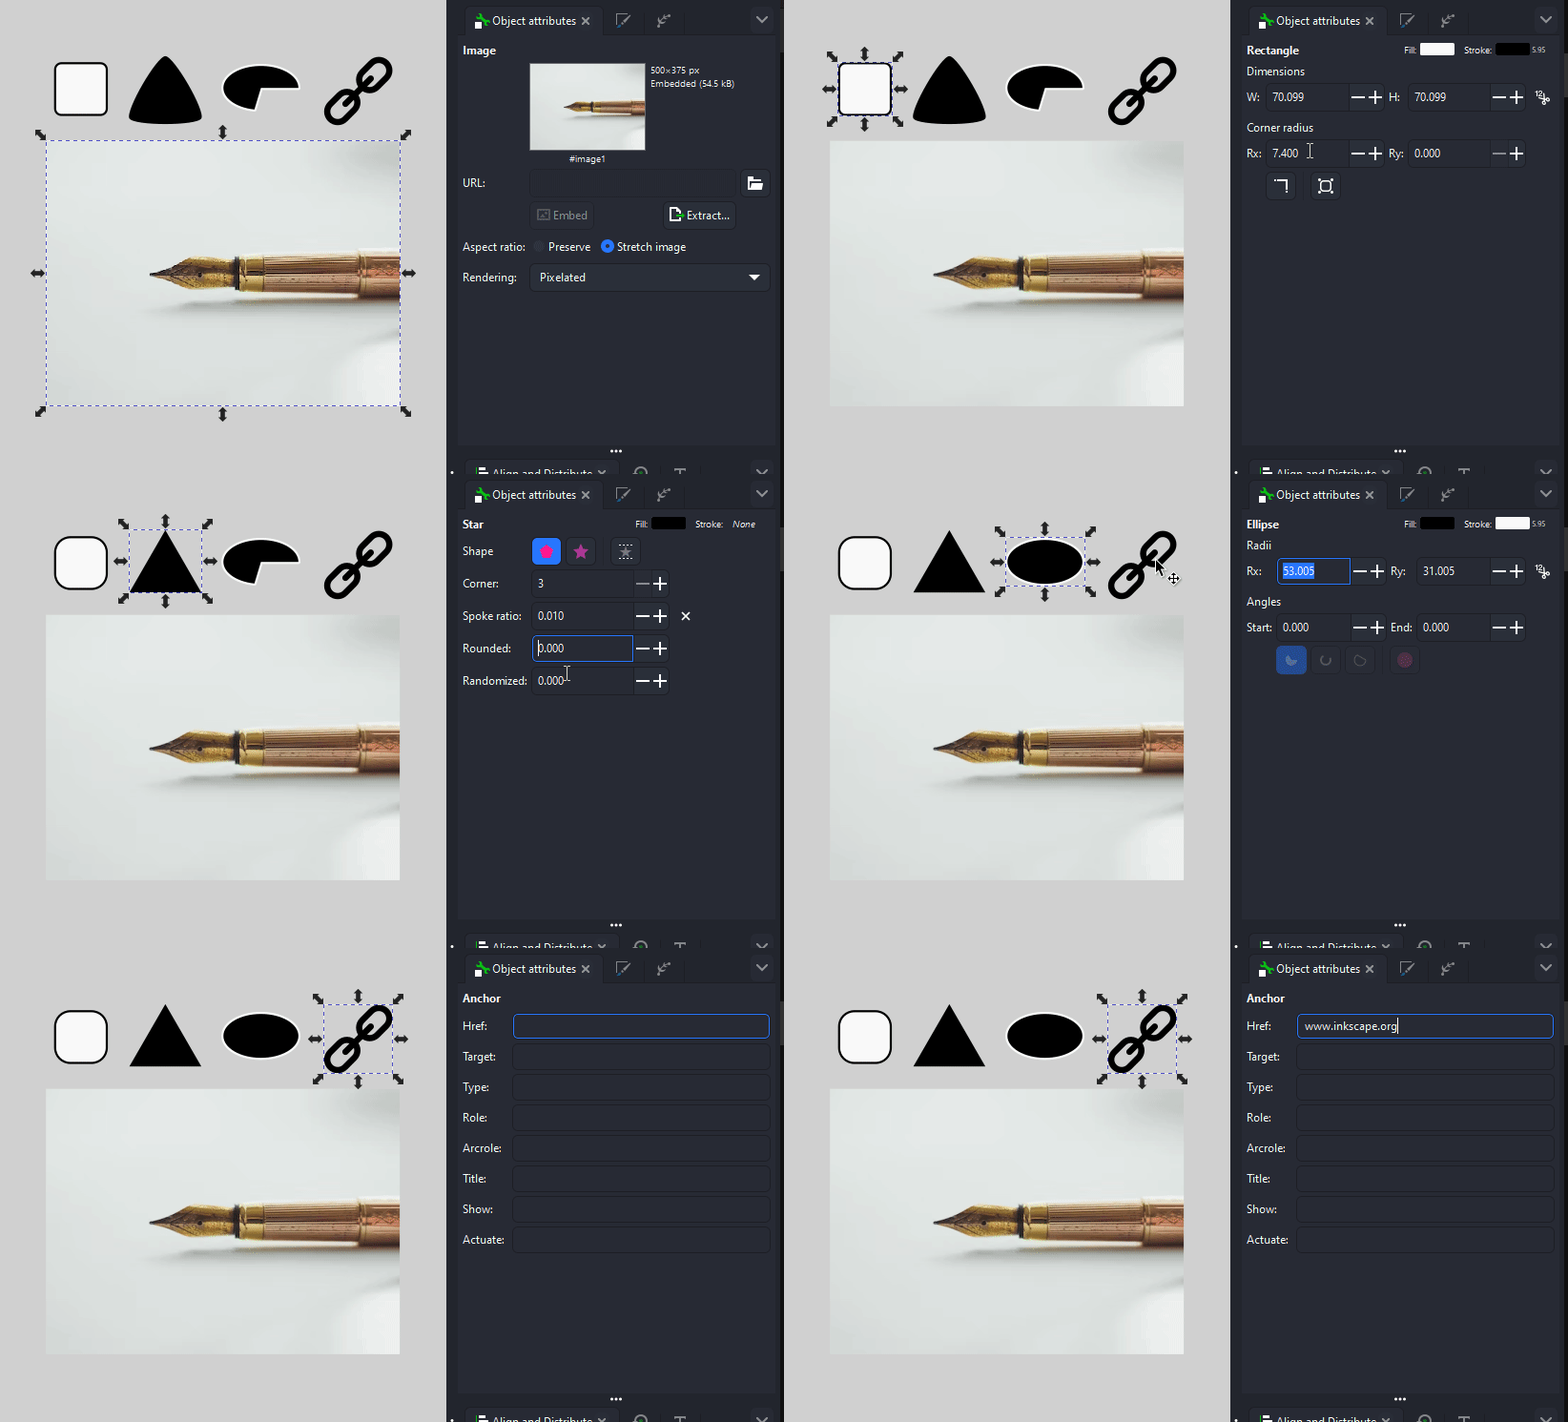
The dialog has been improved and now allows you to set contextual object-dependent attributes for the selected object. It currently supports image objects, shapes (rectangle, circle, polygon) and hyperlinks. For images, it is accessible as 'Image properties' from the context menu, for all objects, it is available from "Object attributes" from the dialog popup menu, and can also be opened by setting a keyboard shortcut for it in the preferences ([ https://gitlab.com/inkscape/inkscape/-/merge_requests/5064 MR #5064]).
In addition to the previously available set of options, the dialog now allows you to adjust/change the following:
- Images: replace existing image, embed a linked image in the document, or extract an embedded image, change aspect ratio and rendering properties.
- Shapes: edit procedural parameters of objects (width, height, radius), round some parameters to whole numbers, for rectangles: add Corners LPE to be able to adjust corner radius independently.
- Hyperlinks: set url, and other metadata
It is still a work in progress, so consider this a preview for a new feature. You can also contribute new ideas to the dialog's development by helping our UX team and our development team.
Swatches Dialog
In the Swatches dialog, the option to display colors together with their names (from the .gpl palette file), in a vertical list, is back again.
Enable it by clicking on the Hamburger menu, choosing 'Configure' and selecting the option 'Show color labels' (MR #4957).
Symbols Dialog
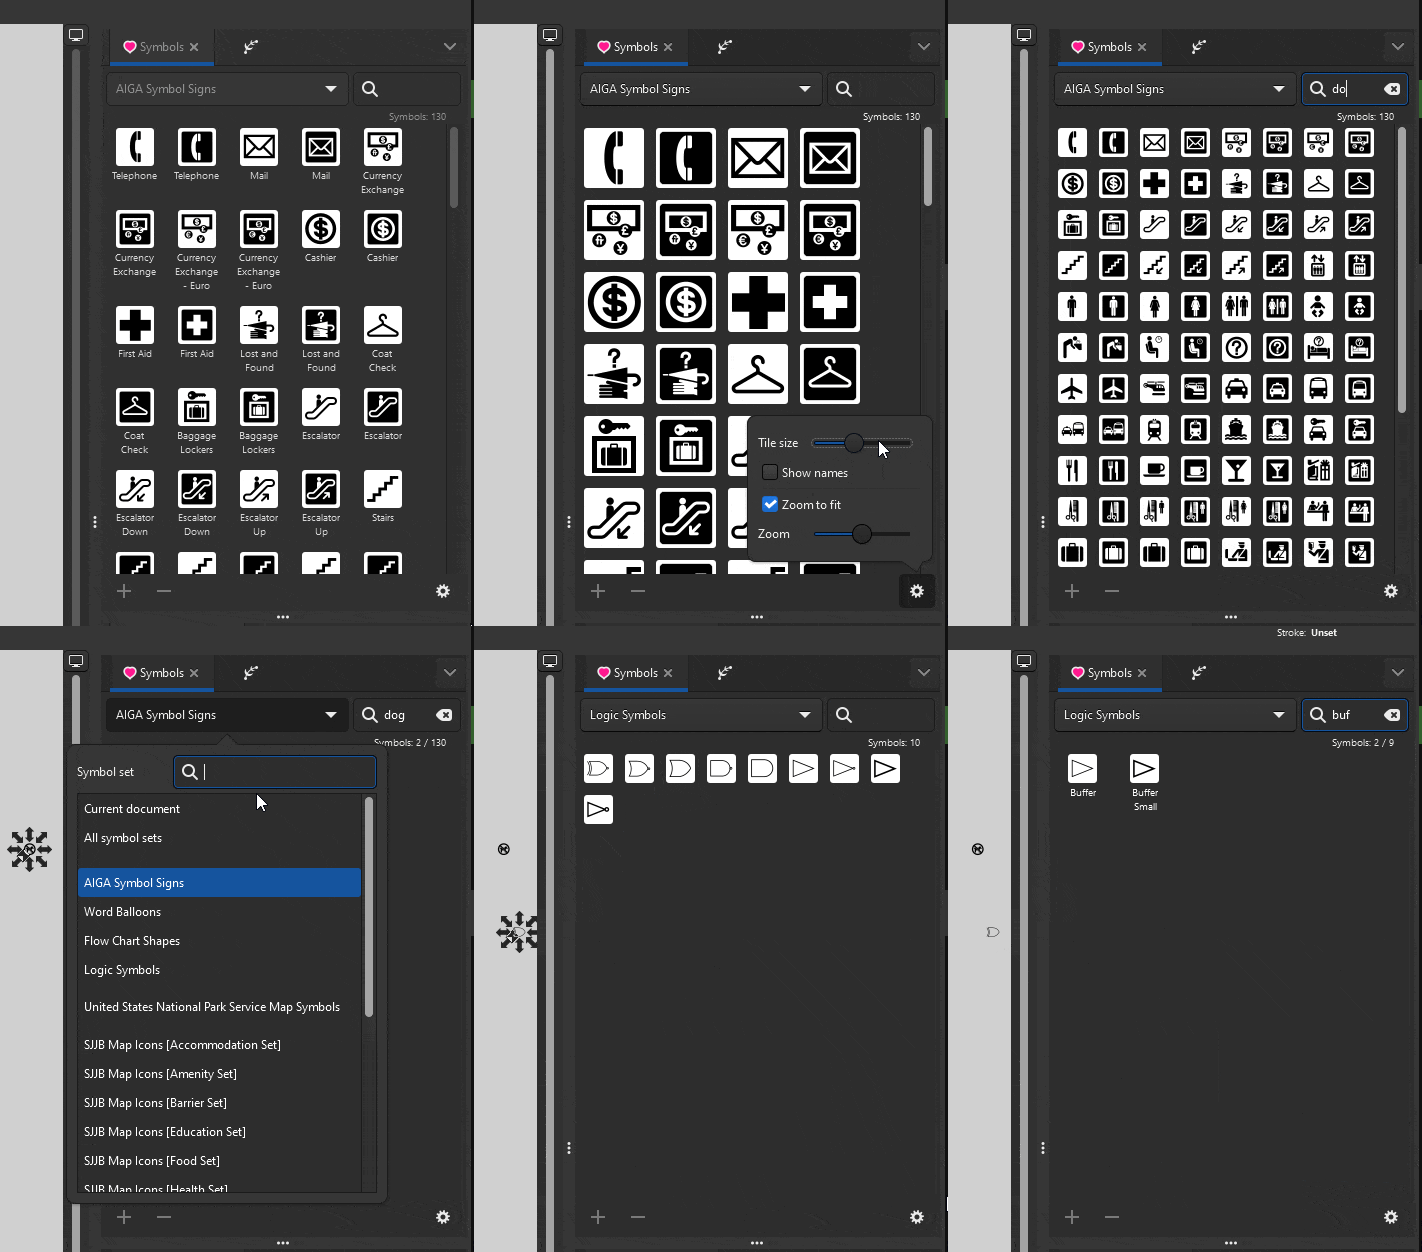
The Symbols dialog has been getting some design love and many improvements (MR #4975, MR #4994, MR #4666, MR #4883, MR #4793, MR #4784):
- its settings have moved to a popover dialog
- the currently selected symbol set and dialog settings are now saved, so when you close and reopen the dialog, you can continue right where you left it
- the maximum symbol preview size and zoom have been increased
- an option to show symbols' names was added
- symbols are now rendered at screen resolution and look sharp (high-dpi aware)
- to manage the growing number of symbol sets, their list is now searchable
- searching for symbols directly filters the symbol set (no need to press Enter anymore).
- performance improvement through rendering symbols on-demand, reducing memory usage and time needed to switch sets
- statistics indicator: lists the total number of symbols in the current set and how many of them are visible after filtering
- more precise positioning of symbols when adding them to the drawing by drag-and-drop
- the dialog is now symbolized by a different icon - the "heart" symbol
- the modern Visio formats
vssxandvsdxcan now be read by Inkscape. - 596 new symbols in 16 categories from the SJJB map icons set
Text and Font Dialog
Font Collections
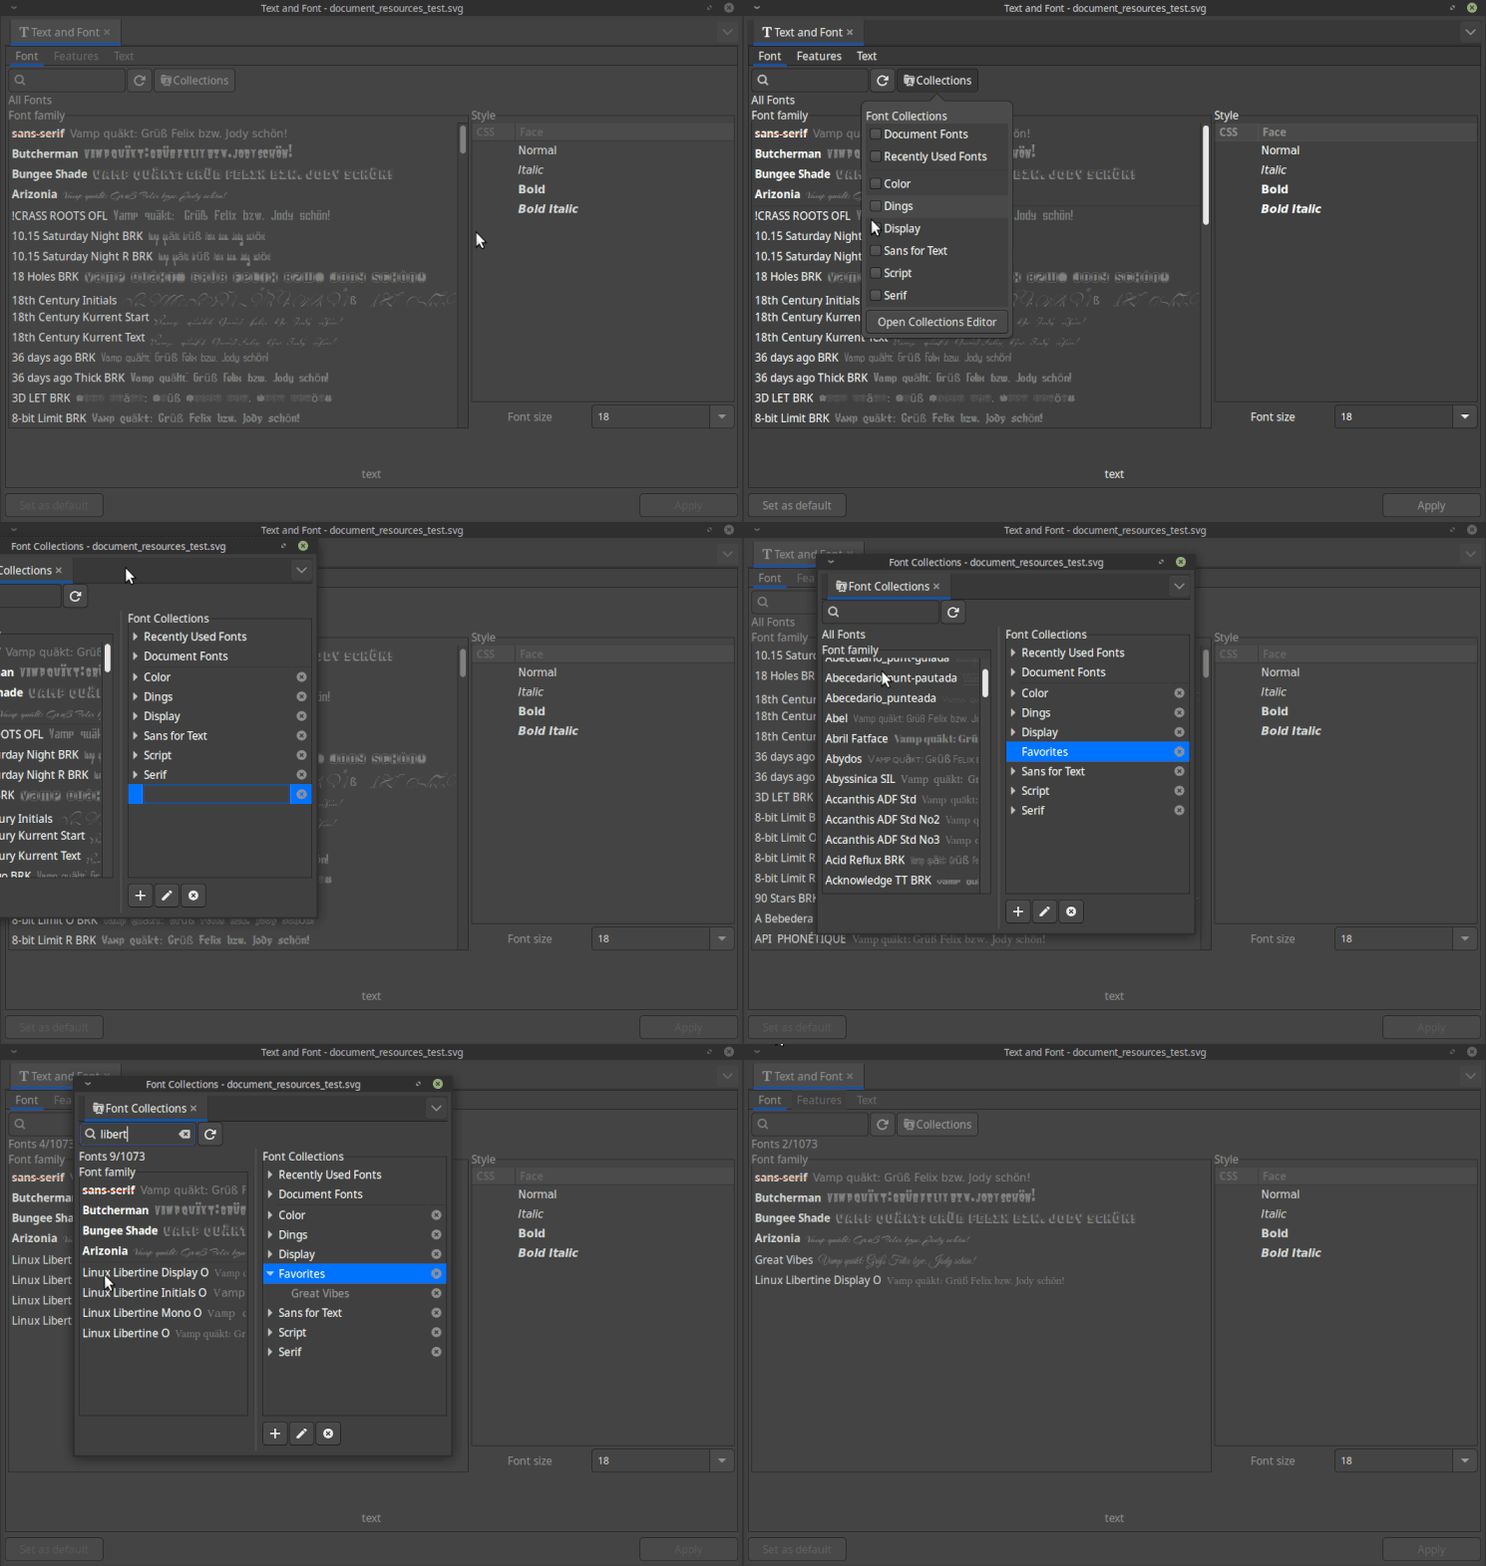
Fonts can now be organized by sorting them into Collections, for example to sort them by their properties (like handwriting, serif, sans serif, …) or by the type of document you want to use them for (e.g. poster, or for a specific customer), or maybe even just by how much you like them (e.g. to filter out fonts that you really dislike, or to gather those you like a lot) (MR #4694).
To create and fill a new Font Collection:
- Click on the
Font Collectionsicon in theText tool's tool controls bar or in theText and Font dialog. - In the popover dialog that will then open, choose to
Open Collections Editor. - In the
Font Collectionsdialog, you can now create a new Collection by clicking on the+icon. - Type the name of the new collection into the text field.
- Now start populating your new Font Collection by dragging a font (or many!) from the left side of the dialog into the collection.
- You can change the name of a collection by either double-clicking on it, or by using the 'Edit' icon.
- Use the 'trash' icon to remove a selected font or a complete font selection (in this case, Inkscape will ask for confirmation) from the list.
When you have created a few collections, you can use the list in the popover dialog in the Text tool's tool controls or in the 'Text and Font' dialog for filtering your fonts.
Trace Bitmap Dialog
- Tracing bitmap images is significantly faster now.
- In those cases where it still takes a bit because of the size or complexity of the trace, it now displays a progress bar
- If it is then still taking unexpectedly long, canceling the tracing process actually works now (MR #4702).
Welcome Dialog
- Files are now sorted by modification time, with the most recently modified at the top.
- When Inkscape crashes, it tries to save the file at its current state. These emergency saves are now listed in the Welcome dialog, so in the optimal case, you can quickly continue working after a crash without a long hunt for your files (MR #5058)
XML Editor
The XML editor received some small cosmetic changes:
- smaller icons (16×16px)
- added auto-responsive layout (default)
- moved layout controls to the top in a dropdown
Syntax Highlighting and Monospaced Font
For improving readability in the XML Editor dialog, syntax highlighting and automatical line-breaks were added.
- The highlighting theme can be selected in
Preferences ➞ Interface ➞ Theming. - You can choose to use a monospace font for the dialog's tree view, as well as select a font and its size, in that same Preferences section.
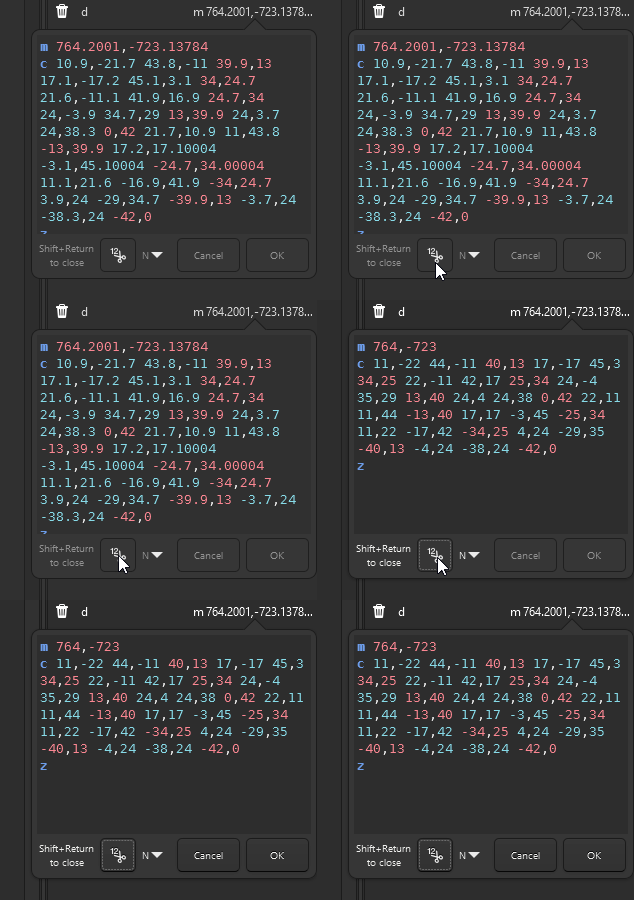
Rounding path data
When a path's d attribute is selected in the XML editor, the editing window now offers a set of two new buttons below the path data (MR #4885):
- a button labelled N.N(NNN) to select how many decimal points to keep after rounding.
- a button to apply the rounding to the currently selected path.
This gives you granular control over optimizing size of SVGs.
Live path effects
General
- The performance of most of the effects has been improved.
- Text objects can now be used as linked geometry (for Boolean operation, Bend, Pattern along path LPEs)
- Dialog redesign
Roughen LPE
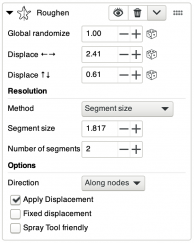
The user interface has been cleaned up, and the order of the parameters has been changed (MR #4872).
Taper Stroke LPE
The Taper Stroke LPE now supports paths with multiple sub-paths (MR #4906).
Power Stroke LPE
The Power Stroke LPE now supports paths with multiple sub-paths (MR #4880).
Corners (Fillet/Chamfer) LPE
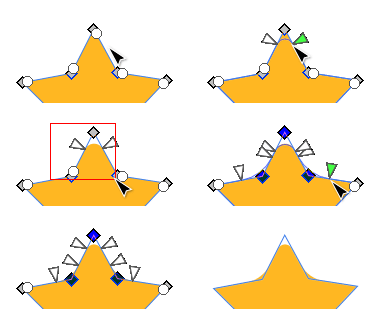
- The handles of the effect have been changed to little triangles, which allows you to position them more precisely (MR #5164).
- You can now assign a shortcut to the LPE to be able to quickly use it on any path without opening the
Path Effectsdialog.
Import / Export
PDF import
The PDF importer was using the svg group as a way of tracking the GfxState matrix, but this actually causes a lot of problems. Using the Sfx CTM matrix state directly provides dependable positions and transformations for creating objects.
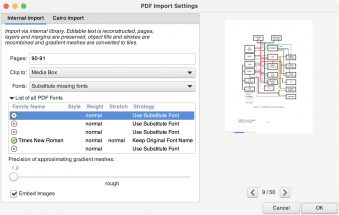
- New import PDF dialog GUI using glade
- Added PDF layer support
- Merging of similar path stroke/fill objects
- Removal of state groups
- Overview about what Inkscape will do with each font it finds in the PDF: convert to paths, keep original font name (even when not installed), use a substitute font, delete the text
- Rendering text methods, to glyphs and to text
- Embedded font handling for rendering methods
- Much better font-name detection
- ICC Color Profile support retains your CMYK colors in the PDF
- Margins, bleeds and page sizes retained.
https://gitlab.com/inkscape/inkscape/-/merge_requests/4757
Rewrite of XAML export
XAML export has been completely rewritten and now supports AvaloniaUI, export to DrawingGroup, conserving swatches for easy styling and exporting Layers to individual resources which allows to maintain an icon library in a single SVG file. For more info, check the extensions documentation. (MR extensions#498)
Improved HPGL import
HP-GL/2 import has been rewritten to support more complex HPGL files including fill and line style, non-linear draw commands, scaling and rotating of the document.
Templates
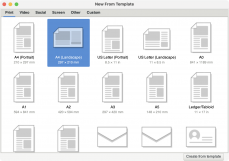
All template dialogs (Welcome screen, New from Template, Page tool default sizes) now use the same template sizes ([1] MR #479)
SVG Standards Compliance
Added support for href and xlink:href in SVG header. This makes Inkscape more compatible with SVG 2.
https://gitlab.com/inkscape/inkscape/-/merge_requests/4596
Customization / Theming
- Added
user.cssto UI folder to allow tweaking UI without interfering with or fully overriding other CSS files. https://gitlab.com/inkscape/inkscape/-/merge_requests/5004
Multiuser resource sharing
In Edit > Preferences > System, users can set a folder for shared default resources. It must be structured like a user's Inkscape preferences directory. This makes it possible to share a set of resources, such as extensions, fonts, icon sets, keyboard shortcuts, patterns/hatches, palettes, symbols, templates, themes and user interface definition files, between multiple users who have access to that folder (on the same computer or in the network). The option requires a restart of Inkscape to work when changed.
Rendering (advanced)
New options in Edit > Preferences > Rendering > Developer mode:
- option to update the dragged region as a single block has been added
- option for choosing the pixel streaming method
- option to define the size of a pre-rendered margin around the visible region
- option to set the minimum size of render tiles at the borders
- option to continuously adjust viewing parameters in an animation loop
Some other advanced options have been removed.
Other
- Fixed hidden icons on menus: https://gitlab.com/inkscape/inkscape/-/merge_requests/4686
- Fixed symbol selection color for dark themes
MacOS-specific Changes
Windows-specific Changes
Inkscape detects dark and light theme and matches color of the title bar.
https://gitlab.com/inkscape/inkscape/-/merge_requests/5144
Extensions
Features
General Extension Changes
- Various extension have been renamed or moved in the extensions menu so users can find them more easily (MR extensions!455, MR extensions!558, MR extensions!559, MR extensions!565, Issue ux#140).
- Inkscape will tell you when the extension is done with its work and Inkscape is loading the file.
- Speed up processing especially on complex documents: https://gitlab.com/inkscape/inkscape/-/merge_requests/4996
New Extensions
- Adds templates of pre-designed grids to be used with the shape builder tool. (MR extensions!552)
Particular extensions
- XAML export has been completely rewritten and now supports the open source toolkit AvaloniaUI (update to Avalonia 11.0 will follow in Inkscape 1.3.1), export to DrawingGroup, conserving swatches for easy styling and exporting Layers to individual resources which allows to maintain an icon library in a single SVG file. For more info, check the extensions documentation (MR extensions!498, various issues)
- HP-GL/2 import has been rewritten to support more complex HPGL files including fill and line, non-linear draw commands, scaling and rotating of the document (MR extensions!515, Issue extensions#501).
- The Print Win32 Vector extension has been updated to work with Inkscape >= 1.0 and 64bit Windows. (MR extensions!547, Issue extensions#417).
- The HPGL export extension (and the plotter extension which is based on it) now also export text elements (as paths) (MR extensions!497, Issue extensions#211).
- Added Serbo-Croatian-Bosnian Latin characters to Hershey Text stroke fonts (MR extensions!535).
- The DXF export extensions (R12 and R14) now also process non-paths by converting them to path beforehand. This includes text, flowed text and clones (MR extensions!567, Issue extensions#518).
Bugs fixed
Particular extensions
- Fix a bug where formulas generated with the pdflatex extensions were sometimes clipped vertically, and remove reference to (nonexistent) log files in case of a pdflatex compile error (MR extensions!512, Issue extensions#493, extensions#502, extension#507).
- Fix scale of rotated ellipses in DXF import: Projected drawings such as cylinders output from CAD can be accurately reflected (MR extensions!504, Issue extensions#504). Also, trailing newlines don't crash the extension anymore (MR extensions!519, Issue extensions#515).
- Allow Export of DXF files with Splines converted to Polylines (MR extensions!545, Issue extensions#540).
- Fix a regression (from 1.2.1) in DXF R14 export in which documents with "pt" or other unsupported units would crash the extension (MR extensions!566, Issue extensions#542).
- Fix a crash in the Synfig Export extension when the CSS Color 3 attribute
currentColoris used. CurrentColor is also correctly used in Gimp Palette export now (MR extensions!568, Issue extensions#516). - Improve the warning message for JPEG export (Commit).
- Make the clipart importer more robust against missing packages (Commit).
- Update the Extensions Manager and prevent spurious warnings from being shown (MR extensions!514).
All extensions
- Fixed an issue where calling Inkscape with a long
--actionsparameter resulted in a crash on Windows due to the command line length limit (MR extensions!484, Issue extensions#482). - Allow inkex to be imported when stdout is closed or atypical (MR extensions#362, Issue extensions#412).
- The
hrefattribute is now handled to fallback toxlink:href(MR extensions!542) as specified in the SVG2 specification. - All extension now have
python3set as default interpreter (MR extensions!521). is_visible()now correctly answer if element is visible in UserAgents (compliant with rendering in browser) (MR extensions!548)- Fix
get_path()on Use elements to include the referenced transform (MR extensions!549).
Extension Development
API Changes for Third-Party Extension Developers
- The format for template extensions has been updated to allow these extensions to appear in the welcome screen, New from template and Page toolbar (MR extensions!479, MR extensions!520).
- The Page API has been reworked to make adding or querying page information more inutitive. In particular,
add_pageonly needs to be called once (was twice) in a single-page (pre-1.2) document to add a second page. Theget_page_bboxfunction now supports multipage documents. (MR extensions!480, Issue extensions#479) - The Guides API has been rewritten to get and set guide properties in the post-1.0 coordinate system, as the current guide API is rather confusing in a multipage setting. For this,
Guide.pointhas been deprecated in favor ofGuide.position(new coordinate system) andGuide.raw_position(old coordinate system). Also,NamedView.new_guide,NamedView.new_unique_guideandGuide.move_tohave been deprecated in favor ofNamedView.new_guide,NamedView.add_unique_guideandGuide.set_position(Documentation, MR extensions!481). - If your export extension should automatically preprocess certains objects before all else (eg text to path or clone unlinking), consider using the new function
OutputExtension.preprocess(Documentation, MR extensions!497). - The
priorityattribute of import extensions is now respected when choosing the default importer to open a given file extension (MR !5201). - Improved handling of additional XML namespaces (MR extensions!516).
BaseElement.composed_transform(self, other)(Documentation) now respects theotherparameter (MR extensions!539).inkscape_command()now handles Inkscape actions since verbs don't exist anymore.
Extension Development Documentation
- Document how to translate third-party extensions (MR extensions!493, Issue extensions#305).
- Document the different extension types (MR extensions!536).
- Improve documentation for building the inkex documentation locally (MR extensions!529) and how to package inkex (MR extensions!532).
- Improve clarity, typos and formatting (MR extensions!482, MR extensions!488, MR extensions!490, MR extensions!526, MR extensions!530).
Under the hood
- Various changes to the CI pipeline: Make automated testing on Windows more robust (MR extensions!495, MR extensions!557), adding an archiving pipeline to allow easier swapping of the local extensions folder for user testing (MR extensions!501), simplify process for fork pipelines (MR extensions!517, MR extensions!546), black v23 update (MR extensions!522).
- A separate readme has been added that is shown on pypi (MR extensions!533).
- Improve testing mechanism for mock commands (MR extensions!512).
- Fully reflect the (existing) requirement for Python 3.7+. (MR extensions!500) and add CI for Python 3.11 (MR extensions!543), while dropping CI for Python 3.7 (MR extensions!553).
- Improve compatibility with Python 3.11 (MR extensions!551, Issues extensions#538, extensions#539).
- For packagers: A script to output all dependencies (and their versions), including in submodules, has been added (MR extensions!523). It is published via CI.
- Refactor
.inxfile schema validation (MR extensions!502). - A change in the underlying Docker image for the pipelines now automatically triggers all jobs based on it (MR extensions!555).
Command line
- new parameter
--actions-file. You specify a list like in--actionsbut in a file to allow bypassing Windows comandline length limit, and also to allow reuse of action lists. - new parameter
--active-window/-qthat runs all commands on the active window of an already-running instance of Inkscape. - new action 'rebase-file', which ... [no idea what this does]
- the node alignment command can now also make use of the last used alignment mode in the Align and Distribute dialog with the value 'pref'
Behind the curtains
Bugfixes
Hundreds of bugs were fixed for this release.
An incomplete list is available by filtering by milestone in our GitLab issue tracker. The full list of changes is available in the commit history.
Translations
The following UI translations received updates:
- Basque
- Brazilian Portuguese
- British English
- Croatian
- Czech
- French
- German
- Greek
- Hungarian
- Icelandic
- Indonesian
- Italian
- Japanese
- Polish
- Romanian
- Russian
- Simplified Chinese
- Slovenian
- Spanish
- Swedish
- Turkish
- Ukrainian
- Vietnamese
The following documentation translations received updates:
- German
- Hungarian
- Korean
- Spanish
Contributing to interface translations
Want to help with translations? Learn how to help!
Documentation
Updates
Documentation (tutorials, man page, keyboard shortcuts list) has been updated to reflect the changes in this version.
Contributing to documentation and documentation translation
Contributions to the documentation translations, as well as improvements to its contents, are welcome at the inkscape-docs repository.
Website
- We now have team blogs available on our website! Check out what the team is up to!
- The website design got a little makeover, for some more modern looks!
Important Inkscape Project Milestones
- We have hired our first external contractors, and more are to come – thanks to your donations!
- We had a Hackfest in Germany this year (Video|Photos)
- We have updated our Fiscal Sponsorship Agreement with the Software Freedom Conservancy
- We have conducted our About Screen Contest again
- We have held an election for the two empty seats on our leadership committee
- We have been accepted for Google Summer of Code again this year, with three participants (Vansh Uppal - Improving CSS Stylesheet Support, Sanidhya Singh – Customizable Appearance of Canvas Controls, Vaibhav Malik – GTK4 Migrations)
- Inkscape will be celebrating its 20th anniversary on November 6th, 2023
Important changes for packagers
Known issues
Other releases
- Inkscape 1.5 — development branch
- Inkscape 1.4 — current stable release branch (1.4.1, 1.4.2, 1.4.3, 1.4.4 next bugfix release)
- Inkscape 1.3 (1.3.1, 1.3.2)
- Inkscape 1.2 (1.2.1, 1.2.2)
- Inkscape 1.1 (1.1.1, 1.1.2)
- Inkscape 1.0 (1.0.1, 1.0.2)
- Inkscape 0.92 (0.92.1, 0.92.2, 0.92.3, 0.92.4, 0.92.5)
- Inkscape 0.91
- Inkscape 0.48 (0.48.1, 0.48.2, 0.48.3, 0.48.4, 0.48.5)
- Inkscape 0.47
- Inkscape 0.46
- Inkscape 0.45
- Inkscape 0.44
- Inkscape 0.43
- Inkscape 0.42
- Inkscape 0.41
- Inkscape 0.40
- Inkscape 0.39
- Inkscape 0.38
- Inkscape 0.37
- Inkscape 0.36
- Inkscape 0.35
