Difference between revisions of "User talk:Davidhewitt"
Davidhewitt (talk | contribs) |
Davidhewitt (talk | contribs) |
||
| Line 149: | Line 149: | ||
=== 3) '''Selecting and Resizing Contour Exclusion objects''' === | === 3) '''Selecting and Resizing Contour Exclusion objects (Externally)''' === | ||
These objects when clicked on with the normal select tool in inkscape (outside of its own edit mode) these objects have 2 seperate active regions... | These objects when clicked on with the normal select tool in inkscape (outside of its own edit mode) these objects have 2 seperate active regions... | ||
| Line 157: | Line 157: | ||
2) The Inner-most outline. | 2) The Inner-most outline. | ||
*Clicking on the object normally with the select tool and then resizing will resize it as normal | *Clicking on the object normally with the select tool and then resizing will resize it as normal. | ||
'''HOWEVER.''' | '''HOWEVER.''' | ||
*Clicking on the object in the middle will actually select the innermost outline...in the same way | *Clicking on the object in the middle will actually select the innermost outline...in the same way it would if this inner outline was a separate object. | ||
However this would not be the case.... | |||
Then re-sizing the whole object from this inner set of object handles would still re-size the whole object but in such a way that maintained the "thickness" of the "donut". | |||
[[Image:Ex_5.png]] | |||
=== 4) '''Tool Specific Resizing of "Contour Exclusion object"''' === | |||
This image shows how this these objects can be edited in its native environment. | |||
=== 4) '''Feather''' === | I.E. When the "Contour Exclusion Tool" is active with this object selected... | ||
Again There are two sets of object handles but in this case these resize each | |||
outline independantly. | |||
[[Image:Ex_6.png]] | |||
=== 5) '''Radial Limit''' === | |||
This tool designed to be used with "contour exclusion objects", allows the user to mask out any part of these objects radially. | |||
The user simply grabs the large "clock like" handle that appears when this tool is selected and drags this around to mask out an area of the "donut" shape produced whe a "contour excluded object" is created. | |||
This mask can be rotated around in a circle with-out effecting its "arc" thickness by using the little round handles midway down each "clock arm". | |||
Picture (3) in the diagram above shows how the '''"Auto Smooth Ends"''' function works. | |||
And picture (4)shows how an adjusted arc can be rotated to mask a different part of the shape | |||
[[Image:Ex_7b.png]] | |||
=== 6) '''Feather''' === | |||
Revision as of 09:22, 18 February 2009
Auto-Scroll whilst creating paths ...
- New type of auto scroll useful whilst creating paths/objects.
- Triggered when the mouse pointer gets with-in a set margin from the edge of the screen. (X pixels).
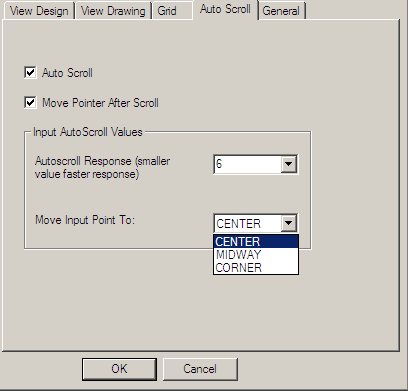 (Image is a dialogue from a program with a similar fuction)
Parameters ...
- 1) trigger margin...(ie the width of the virtual boarder (in pixels) around the edge of the screen that triggers the auto-scroll function.)
- 2) Pan Incrament... how far the screen moves in relation to the position of the mouse pointer...I.E pan to center on pointer, pan half way to pointer, or pan past the pointer etc....
- 3) weather to reposition the mouse pointer relative to the screen or to so maintain its position relative to the design....
(This option is to accommodate pen tablets that map the screen directly to the tablet itself)...
Anyway the effect of this autoscroll is that when the user gets to the edge of the screen, it is usually set to, automatically re-position the scren to center the area where you were when you hit the edge of the screen so you can continue your path....
It can be a little jarring for some people but you quickly get used to this... I would recommend that an additional option for this function would be a second margin should be able to be defined inside the active area that would be a warning margin..I.E that when you got say between 20-10 pixels from the edge of the screen a warning would happen by way of flashing the cursor once ETC.. and then when you got to with in say 10 pixels (the active area) the autoscroll (re-center) would be executed...
New Inkscape input tool...
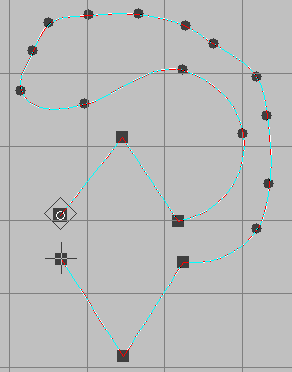
- A new input tool for inkscape, similar to xara,s "shape editor tool", the main input tool for xara extreme.
- Input is with "curve nodes" and "corner nodes"
 Input with both types of nodes would be exactly the same as if you were to
 laying down a bunch of corner nodes using the pen tool.
 However the "curve nodes" although created like corner nodes would be like
 corner nodes that had been converted to smooth nodes.
- This tool would have a 2Button mode where Left mouse would be for "curve points" and "Right mouse" for "corner points"
- Ideal host tool for Spiro: as it is not a Beizier input method.
- An alternative input tool more accurate than sketching with the pencil tool and twice as fast as the beizier tool.
- Very intuitive: Anyone can use it with virtually no learning curve...
- Excellent tool for tracing accurately if you work off raster art...
 (Allot of artists like to sketch on paper then scan it in and import the art
 and use this as the basis/framework for their vector design....)
 This tool is very good for this type of work....
Tool synthsis
This new input method would allow the user to incorporate sketch, beizier and Curve/corner input modes for different segments of the same path with out changing tools... And the way this would be executed could be tailored in options to suit the user.
Customization
- Totally configurable.
All the input options for this tool would available in options and could be configured individually in its options page...so that it could be taylored to a specific input device of to suit personal taste... For example:
 1) Curve node ------> [left mouse].
 2) corner node -----> [Hold Shift]+[Left Mouse]
 3) Sketch Segment --> [middle Mouse]-(Click & Drag to sketch)
 4) bezier segment --> [alt] - (active whilst held)
 5) finalize --------> [Right mouse] or [Enter]
 6) node reduce -----> [Hold Shift]-[mouse wheel]
OR you could configure any way you wanted I.E another example
 1) Curve node ------> [right mouse]
 2) corner node -----> [Left Mouse]
 3) Sketch Segment --> [Left Mouse]-[Hold shift]-(Click & Drag to sketch)
 4) bezier segment --> [alt] - (active whilst held)
 5) finalize --------> [Middle mouse]
 6) node reduce -----> [Middle mouse and hold down]-(move mouse to control)
ETC...
This would allow great flexibility to accommodate a wide range of input hardware and also personal preferences.
New Inkscape "Contour FX" Icon & tool bar...
General description/about this article...
- A new Tool bar icon for inkscape that brings up tools for various contour effects on the top info bar...
 This new icon would activate the active content bar and serve up all contour
 related functionality in one area up on the top tool space.
 This would house some existing inkscape contour functions, introduce new
 functionality and also be the future stage for future contour tools yet to be
 developed.
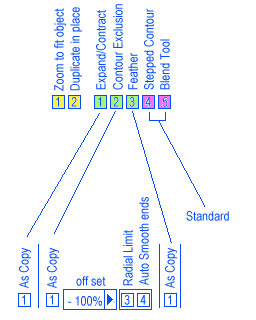
The top row of icons (colored) shows what functions would appear (If this proposal was fully realized) up on the top tool bar when this "Contour FX icon" was activated and the bottom row shows what additional tool options that would appear along with each contour function (colored button) when it was selected.
- This article does not deal with the "standard" contour and Blend tools (Shown in PINK)as they exist in "Xara Extreme" and "Corel Draw" ETC... As a peek at either one of these apps could give you more and better ideas RE: these functions than i could...(although space for these functions has been reserved: I.E. the two pink icons)
This article is related more specifically to: (the GREEN Buttons)
And also specifically to what additional on screen UI functionality would be introduced to properly operate each function. (More detail later).
These functions are:
1) Expand/Conract
This is an Expand or Contract function similar (in capability) to what already exists in inkscape via the "[Ctrl] [(]" & "[Ctrl] [)]" Functions...
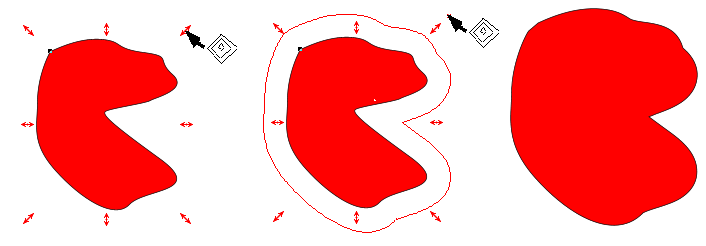
N.B. However a certain "bug" in the way this existing functionality currently works would have to be addressed (illustrated below):Notice how when a shape is reduced and then re-expanded that that calculations do not refer back to the original shape. The reason why this will need to be fixed will become apparent as this article progresses and more elaborate functionality is shown...
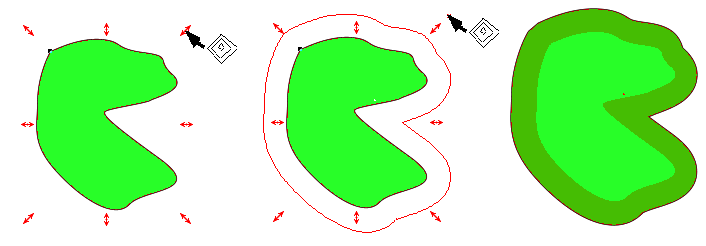
This Expand/Contact function would be simply achieved by clicking the appropriate button [Green 1] when an object was selected
This would activate the "Special" object handles which would be used to drag in or out to expand or contract the shape as shown... (In the same way that the xara contour tool is operated.) Objects could be expanded or contracted in the same way by click dragging any of these special object handles outward or inward respectively.
- This expand/contract function would have an "as copy" option...
 Checking this option (a tick box would be sufficient) would create a
 new copy of the source object (in the same position) with the transformation
 applied (when the mouse button was released).
 This copy would be placed on top of the source object for reduction...
 Or just underneath the source object for expansion actions.
This image shows how an expansion action with the "as copy" option creates another copy of the source object placed underneath the source (based on the expansion of the source object itself).
With this option the copy would be a "free agent" and would not be automatically grouped to the source object.
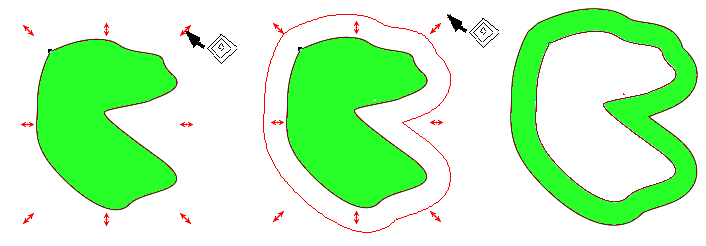
2) Contour Exclusion
- This is an exciting new tool for Inkscape!...
 This tool operates exactly like a normal expansion or contraction except that
 the Expansion/Contraction action produces a "donut" effect.
 (In the same way as if a new object had been created with the Expansion/Contraction
 and this was then combined with the source object with Exclude function.
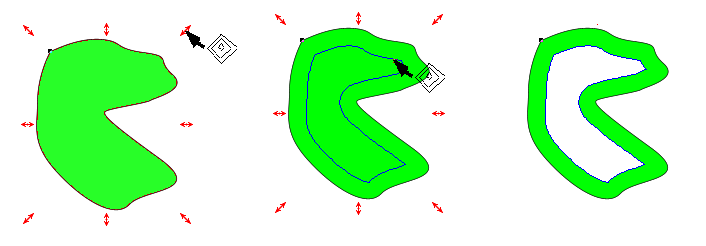
This next image shows the same object with a reduction action applied with this tool.
And a powerful option associated with this tool: "Radial Limit"
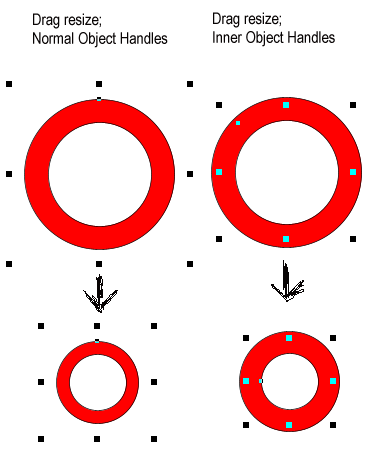
3) Selecting and Resizing Contour Exclusion objects (Externally)
These objects when clicked on with the normal select tool in inkscape (outside of its own edit mode) these objects have 2 seperate active regions...
1) The Outer-most outline. &
2) The Inner-most outline.
- Clicking on the object normally with the select tool and then resizing will resize it as normal.
HOWEVER.
- Clicking on the object in the middle will actually select the innermost outline...in the same way it would if this inner outline was a separate object.
However this would not be the case.... Then re-sizing the whole object from this inner set of object handles would still re-size the whole object but in such a way that maintained the "thickness" of the "donut".
4) Tool Specific Resizing of "Contour Exclusion object"
This image shows how this these objects can be edited in its native environment.
 I.E. When the "Contour Exclusion Tool" is active with this object selected...
 Again There are two sets of object handles but in this case these resize each
 outline independantly.
5) Radial Limit
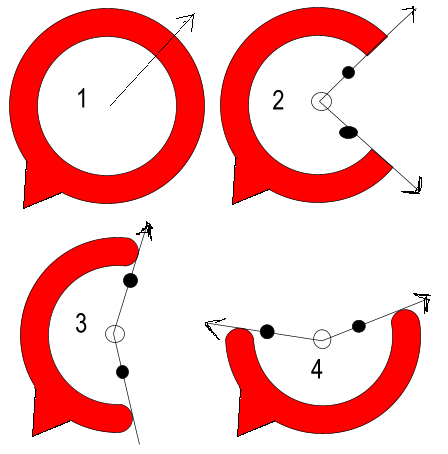
This tool designed to be used with "contour exclusion objects", allows the user to mask out any part of these objects radially.
The user simply grabs the large "clock like" handle that appears when this tool is selected and drags this around to mask out an area of the "donut" shape produced whe a "contour excluded object" is created.
This mask can be rotated around in a circle with-out effecting its "arc" thickness by using the little round handles midway down each "clock arm".
Picture (3) in the diagram above shows how the "Auto Smooth Ends" function works.
And picture (4)shows how an adjusted arc can be rotated to mask a different part of the shape
