Difference between revisions of "SpecSprayTool"
(more options dialogue) |
Romain2Boss (talk | contribs) m (Add category Proposals) |
||
| (8 intermediate revisions by 2 users not shown) | |||
| Line 1: | Line 1: | ||
'''NOTE: If you want to propose something, please put it on a separate section. It helps me keeping my part tidy.''' --[[User:Pajarico|Pajarico]] 05:26, 10 August 2008 (UTC) | |||
---- | |||
Launchpad Entry: | Launchpad Entry: | ||
https://blueprints.launchpad.net/inkscape/+spec/spray-tool | https://blueprints.launchpad.net/inkscape/+spec/spray-tool | ||
inkscape-devel thread: | |||
http://www.nabble.com/Spray-tool-discussion-td18860839.html | |||
== Summary == | == Summary == | ||
| Line 21: | Line 26: | ||
'''Other options...''' | '''Other options...''' | ||
[[Image: | [[Image:Spray-tool-ui02.png]] | ||
* '''Scaling:''' Define how object's scale should vary. | * '''Scaling:''' Define how object's scale should vary. | ||
| Line 29: | Line 34: | ||
The above settings variation are controlled by: | The above settings variation are controlled by: | ||
* '''Randomness:''' Define to which extent the attributes above should vary randomly. | * '''Randomness:''' Define to which extent the attributes above should vary randomly. | ||
* '''Limits:''' Min and max values for the variation. E.g.: | * '''Limits:''' Min and max values for the variation. E.g.: | ||
** For scaling: ''max: 110%, min: 80%'' | ** For scaling: ''max: 110%, min: 80%'' | ||
| Line 39: | Line 45: | ||
=== Usage === | === Usage === | ||
The radiuses on the first example show one of the possible ways to configure the spraying density: | |||
[[Image:Spray-tool-usage01.png]] | [[Image:Spray-tool-usage01.png]] | ||
However, a secondary system (which is more powerful) works like this. Note that this example correlates to the UI example proposed by Pajarico above. It uses a curve to adjust the density instead of two radiuses: | |||
[[Image:Spray-tool-cursor01.png]] | |||
[[Image:Spray-tool-cursor02.png]] | |||
This system allows: | |||
* Literally draw densities in a intuitive way. | |||
* Adjust a different density for each object, or share them via Presets. | |||
* Set density functions that has a hole in them or concentric rings. | |||
* Set degrees of density that you can't get with the 2-radiuses approach. | |||
---- | |||
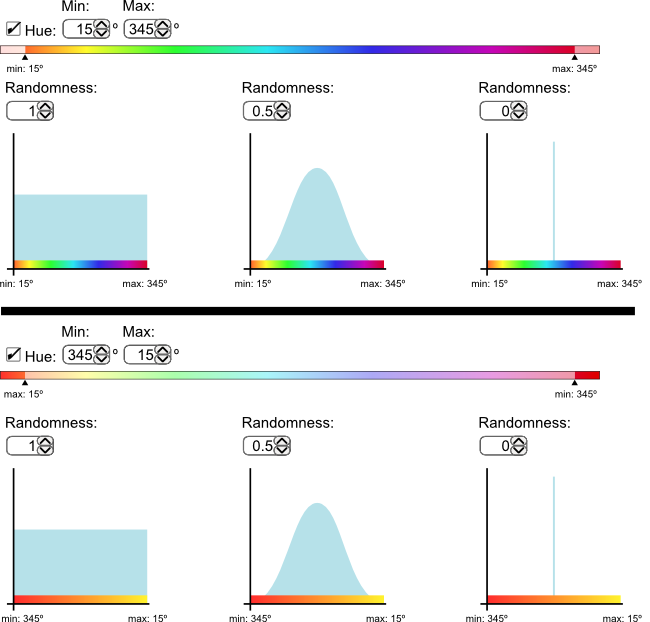
On the following mockup is shown how the limits and randomness work for Hue. Depending on the limits the user gets a different gamma of possible colors; and randomness controls the distribution of the Hue values inside those limits: | |||
[[Image:Spray-tool-attributes01.png]] | |||
Randomness=0 means "pick the middle value between limits". | |||
=== SVG representation === | === SVG representation === | ||
| Line 46: | Line 73: | ||
== Discussion == | == Discussion == | ||
[[Category:Proposals]] | |||
Latest revision as of 10:23, 31 March 2012
NOTE: If you want to propose something, please put it on a separate section. It helps me keeping my part tidy. --Pajarico 05:26, 10 August 2008 (UTC)
Launchpad Entry: https://blueprints.launchpad.net/inkscape/+spec/spray-tool
inkscape-devel thread: http://www.nabble.com/Spray-tool-discussion-td18860839.html
Summary
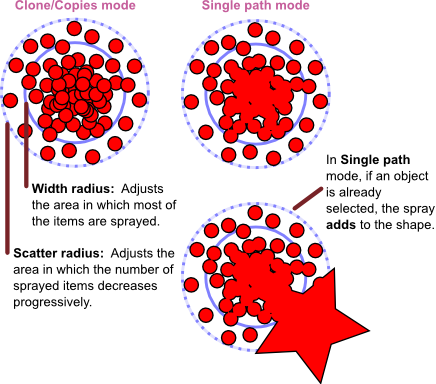
This tool allows "painting" of motifs on the canvas. When clicking and dragging, several copies are scattered following the drawn stroke. Controls to adjust scaling, rotation, color (HSLO) and the randomness (or limits) of each parameter should be made available. The radius of the tool controls the main active zone where the copies will be drawn. The described controls set how the copies vary. The result could be:
- Copies.
- Clones (shift+D would point the original).
- Everything is rendered to a single-path object. Having a selected object would ADD to it.
The motifs are taken from the clipboard but some default shapes could be provided (like a circle, a square, a snow flake...). Some of the UI elements keep similarities with the Tweak tool.
Release Note
Rationale
Design
UI
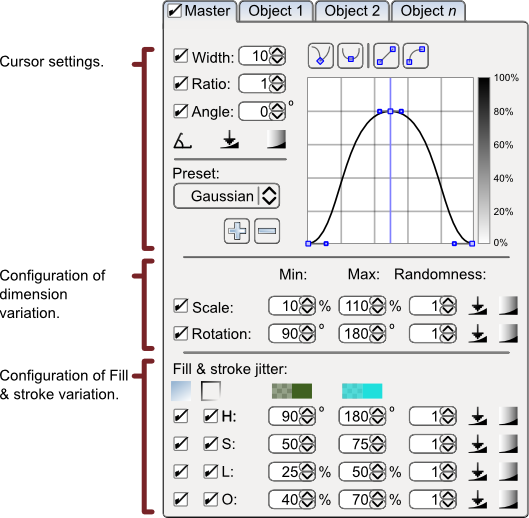
Other options...
- Scaling: Define how object's scale should vary.
- Rotation: Define how object's rotation should vary.
- Color: Define how object's color should vary. Settings for controlling HSLO.
The above settings variation are controlled by:
- Randomness: Define to which extent the attributes above should vary randomly.
- Limits: Min and max values for the variation. E.g.:
- For scaling: max: 110%, min: 80%
- For rotation: max: 180º, min: 30º (values between 0 and 360º)
- For color: Two user-selected colors are compared in HSL values, according to what is set on the HSLO buttons, the sprayed items color will be between their H, S, L and/or O attributes.
For example:
- Setting a non-zero value for randomness and limits max: 180º, min: 30º would rotate the objects randomly only between 30 and 180º.
- Use path: Use an already drawn path as a guide for spraying using current settings.
Usage
The radiuses on the first example show one of the possible ways to configure the spraying density:
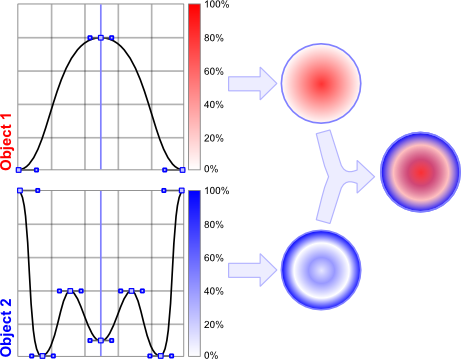
However, a secondary system (which is more powerful) works like this. Note that this example correlates to the UI example proposed by Pajarico above. It uses a curve to adjust the density instead of two radiuses:
This system allows:
- Literally draw densities in a intuitive way.
- Adjust a different density for each object, or share them via Presets.
- Set density functions that has a hole in them or concentric rings.
- Set degrees of density that you can't get with the 2-radiuses approach.
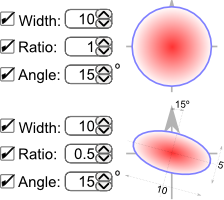
On the following mockup is shown how the limits and randomness work for Hue. Depending on the limits the user gets a different gamma of possible colors; and randomness controls the distribution of the Hue values inside those limits:
Randomness=0 means "pick the middle value between limits".

