Difference between revisions of "Tiling tool"
(category) |
(Another major overhaul) |
||
| Line 1: | Line 1: | ||
== Tiling tool == | == Tiling tool == | ||
The current tiling interface is hard to use. The current | The current tiling interface is hard to use. The current interface attempts to make the process more user friendly through the use of a tool that creates a "render frame", which consists of two parts: | ||
* A base tile, where the pattern is supposed to be | |||
* A more general render frame, showing the location of the output | |||
* Both can be edited on-canvas | |||
The tiling process is simply: | |||
# Create a frame | |||
# Select a pattern and a frame | |||
# Click "Render" from the tiling tool | |||
* By default the frame becomes invisible after a render, and becomes "implied" in the generated output (a bit like clipping?). | |||
* Undoing the render makes the frame appear again. | |||
* The user can choose to drop a copy of the frame after a render for re-use however, or make a copy before applying. | |||
{| class="wikitable" | {| class="wikitable" | ||
|+ | |+ | ||
| Line 12: | Line 25: | ||
| | | | ||
* This is for radial designs, and allows both angular clones and radial clones. | * This is for radial designs, and allows both angular clones and radial clones. | ||
* For angular clones, users can choose between simple rotation or symmetry + rotation. | * For angular clones, users can choose between simple rotation or symmetry + rotation. (thus covering the Rosetta patterns as well) | ||
* For radial clones, users can choose between same direction and alternating directions. | * For radial clones, users can choose between same direction and alternating directions. | ||
|- | |- | ||
| Line 21: | Line 34: | ||
|} | |} | ||
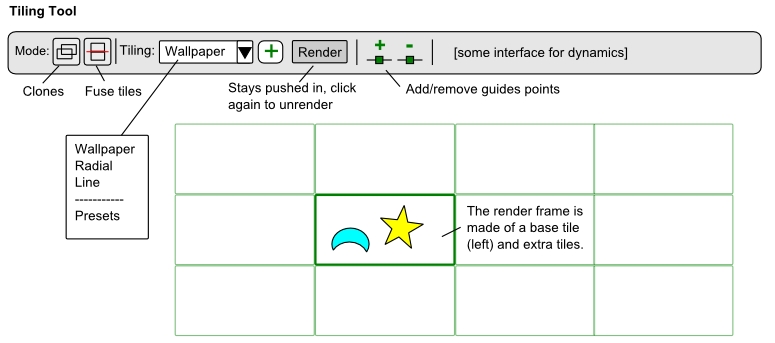
= | [[File:Tiling_Tool_Toolbar.png|UI Proposal for tiling tool]] | ||
<br clear="all"/> | |||
== Render modes == | |||
There are two modes: | |||
* Create clones: This is the current rendering mode | |||
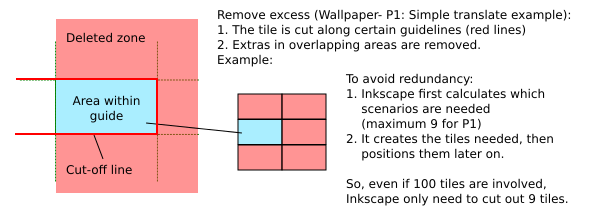
* Fuse: This mode first cuts excess for "inner" sides, then performs a "fuse" operation on the whole output. | |||
[[File:Tiling_cut_excess.png|Explanation of "Fuse" feature for tiling proposal]] | |||
<br clear="all"/> | |||
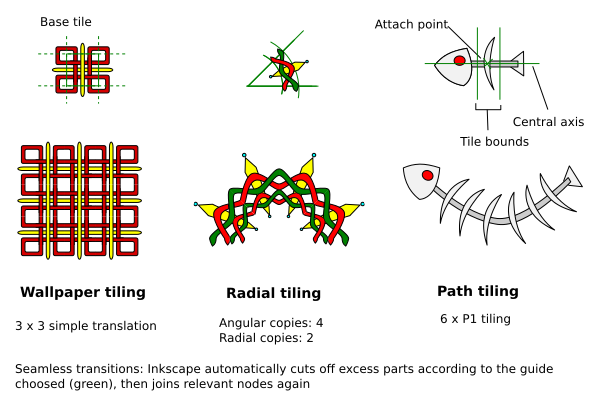
[[File: | [[File:Tiling_interface_examples.png|More examples of the possible outputs for the “Fuse Cut” mode]] | ||
<br clear="all"/> | <br clear="all"/> | ||
== Render frame == | |||
The render frame is made up of: | |||
* A central tile, which defines the location of the pattern to copy | |||
* A more general render grid | |||
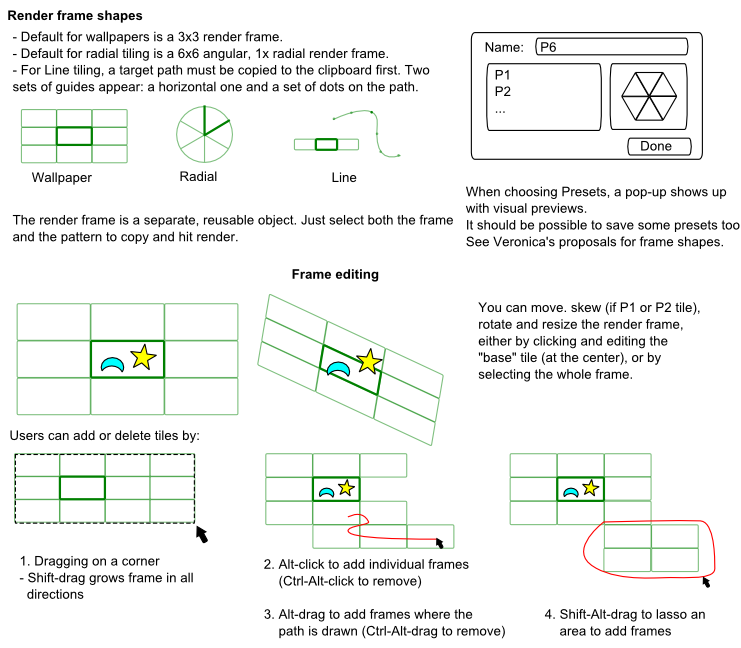
[[File:Tiling_Tool_Render_Frame.png|UI Proposal for the Render frame of the Tiling tool proposal]] | |||
[[File: | |||
<br clear="all"/> | <br clear="all"/> | ||
== | == On-canvas transformation handles == | ||
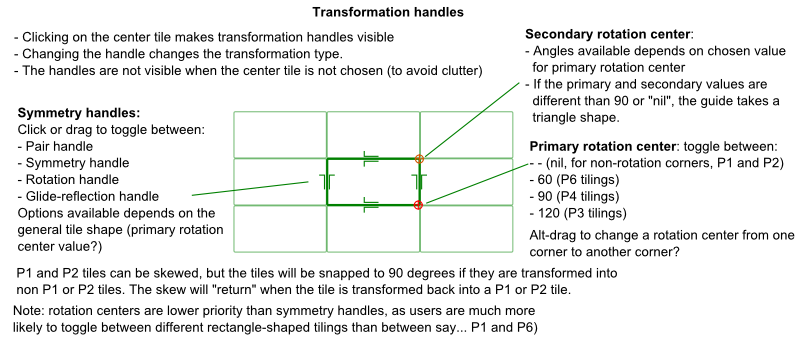
[[File: | [[File:Tiling_Tool_Transformation_Handles.png|UI proposal for on-canvas handles for the tiling tool proposal]] | ||
<br clear="all"/> | <br clear="all"/> | ||
== Guide points and other guides == | |||
[[File:Tiling_Tool_Guides.png|UI proposal for guide points feature for Tiling Tool]] | |||
[[File: | |||
<br clear="all"/> | <br clear="all"/> | ||
Guide points are there to serve as reference point when creating tile designs. | |||
* When you add a guide point, "counterparts" are generated in all the other tiles | |||
* Ctrl-drag to drag out a segment. | |||
* The idea is that users can snap guide points along tile edges, snap a node of the pattern to that guide and snap the node handle to the end of the guide segment, then repeat with the guide point's counterparts. This should help easily create seamless transitions. | |||
[[File: | == Render frame == | ||
<br clear="all"/> | [[File:Tiling_Tool_Render_Frame.png|Render frame feature for the tiling tool proposal]] <br clear="all"/> | ||
A render frame is a tiling outline allowing the user to manually choose which frames to render. This is made up of a "central" tile and additional tiles (so when dynamics are applied, they start with the central tile). By default the frame is rendered over the original tile, but is a separate object that can be moved around, rotated and resized. | |||
== | == On-canvas dynamics editing == | ||
(in progress) | |||
== | == Radial tiling == | ||
(to-do) | |||
== Line tiling == | |||
== | |||
(to-do) | |||
== Tile stacking == | == Tile stacking == | ||
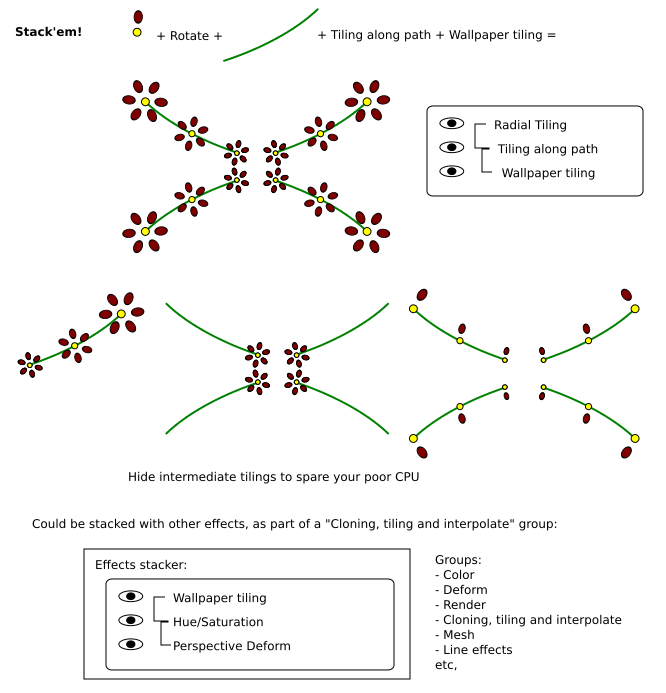
You can | You can stack different tilings! | ||
[[File:Tiling stacking.png|Explanation of tile stacking feature for my tiling proposal]] <br clear="all"/> | [[File:Tiling stacking.png|Explanation of tile stacking feature for my tiling proposal]] <br clear="all"/> | ||
| Line 168: | Line 106: | ||
== Implementation == | == Implementation == | ||
Proposed implementation steps: | |||
* | === 0. Very desirable: Guide management === | ||
* | |||
See blueprint. Rather, what is needed here is not a full guide management system, but rather how to "define" a guide, as the guides here have properties very different from "normal" objects. | |||
=== Core features === | |||
'''1. The glorified clone and distribute tool ''' | |||
[[File:Tiling Tool Step1.png|UI Proposal for first step of tiling tool implementation]] | |||
<br clear="all"/> | |||
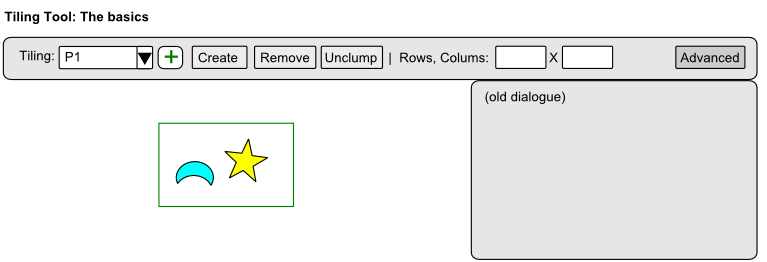
*This step is a mere front-end to the current interface. It allows you to place a single guide tile for a given wallpaper group. | |||
*Select that tile, select your pattern, input some tile values, and render. | |||
*To add dynamics, you have to open the old Tiling dialogue. | |||
What needs to be done: | |||
# The programer should guide tiles for all 17 wallpaper groups. Many can share tiles, so can be grouped into "Rectangle, P3, P4 etc." | |||
# The tiling interface is forced to take bound coordinates from this tile. | |||
# Preview in the dialogue: Veronica has already done previews. They need to be added for users to be informed about what is being used. | |||
If guide management isn't available yet, the interface could drop a normal object of the right shape. By default, Inkscape will then use the top object's bounds to render the tile. But honestly, let's have some proper guides, they'll be needed for the other features. | |||
Why it's an improvement over the past interface: | |||
* Better visibility. Many users likely don't know the tiling dialogue exists. | |||
* And they run away as soon as they do find it. I know I did. | |||
* Make a rectangle. Apply a P3 transformation. Any idea what happened? Me neither. At least with tiles, users will know what the heck is being transformed, so they can actually create proper patterns. | |||
* Also, users don't need to resort to the trick of grouping the pattern they want with a rectangle first, and deleting that rectangle afterwards. | |||
''' 2. The render frame - static ''' | |||
What needs to be done: | |||
# The user needs to be able to implement a grid object ("render frame") for all 17 wallpaper groups (again, many wallpaper groups use the same types of render frames) around the base tile object. | |||
# It should be possible to add to this grid just by dragging on the edges. Shift-drag to increase in all directions. | |||
#* Additional features: add/remove tiles by Alt-clicking individual frames, by Alt-dragging (touch-create) and by Ctrl-Alt-dragging (lasso around an area to create or remove)(hold down shift for the last two to remove instead). | |||
# Once this feature has been implemented, the "Rows, Columns" and "Width, Height" fields of the tiling dialogue can be removed completely. | |||
Once I.1. and I.2. are implemented, we'll have a decent tiling tool. I propose also re-arranging the dialogue to make it easier to use: | |||
* Symmetry and render buttons could potentially be moved from the dialogue to the tool. | |||
* Presets for dynamics | |||
* Dynamics get listed vertically, with checkboxes, so Inkscape can have default usable values that users can access by just checking the box. | |||
=== More advanced wallpaper tiling features === | |||
These can now be implemented separately. | |||
''' 1. Base tile handles ''' | |||
Handles are added to the base tiles, making it possible to switch from one tiling to another. | |||
# Changing symmetries should be the priority. | |||
# Eventually controls for angles could be added too, though this is lower priority, as not many users absolutely need to change from one tile shape to another. | |||
# Before, tiles and tiling type are treated separately, since the same rectangle tile for example can be used for several different type of transformations. Now that the tiling can be visualized and edited on-canvas, the tiling type should now be linked directly to the guide tile, so the tiling type drop-down can be removed. | |||
# Users are now offered to create a "Wallpaper" tile by default. Other transformation types are accessed via a pop-up when choosing "others." All previews are moved to this pop-up. | |||
Note: P1 tiles can be skewed, but certain handle transformations may snap it straight. | |||
''' II.2. Fuse mode ''' | |||
As noted, this is a cut + fuse operation. The programmer needs to implement the following features: | |||
# Boolean operation (specifically cut) on groups | |||
# This also means fixing the cut operation, which is currently rather buggy... | |||
# The guides must be extended, and for each wallpaper group, the ways to "cut" the tiles must be defined | |||
# The programmer must then find the way to define the zone to be delete | |||
# "Fuse" uses the existing group node join operation however | |||
** [https://bugs.launchpad.net/inkscape/+bug/166302 Bug #166302: Cut Path looses some segments ] | ** [https://bugs.launchpad.net/inkscape/+bug/166302 Bug #166302: Cut Path looses some segments ] | ||
** [https://bugs.launchpad.net/inkscape/+bug/171379 Bug #171379: Boolean Operations on Groups ] | ** [https://bugs.launchpad.net/inkscape/+bug/171379 Bug #171379: Boolean Operations on Groups ] | ||
** [https://bugs.launchpad.net/inkscape/+bug/701819 Bug #701819: Copy/Cut a Part of a Grouped Object ] (scenario of above) | ** [https://bugs.launchpad.net/inkscape/+bug/701819 Bug #701819: Copy/Cut a Part of a Grouped Object ] (scenario of above) | ||
** [https://bugs.launchpad.net/inkscape/+bug/408551 Bug #408551: Cut Path with a grouped object does nothing ] | ** [https://bugs.launchpad.net/inkscape/+bug/408551 Bug #408551: Cut Path with a grouped object does nothing ] | ||
''' 3. Guide points ''' | |||
Again, the tricky part is how to define guide points and implement them as a separate object (how does the code for object rotation centers work?). On the other hand, point object are useful for other tools and features (such as serving as guides for connectors, etc.) The programmer must: | |||
# Define/create guide points. This object can be snapped to objects and guides. | |||
# Program it so that iterations of it appear and are rendered correctly in each tile of the render frame according to the chosen transformation mode. If the transformation type is changed, they must also update automatically. | |||
# Additional feature: Ctrl-drag to create a segment from the point: this helps make transformations in each tile more obvious, and helps for handle-snapping. | |||
=== Super fancy wallpaper features === | |||
''' On-canvas dynamics editing ''' | |||
This may require reworking the dynamics mechanism. | |||
* Two tiles are chosen as reference frames, for row and column respectively. | |||
* Deformations are propagated live along the other types. | |||
* Colors can be added to the reference tile for HSL interpolation. | |||
The programmer must basically: | |||
# Change the static render frame into a dynamic one that updates dynamically by propating values across all tiles. Good luck. | |||
# The old dynamics dialogue can probably be replaced with a leaner interface restricted to row for one, and columns for the other. The core mechanism is still more or less the same. | |||
In-progress: mechanism for adding and previewing jitters? | |||
''' 2. Interpolation gradients? ''' | |||
This takes the previous a step further. You can now add multiple stops. The current internal mechanisms thus have to be reworked. | |||
=== Other tiling types === | |||
Two other desirable tilings are Radial and Line tiling. Implementation can probably start once the features in I. Core features are implemented. | |||
IV.1. Radial tiling | |||
IV.2. Line tiling | |||
[[Category:Proposals]] | [[Category:Proposals]] | ||
Revision as of 11:20, 31 March 2012
Tiling tool
The current tiling interface is hard to use. The current interface attempts to make the process more user friendly through the use of a tool that creates a "render frame", which consists of two parts:
- A base tile, where the pattern is supposed to be
- A more general render frame, showing the location of the output
- Both can be edited on-canvas
The tiling process is simply:
- Create a frame
- Select a pattern and a frame
- Click "Render" from the tiling tool
- By default the frame becomes invisible after a render, and becomes "implied" in the generated output (a bit like clipping?).
- Undoing the render makes the frame appear again.
- The user can choose to drop a copy of the frame after a render for re-use however, or make a copy before applying.
| Type | Description |
|---|---|
| Wallpaper tiling | Allows users to use the 17 wallpaper types. |
| Radial tiling |
|
| Path tiling |
|
Render modes
There are two modes:
- Create clones: This is the current rendering mode
- Fuse: This mode first cuts excess for "inner" sides, then performs a "fuse" operation on the whole output.
Render frame
The render frame is made up of:
- A central tile, which defines the location of the pattern to copy
- A more general render grid
On-canvas transformation handles
Guide points and other guides
Guide points are there to serve as reference point when creating tile designs.
- When you add a guide point, "counterparts" are generated in all the other tiles
- Ctrl-drag to drag out a segment.
- The idea is that users can snap guide points along tile edges, snap a node of the pattern to that guide and snap the node handle to the end of the guide segment, then repeat with the guide point's counterparts. This should help easily create seamless transitions.
Render frame
A render frame is a tiling outline allowing the user to manually choose which frames to render. This is made up of a "central" tile and additional tiles (so when dynamics are applied, they start with the central tile). By default the frame is rendered over the original tile, but is a separate object that can be moved around, rotated and resized.
On-canvas dynamics editing
(in progress)
Radial tiling
(to-do)
Line tiling
(to-do)
Tile stacking
You can stack different tilings!
Inkscape will likely have an Effects stacking mechanism in the future. Whatever it is, tiling would also fit right into it.
Line patterns
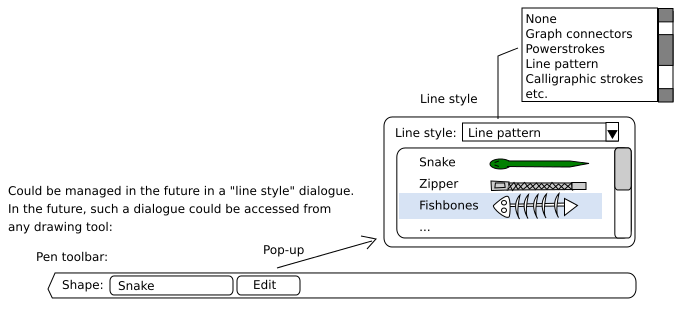
And why not "line patterns" while we're at it?
Implementation
Proposed implementation steps:
0. Very desirable: Guide management
See blueprint. Rather, what is needed here is not a full guide management system, but rather how to "define" a guide, as the guides here have properties very different from "normal" objects.
Core features
1. The glorified clone and distribute tool
- This step is a mere front-end to the current interface. It allows you to place a single guide tile for a given wallpaper group.
- Select that tile, select your pattern, input some tile values, and render.
- To add dynamics, you have to open the old Tiling dialogue.
What needs to be done:
- The programer should guide tiles for all 17 wallpaper groups. Many can share tiles, so can be grouped into "Rectangle, P3, P4 etc."
- The tiling interface is forced to take bound coordinates from this tile.
- Preview in the dialogue: Veronica has already done previews. They need to be added for users to be informed about what is being used.
If guide management isn't available yet, the interface could drop a normal object of the right shape. By default, Inkscape will then use the top object's bounds to render the tile. But honestly, let's have some proper guides, they'll be needed for the other features.
Why it's an improvement over the past interface:
- Better visibility. Many users likely don't know the tiling dialogue exists.
- And they run away as soon as they do find it. I know I did.
- Make a rectangle. Apply a P3 transformation. Any idea what happened? Me neither. At least with tiles, users will know what the heck is being transformed, so they can actually create proper patterns.
- Also, users don't need to resort to the trick of grouping the pattern they want with a rectangle first, and deleting that rectangle afterwards.
2. The render frame - static
What needs to be done:
- The user needs to be able to implement a grid object ("render frame") for all 17 wallpaper groups (again, many wallpaper groups use the same types of render frames) around the base tile object.
- It should be possible to add to this grid just by dragging on the edges. Shift-drag to increase in all directions.
- Additional features: add/remove tiles by Alt-clicking individual frames, by Alt-dragging (touch-create) and by Ctrl-Alt-dragging (lasso around an area to create or remove)(hold down shift for the last two to remove instead).
- Once this feature has been implemented, the "Rows, Columns" and "Width, Height" fields of the tiling dialogue can be removed completely.
Once I.1. and I.2. are implemented, we'll have a decent tiling tool. I propose also re-arranging the dialogue to make it easier to use:
- Symmetry and render buttons could potentially be moved from the dialogue to the tool.
- Presets for dynamics
- Dynamics get listed vertically, with checkboxes, so Inkscape can have default usable values that users can access by just checking the box.
More advanced wallpaper tiling features
These can now be implemented separately.
1. Base tile handles
Handles are added to the base tiles, making it possible to switch from one tiling to another.
- Changing symmetries should be the priority.
- Eventually controls for angles could be added too, though this is lower priority, as not many users absolutely need to change from one tile shape to another.
- Before, tiles and tiling type are treated separately, since the same rectangle tile for example can be used for several different type of transformations. Now that the tiling can be visualized and edited on-canvas, the tiling type should now be linked directly to the guide tile, so the tiling type drop-down can be removed.
- Users are now offered to create a "Wallpaper" tile by default. Other transformation types are accessed via a pop-up when choosing "others." All previews are moved to this pop-up.
Note: P1 tiles can be skewed, but certain handle transformations may snap it straight.
II.2. Fuse mode
As noted, this is a cut + fuse operation. The programmer needs to implement the following features:
- Boolean operation (specifically cut) on groups
- This also means fixing the cut operation, which is currently rather buggy...
- The guides must be extended, and for each wallpaper group, the ways to "cut" the tiles must be defined
- The programmer must then find the way to define the zone to be delete
- "Fuse" uses the existing group node join operation however
3. Guide points
Again, the tricky part is how to define guide points and implement them as a separate object (how does the code for object rotation centers work?). On the other hand, point object are useful for other tools and features (such as serving as guides for connectors, etc.) The programmer must:
- Define/create guide points. This object can be snapped to objects and guides.
- Program it so that iterations of it appear and are rendered correctly in each tile of the render frame according to the chosen transformation mode. If the transformation type is changed, they must also update automatically.
- Additional feature: Ctrl-drag to create a segment from the point: this helps make transformations in each tile more obvious, and helps for handle-snapping.
Super fancy wallpaper features
On-canvas dynamics editing
This may require reworking the dynamics mechanism.
- Two tiles are chosen as reference frames, for row and column respectively.
- Deformations are propagated live along the other types.
- Colors can be added to the reference tile for HSL interpolation.
The programmer must basically:
- Change the static render frame into a dynamic one that updates dynamically by propating values across all tiles. Good luck.
- The old dynamics dialogue can probably be replaced with a leaner interface restricted to row for one, and columns for the other. The core mechanism is still more or less the same.
In-progress: mechanism for adding and previewing jitters?
2. Interpolation gradients?
This takes the previous a step further. You can now add multiple stops. The current internal mechanisms thus have to be reworked.
Other tiling types
Two other desirable tilings are Radial and Line tiling. Implementation can probably start once the features in I. Core features are implemented. IV.1. Radial tiling
IV.2. Line tiling
