Difference between revisions of "CMake"
(→Using CMake with Ninja to build Inkscape: use documented order (altough it works the other way round, too)) |
(→Using CMake to run tests: packaged version of gtest should be preferred) |
||
| Line 93: | Line 93: | ||
== Using CMake to run tests == | == Using CMake to run tests == | ||
First, install Google Test framework by running download-gtest.sh in the main directory of inkscape source: | First, install Google Test framework: Preferably by getting the packaged version for your distribution, if that fails you can try to download a local copy by running download-gtest.sh in the main directory of inkscape source: | ||
<pre> | <pre> | ||
Revision as of 21:43, 21 March 2019
CMake will replace Autotools as our build system for Inkscape 0.92 onwards!
Cmake is a cross-platform build system know to work on all major platforms we support (*nix, Windows, OSX).
CMake is an extensible, open-source system that has many powerful features. Those features include:
- Supports complex, large build environments. CMake has been proven in several large projects (KDE, ParaView, SecondLife, Scribus)
- Generates native build files (e.g., makefiles on Unix; workspaces/projects on MS Visual C++). Therefore, standard tools can be used on any platform/compiler configuration.
- Powerful system introspection abilities including the ability to find installed include files, libraries and executables. Also the ability to test the compiler for supported features.
- Integrated testing system called CTest.
- Integrated packaging system called CPack.
- Easy integration with CDash and Dart dashboard servers.
- Powerful scripting language with simple syntax.
- Supports in-place and out-of-place builds. Multiple compilation trees are possible from a single source tree.
- Can be easily extended to add new features.
- CMake is open source, under a liberal BSD license.
- CMake operates with a cache designed to be interfaced with a graphical editor. The cache provides optional interaction to conditionally control the build process.
- Ability to create Mac OSX Frameworks and Application Bundles.
- Supports adding complex custom rules to the build.
How you can help
We have completed the building of the CMakeLists.txt for almost everything needed. We are now working on get the build to compile properly. See below Testing/Using to help.
There is a separate CMake Tasks page with things that are left to do w.r.t. cmake building of Inkscape.
SIMPLE CmakeLists.txt
   SET(libavoid_SRC
   connector.cpp
   geometry.cpp
   graph.cpp
   makepath.cpp
   polyutil.cpp
   region.cpp
   router.cpp
   shape.cpp
   static.cpp
   timer.cpp
   vertices.cpp
   visibility.cpp
   )
SIMPLE with single sub-directory Cmakelists.txt
   SET(libavoid_SRC
   connector.cpp
   geometry.cpp
   graph.cpp
   makepath.cpp
   polyutil.cpp
   region.cpp
   router.cpp
   shape.cpp
   static.cpp
   timer.cpp
   vertices.cpp
   visibility.cpp
   #Add our subdirectory sourcelist Var
   ${libavoid_parameter_SRC}
   )
   # this adds a single sub-directory
   ADD_SUBDIRECTORY(parameter)
Using CMake to build Inkscape
Experience with Scribus strongly suggests using an "out of source" build arrangement. E.g.
mkdir build
cd build
cmake /path/to/inkscape
make
make install      # only if you want to install the distribution
/path/to/inkscape is the root directory of your Inkscape checkout (or the folder to where you extracted the source when working with an official source tarball).
References:
Installing Scribus with Cmake
Installing with CMake on OSX
Using CMake with Ninja to build Inkscape
Another option for building with CMake is to use it in combination with Ninja which is a small build system with a focus on speed and replaces GNU Make.
Usage of Ninja will significantly speed up incremental rebuilds (i.e. if only few code files need to be re-compiled) as the build systems overhead is greatly reduced and scanning dependencies is almost instantaneous.
After following the instructions on the website to get Ninja the procedure is almost identical (only changes necessary highlighted in red):
mkdir build
cd build
cmake -G Ninja /path/to/inkscape
ninja
ninja install     # only if you want to install the distribution
Using CMake to run tests
First, install Google Test framework: Preferably by getting the packaged version for your distribution, if that fails you can try to download a local copy by running download-gtest.sh in the main directory of inkscape source:
cd /path/to/inkscape
bash download-gtest.sh
Then, toggle the CMake config var "WITH_GTEST" to ON, e.g. by editing CMakeCache.txt, or by passing "-DWITH_GTEST=ON" to cmake. Don't forget to re-run cmake after the configuration change:
cd /path/to/buildinkscape
# modify CMakeCache.txt
cmake ../inkscape
Finally, run "make check" from same directory to run the tests:
make check
Configuring your build further
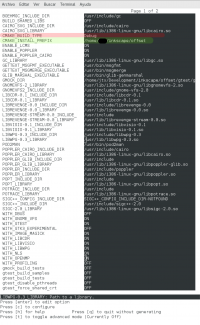
It is possible to change some more options of the build, e.g. whether to compile against GTK2 or GTK3 libraries. If you fiddle a lot with this, you may want to install the interactive cmake configuration tool "ccmake", like so:
sudo apt-get install cmake-curses-gui
ccmake ../inkscape  # In buildinkscape folder
The ccmake utility will have features to re-run cmake for you before exiting.
For example you can use CMAKE_INSTALL_PREFIX Path in which "make install" installs Inkscape and allow handle multiple Inkscape instalations.
Press enter on the line to edit.
Press again to save, when all your changes are done press c to configure, exit help and press g to generate.
After this you exit ccmake and can finish with make.
adding options to cmake
you can specify some variable on cmake invokation. i.e.
cmake .. -G "MinGW Makefiles" -DCMAKE_BUILD_TYPE=Debug
Useful CMake configuration variables include
- CMAKE_BUILD_TYPE: Either Release or Debug (a string).
- WITH_GTK3_EXPERIMENTAL: ON/OFF. Toggle between GTK2 or GTK3 ui toolkit.
- CMAKE_INSTALL_PREFIX: Path in which "make install" installs Inkscape.
