Difference between revisions of "Tiling tool"
m (Moved some things around) |
|||
| Line 20: | Line 20: | ||
* Users can choose from all 7 Frieze groups. | * Users can choose from all 7 Frieze groups. | ||
|} | |} | ||
== Terminology == | == Terminology == | ||
| Line 63: | Line 54: | ||
[[File:Tiling_Tool_Render_Mode.png|GUI proposal for the Render mode of the Tiling tool]] | [[File:Tiling_Tool_Render_Mode.png|GUI proposal for the Render mode of the Tiling tool]] | ||
<br clear="all"/> | <br clear="all"/> | ||
The tile creation process: | |||
# Create a base pattern. | |||
# From the tiling mode, add a “Tile.” | |||
#* Edit the tile as needed. Double-clicking a tile enters a tile edit mode. Double-click elsewhere to exit. | |||
#* Make additional changes to the base pattern as needed. | |||
# Select a base pattern and a tile. Switch to tiling tool again. | |||
#* Before selecting the base pattern and tile, copy a target to render over if needed. | |||
#* Choose tiling options. | |||
# Click render. | |||
== Tile edit mode == | == Tile edit mode == | ||
Revision as of 14:33, 27 March 2012
Tiling tool
The current tiling interface is hard to use. The current Tiling Tool proposal attempts to resolve part of that issue through the use of on-canvas guides called “Tiles.” This feature also expands the tiling to radial tiling and line tiling (currently known as Pattern Along Path).
| Type | Description |
|---|---|
| Wallpaper tiling | Allows users to use the 17 wallpaper types. |
| Radial tiling |
|
| Path tiling |
|
Terminology
- Tile: A tile is defined here a guide used to mark the boundaries of the base tiling, as well as define the tiling type. It defines the “unit” of the tiling. For example, it is a rectangle for a “P1: Simple translation” tiling. Tiles can be moved, rotated or scaled. In tile edit mode, the type of tile can be modified through the use of handles or from a drop-down list. When rendering a tiling, Inkscape automatically detects the type of tile being used to select the tiling type.
- Base pattern: Defined here as the pattern that needs to be repeated.
- Tiling tool: This tool. Used to render tilings.
- Render mode: The main mode of the tiling tool. From here you can create a new tile, and if you have a tile and based pattern selected, you can “render” the appropriate tiling.
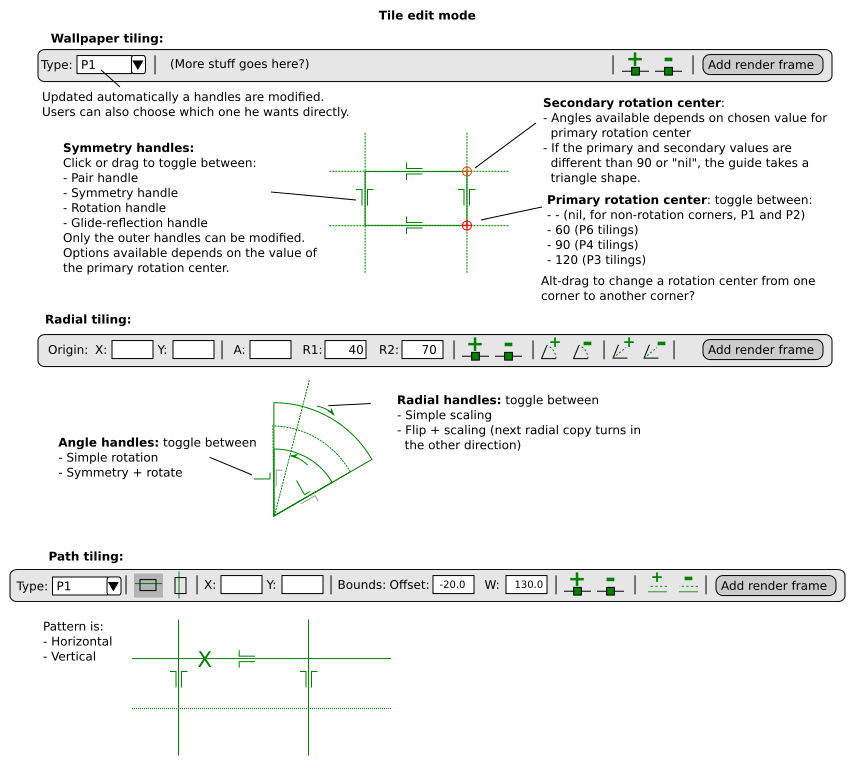
- Tile edit mode: Double-clicking on a tile enters the tile edit mode. Double-clicking elsewhere leaves it. In tile edit mode, the toolbar changes to one appropriate for that tiling operation (wallpaper, radial or line tiling). Additional features proposed:
- Guides: In tiling mode, the user can add additional guides (points or lines) to help design their pattern. These additional guides are just visual references and don’t perform additional actions.
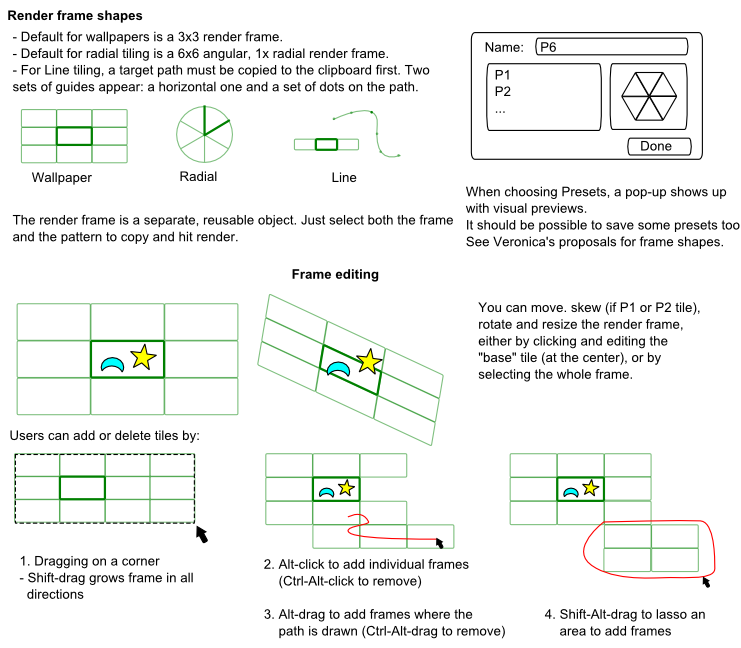
- Render frame: A render frame shows an outline of frames to render. Users can add or delete frames with the mouse. The whole frame can also be moved, rotated and resized.
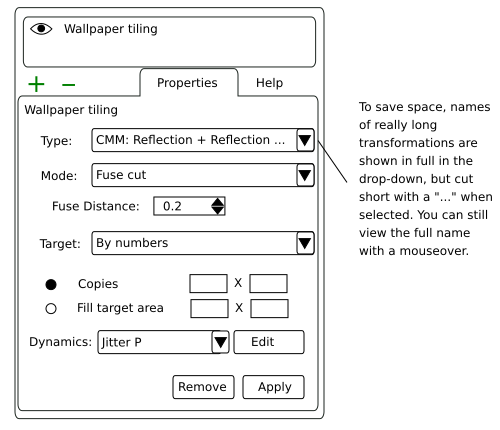
- Tiling dialogue: A dialogue with additional options, behaving like an LPE dialogue. Users can also see the stacking of tilings from here.
Implementation
This proposal contains a lot of features, but it is also very modular, so features can be added separately.
- The base version of this tool would be a version only for wallpaper tiling, with only simple rectangular tile from which Inkscape will take coordinates. The base version could be a mere front-end to the old dialogue, with the difference being that the rectangular tile will be used to calculate coordinates.
- The different types of tiles and the Tile Edit Mode can be added separately. Users can first choose from a drop-down. Handles can also be programmed separately.
- In tile edit mode, additional "guides" (guide points etc.) can also be implemented separately.
- "Render frame" feature can also be implemented separately.
- All tiling modes can be implemented separately (clip, fuse and fuse cut). Note: the Fuse Cut operation requires the ability to perform Boolean operations (specifically “cut”) on a group of objects:
- Dynamics drop-down and presets for dynamics can be implemented separately. The dialogue for dynamics can also be re-arranged independently.
- Most “target” options can be implemented separately.
- The above describes the tiling tool for just wallpaper tiling. All features can be expanded to radial tiling and line tiling separately.
Tiling tool: Render mode
The toolbar looks like this:
The tile creation process:
- Create a base pattern.
- From the tiling mode, add a “Tile.”
- Edit the tile as needed. Double-clicking a tile enters a tile edit mode. Double-click elsewhere to exit.
- Make additional changes to the base pattern as needed.
- Select a base pattern and a tile. Switch to tiling tool again.
- Before selecting the base pattern and tile, copy a target to render over if needed.
- Choose tiling options.
- Click render.
Tile edit mode
To enter Tile Edit mode, double-click on a tile. Exit by double-clicking elsewhere. The tile can be moved, resized and rotated using just the Transform (F1) tool, just like how rectangles and ellipses can be edited outside of their respective tools.
Advanced users can then change the type of the base tile (example: from P1 to P2) in tile edit mode through the use of handles or drop-downs. These handles are not visible nor editable outside the tile edit mode (to avoid getting in the way).
| Type | Description |
|---|---|
| Wallpaper tiling | These guides corresponds to the different wallpaper categories |
| Radial tiling | These are to create radial patterns. They're basically arc segments with a direction. |
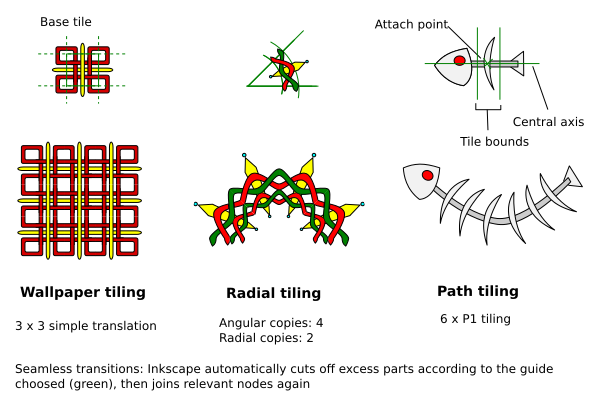
| Tiling along Path | This is defined by a central axis, an attach point and 2 tile bounds. The central axis represents the path to which the tile will attach, basically a visual normal offset. The tile attaches to a specific node (say, the first node of the path) from the attach point, basically a visual tangential offset. The two bounds decide where the tile cuts off save for edge scenarios. |
(Veronica made a nice list of tiles for wallpapers and corresponding output previews, but the link died….)
Tiling modes
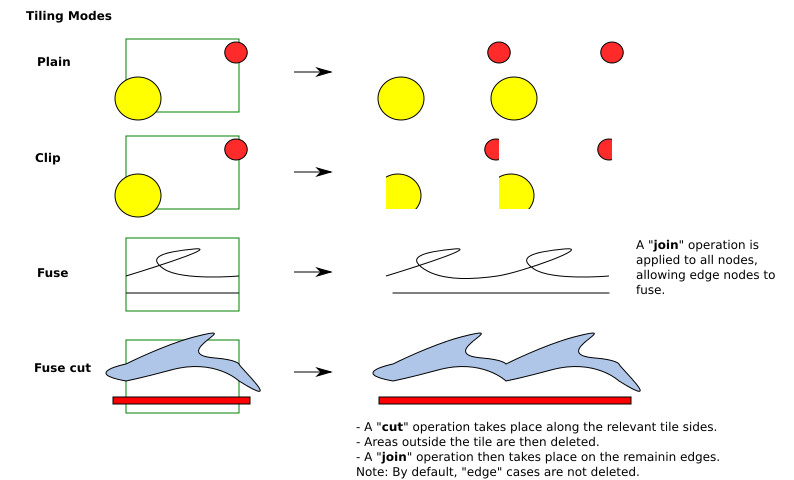
There are 4 modes in the current proposal:
- Plain: this is a normal tiling
- Clip: through clipping, only the part within the tile is shown. This is to avoid overlapping.
- Fuse: a “join node” operation is then conducted on all the nodes in the output. If the user designed the tiles to be seamless, then the lines should join up to create a seamless output.
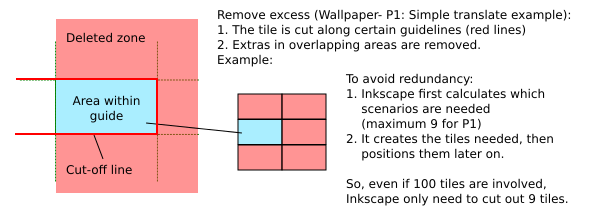
- Fuse cut: this is, in fact, a “cut” and “delete” operation followed by a “join nodes” operation. Inkscape will cut along certain lines and delete parts for “inner” tiles. This last mode allows the user to create seamless tiles with “edge” scenarios from a single base pattern:
More explanations of the "fuse cut" mode
Dynamics
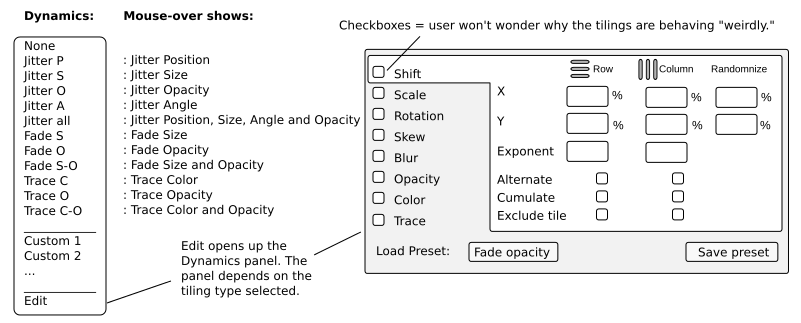
Simple dynamics presets could be accessible from the tiling tool. A separate “Dynamics” panel corresponding to the current tiling operation pops up when choosing the Edit option. Major differences are:
- Vertical listing
- Checkbox next to every transformation type, so users can easily remove all of them while retaining some values.
- Radial Clones use Polar coordinates.
- Tiling along Path use orthogonal coordinates (normal and orthogonal).
- Users can save and use presets. This includes a "No dynamics" option.
Target
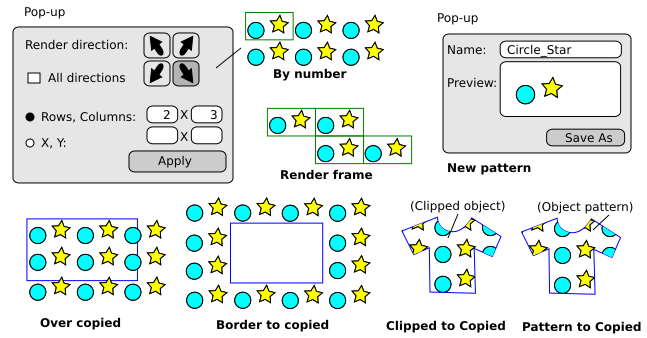
"Target" determines where you render your tiling.
For wallpaper tiling:
- By numbers: A pop-up asks you to input the number of tiles to make (example: 3 x 5), or the size of a rectangular area to render over
- Render frame: See guide description. After adding a render frame, Inkscape will render tiles according to that frame.
- Over copied: If you have a copied object, Inkscape will render over the copy.
- Border to copy: easy page borders? Makes a border.
- Clip to copied: Same as above, except clipped to the target. Use for clothes etc.
- Pattern to copy: (if allowed by .svg standards) The tiling is converted to a pattern and applied to the copied object. This pattern can be manually adjusted with the Pattern edit tool.
- New pattern: (if allowed by .svg standards) A pop-asks asks you to name and save the new pattern for later use.
For radial tiling:
- By number: A pop-up asks you to input the number of radial and angular copies. You can choose to input by angle and by radial distance instead.
- Render frame: see render frame description.
- No "to copied" option, because I think people usually want to define a radial tile just where the base tile is, but I could be wrong.
For Tiling along path:
- On selected Path. Note: this can be a closed path. A pop-up allows you to choose additional options and values.
- As selected path's line pattern: takes the selected path and makes the Tiling along path its new pattern.
- As new line pattern: if clone patterns can somehow be saved somewhere.
Alternatively, the "target" field could be excluded from the toolbar, and appear as options in a pop-up when clicking "Render."
Add tile
This adds a tile to the canvas: wallpaper, radial or line. See Tile edit mode for more.
Options
Opens a Tiling dialogue. From here you can see what options have been applied to an existing tiling, change them and toggle tile stacking.
Guide points and other guides
These features are there to help you design your tile pattern. Specifically, they're there to help design seamless tiles.
- Guide points: When a guide point is created on one side of a guide, counterparts are automatically created on all other sides of the basic guide. All changes to the original will be reflected onto counterpart. To create seamless designs, just make sure that all lines going in and out of a tile are connected to guide points.
- Guide segment: clicking and dragging on a guide point creates a guide segment, which also shows on all of the guide point's counterparts. The idea is to place a node on a guide point, snap its handle to the end of the segment, then repeat with the guide point's counterparts. When a "fuse" operation is applied, the result will be a perfectly smooth transition from one tile to the next.
See this javascript program for an approximate idea of how it'd behave. Note: programming-wise, the guide points don't actually do anything, they're just visual references. When Inkscape creates a "Fuse path" tiling, it just joins the nearest nodes. This means you can introduce slight dynamics and still have lines link up, though Inkscape can't guarantee the results in this case. Depending on the guide type, other types of guides are available (parallel lines, arcs etc.)
Render frame
A render frame is a tiling outline allowing the user to manually choose which frames to render. This is made up of a "central" tile and additional tiles (so when dynamics are applied, they start with the central tile). By default the frame is rendered over the original tile, but is a separate object that can be moved around, rotated and resized.
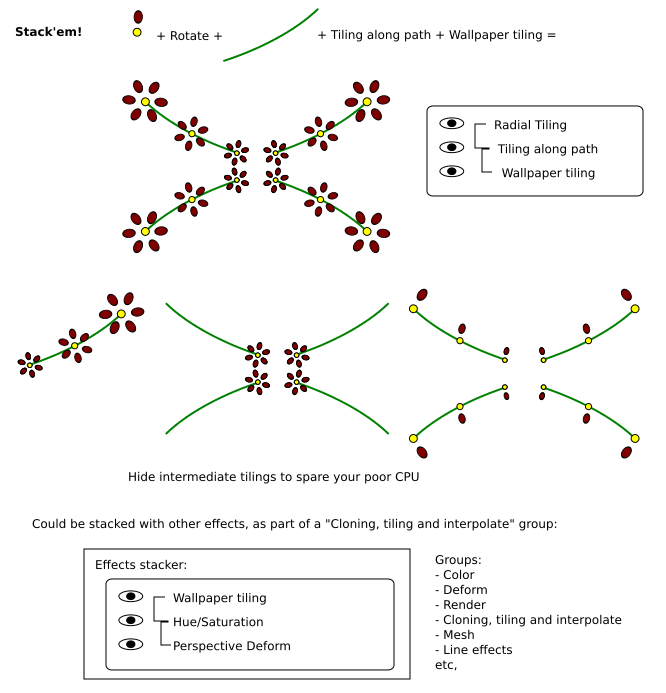
Tile stacking
You can easily stack different tilings!
Inkscape will likely have an Effects stacking mechanism in the future. Whatever it is, tiling would also fit right into it.
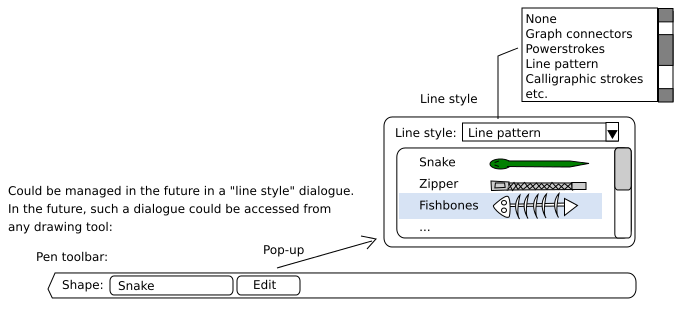
Line patterns
And why not "line patterns" while we're at it?

