Difference between revisions of "Tiling tool"
(→Implementation: Changes to make more sense from programming POV? (though I may be saying nonsense)) |
|||
| (39 intermediate revisions by 3 users not shown) | |||
| Line 1: | Line 1: | ||
== Tiling tool == | |||
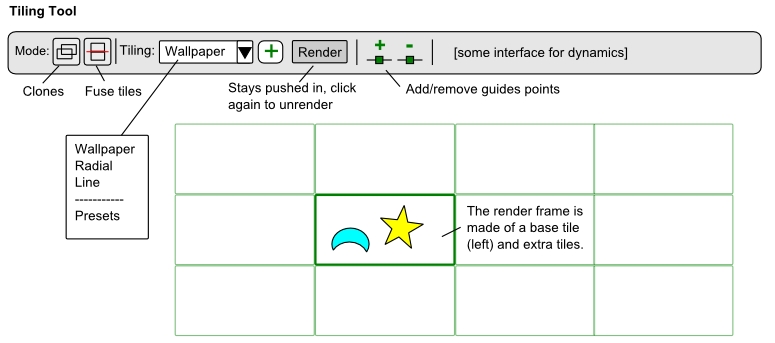
The current tiling interface is hard to use. The current interface attempts to make the process more user friendly through the use of a tool that creates a "render frame", which consists of two parts: | |||
* A base tile, where the pattern is supposed to be | |||
* A more general render frame, showing the location of the output | |||
* Both can be edited on-canvas | |||
The tiling process is simply: | |||
# Create a frame | |||
# Select a pattern and a frame | |||
# Click "Render" from the tiling tool | |||
The | * By default the frame becomes invisible after a render, and becomes "implied" in the generated output (a bit like clipping?). | ||
* Undoing the render makes the frame appear again. | |||
* The user can choose to drop a copy of the frame after a render for re-use however, or make a copy before applying. | |||
{| class="wikitable" | {| class="wikitable" | ||
! | | |+ | ||
! | Description | ! scope="col" width="180"| Type | ||
! scope="col" width="700" | Description | |||
|- | |- | ||
! | ! Wallpaper tiling | ||
| | | Allows users to use the 17 wallpaper types. | ||
|- | |- | ||
! | ! Radial tiling | ||
| This | | | ||
* This is for radial designs, and allows both angular clones and radial clones. | |||
* For angular clones, users can choose between simple rotation or symmetry + rotation. (thus covering the Rosetta patterns as well) | |||
* For radial clones, users can choose between same direction and alternating directions. | |||
|- | |- | ||
! | ! Path tiling | ||
| | | | ||
* Clones are generated along a path. This can be used to create a string of decorations, for repeating frills, for page borders etc. | |||
* Users can choose from all 7 Frieze groups. | |||
|} | |||
|} | |||
[[File:Tiling_Tool_Toolbar.png|UI Proposal for tiling tool]] | |||
<br clear="all"/> | |||
[[Media:WallpaperTransformations.png | Transformation images for wallpaper groups]] | |||
== Render modes == | |||
There are two modes: | |||
* Create clones: This is the current rendering mode | |||
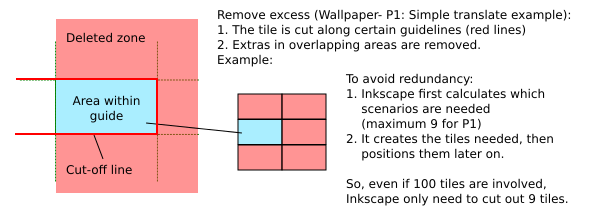
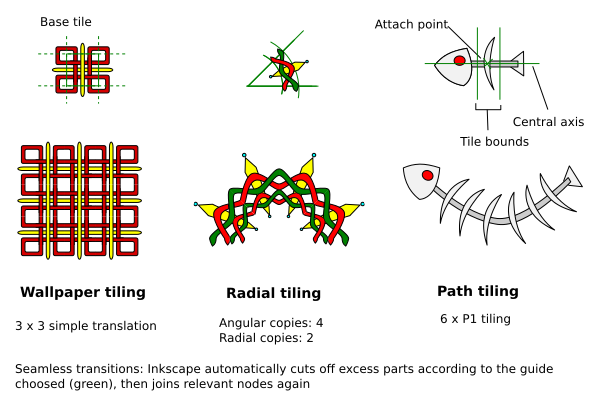
* Fuse: This mode first cuts excess for "inner" sides, then performs a "fuse" operation on the whole output. | |||
[[File:Tiling_cut_excess.png|Explanation of "Fuse" feature for tiling proposal]] | |||
<br clear="all"/> | |||
[[File:Tiling_interface_examples.png|More examples of the possible outputs for the “Fuse Cut” mode]] | |||
<br clear="all"/> | |||
== Render frame == | |||
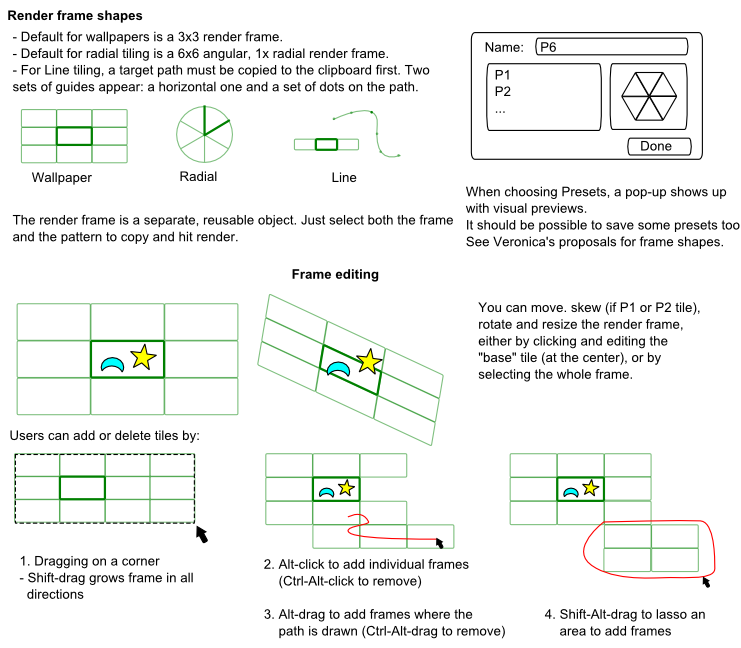
The render frame is made up of: | |||
* A central tile, which defines the location of the pattern to copy | |||
* A more general render grid | |||
[[File:Tiling_Tool_Render_Frame.png|UI Proposal for the Render frame of the Tiling tool proposal]] | |||
<br clear="all"/> | |||
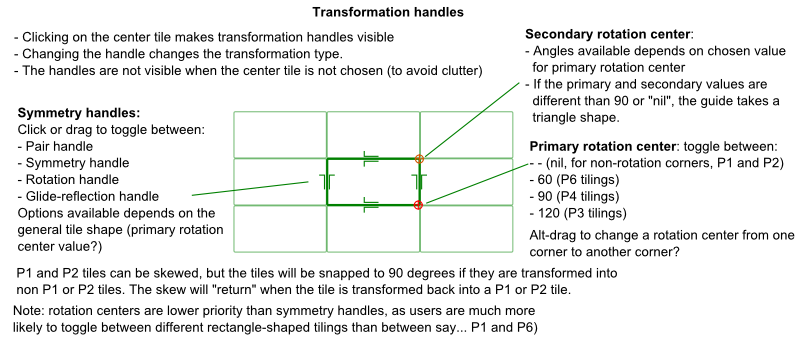
== On-canvas transformation handles == | |||
[[File:Tiling_Tool_Transformation_Handles.png|UI proposal for on-canvas handles for the tiling tool proposal]] | |||
<br clear="all"/> | |||
== Guide points == | |||
[[File:Tiling_Tool_Guides.png|UI proposal for guide points feature for Tiling Tool]] | |||
<br clear="all"/> | |||
Guide points are there to serve as reference point when creating tile designs. | |||
* When you add a guide point, "counterparts" are generated in all the other tiles | |||
* Ctrl-drag to drag out a segment. | |||
* The idea is that users can snap guide points along tile edges, snap a node of the pattern to that guide and snap the node handle to the end of the guide segment, then repeat with the guide point's counterparts. This should help easily create seamless transitions. | |||
== Option for dynamics Symmetry around base tile? == | |||
Proposal: option for all dynamics to be rendered in a symmetry around the base tile. This proposal is because users may want tiles to fade around a central tile. Rendering the frame in just one direction is easy, but achieving the symmetry otherwise is not. | |||
The main difficulty is that the current dynamics mechanism is linear, so adjustments would be needed. | |||
[[File:Tiling Tool Symmetry.png|Proposal for dynamics to occur in a symmetry around the base tile for the tiling tool]] | |||
<br clear="all"/> | |||
== On-canvas dynamics editing == | |||
Currently the two following approaches to on-canvas dynamics editing have been considered: | |||
# Edit a tile of the render frame (rotate and resize for example), all other tiles in the render frame are updated dynamically to give you an idea of the result. | |||
#* Pros: high preview value, as the outline of the tiles by themselves should give an idea as to the output of the whole tiling. | |||
#* Cons: forcing live update of tiles may be slow, and big displacements of tiles are distracting from the editing process. Worse if jitters are also visualized on-canvas. | |||
# Edit only one or two "reference" tiles. None of the other tiles change. Inkscape deduces transformation values from there and converts them into values for the existing tiling mechanism. | |||
#* Pros: less taxing on the interface. | |||
#* Cons: Less preview value. | |||
Tom Lechner made a possible mock-up for the second option: [http://www.tomlechner.com/randompics/finishing.png Mock-up for on-canvas tile dynamics editing] | |||
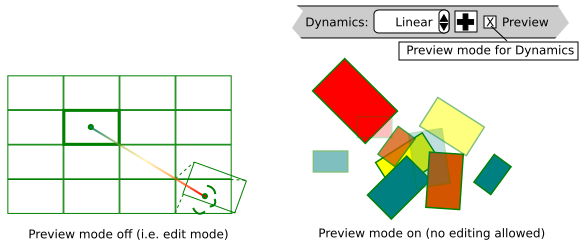
It could be possible to combine the best of both worlds with a "Dynamics preview" mode (so it's a preview of the dynamics, not of the pattern getting tiled): | |||
* When preview mode is on, Inkscape generates a preview of the render frame's tiles with dynamics applied, including jitters. | |||
* Editing is not allowed. You have to exit the preview mode to make other adjustments. | |||
* The idea is that some complex tilings will probably take a long time to render. This preview mode gives a quick idea about the outcome without having to do a full render, then undo, adjust and re-render again. | |||
[[File:Tiling Tool Dynamics Preview Mode.png|Preview mode for dynamics for the Tiling Tool proposal]] | |||
<br clear="all"/> | |||
== Radial tiling == | |||
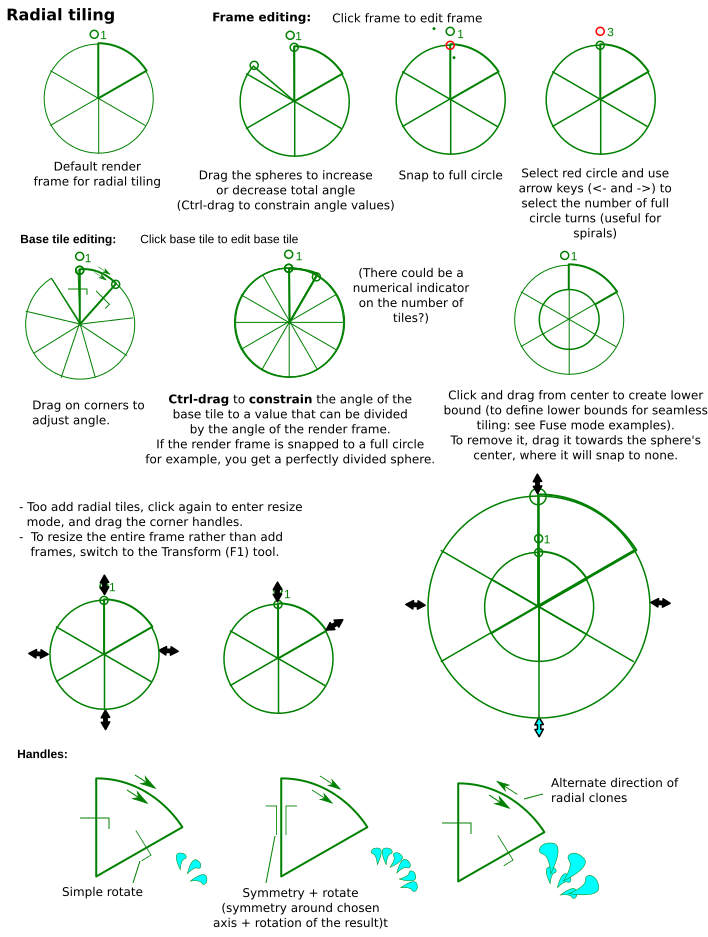
In theory, radial tiling could use the same mechanism as rows and columns tiling, by converting all input into X, Y input. Although users can also use rows and columns tiling to achieve radial tiling, doing so would not be very intuitive. | |||
[[File:Tiling Tool Radial Tiling.png|UI proposal for radial tiling in the tiling tool]] | |||
<br clear="all"/> | |||
== Line tiling == | |||
Implementing line tiling would be more complicated that implementing radial tiling, because it is an extension of the Pattern Along Path function rather than of the existing tiled clones mechanism. So, the programer would have to figure out a way to combine Pattern Along Path and the dynamics for Tiled Clones, all the while implementing the proper render guide. If he achieves it though, it'd be an amazingly powerful and versatile tool for designers of all kinds. | |||
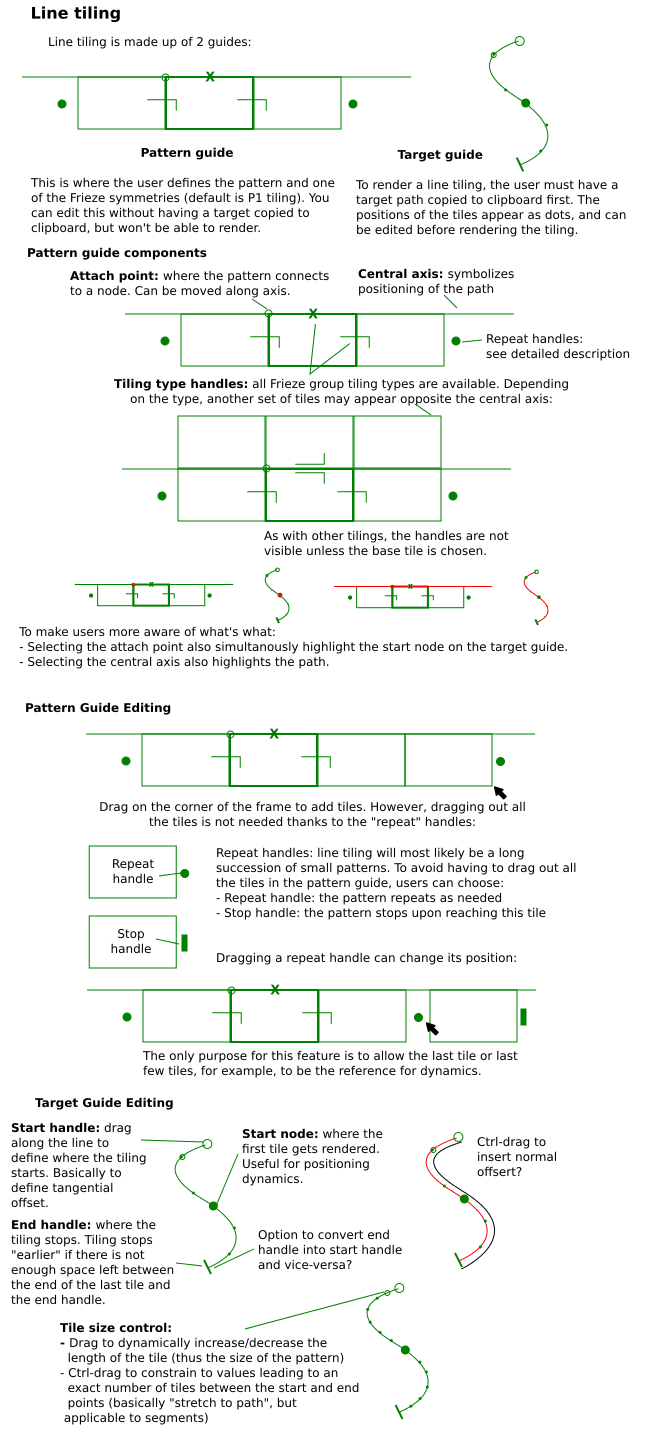
Line tiling actually comes in two sets of guides: | |||
* A pattern guide. | |||
* A target guide. This target guide appears over the target path, which has to be copied first to the clipboard. | |||
The pattern guide can actually be edited independently of a target path, but unless a target path is copied to the clipboard, the user cannot render the line tiling. So, the user can first adjust the pattern design and tiling properties, then copy a path, adjust and apply. | |||
[[File:Tiling tool line tiling.png|UI proposal for line tiling in the tiling tool]] | |||
<br clear="all"/> | |||
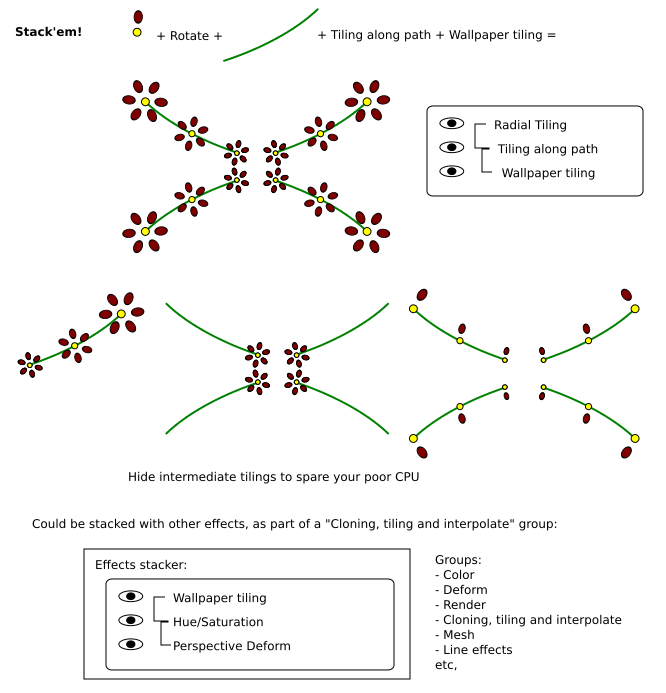
== Tile stacking == | |||
You can stack different tilings! | |||
[[File:Tiling stacking.png|Explanation of tile stacking feature for my tiling proposal]] <br clear="all"/> | |||
Inkscape will likely have an Effects stacking mechanism in the future. Whatever it is, tiling would also fit right into it. | |||
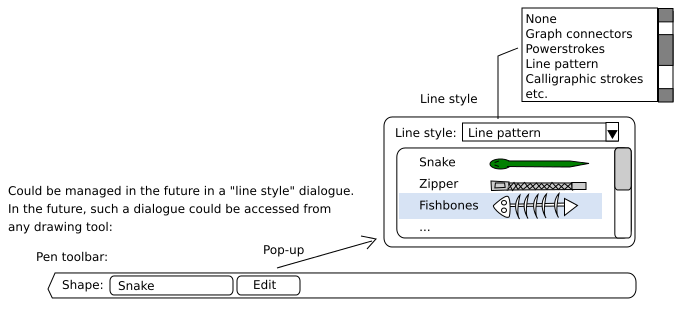
== Line patterns == | |||
And why not "line patterns" while we're at it? | |||
[[File:Tiling line patterns.png|UI proposal for line pattern choosing]] <br clear="all"/> | |||
== | == UI design status == | ||
This section is a summary of how ready the UI proposal for the various features are (as well as comments about coding): | |||
'''General concept and tiling methods:''' | |||
{| class="wikitable" | |||
|+ | |||
! scope="col" width="180" | Feature | |||
! scope="col" width="600" | Status | |||
|- | |||
! General concept | |||
| Valerie: The current interface is the result of exploring several very different concepts with inputs and criticism by a number of people. The "On-canvas editable central tile + render frame" concept is currently the first of these concepts to have encountered no major objections as to its usability, so it should be safe to consider this an acceptable general direction unless a better proposal comes along. | |||
|- | |||
! Wallpaper tiling | |||
| Valerie: The general proposal (base tile, handles + render frame) doesn't seem to generate many objections. The exact form of the handles and the details about manipulation could still be refined. | |||
|- | |||
! Radial tiling | |||
| Valerie: Not much input yet. | |||
|- | |||
! Line tiling | |||
| Valerie: Not much input yet. There should be, as this is a potentially very powerful feature for designers, though also hard to implement. | |||
|} | |||
'''Specific features (all tiling methods)''' | |||
{| class="wikitable" | {| class="wikitable" | ||
|+ | |+ | ||
! | ! scope="col" width="180" | Feature | ||
! | ! scope="col" width="600" | Status | ||
|- | |- | ||
! | ! Fuse mode | ||
| | | Valerie: General input seems to be that this is a "good idea." | ||
|- | |||
! Guide points | |||
| Valerie: General input seems to be that this is a "good idea." | |||
| | |- | ||
| | ! On-canvas handling of dynamics | ||
| Valerie: Concensus is that on-canvas manipulation of dynamics is very desirable. However, the exact form is still up to debate. Tom Lechner has a proposal that will allow to visualize most elements, but more work is needed to establish a mechanism for visualizing and controlling jitter as well. | |||
|- | |||
! Multi-Stop Interpolation Gradient (multi-stop dynamics) | |||
| Valerie: Such a mechanism would require reworking the entire tiling mechanism. The only bright side is that Inkscape doesn't store any tiling information, so changing the mechanism won't break backwards compatibility. See Jasper's detailed comment in "Implementation." | |||
|- | |- | ||
! | ! Symmetrical dynamics output around base tile | ||
| | | Valerie: Looking at Jasper's explanation below, symmetrical dynamics around a central tile basically aren't supported by the current mechanism. | ||
|- | |- | ||
! | ! Tile stacking and line pattern management | ||
| | | Valerie: At this point both are just suggestions, as Inkscape has neither the mechanisms in place nor an UI. | ||
|} | |||
'''Implementation comments''' | |||
| | |||
| | {| class="wikitable" | ||
|+ | |||
! scope="col" width="180" | Feature | |||
! scope="col" width="600" | Comments | |||
|- | |- | ||
! | ! Multi-Stop Interpolation Gradient | ||
| | | Jasper (mail from mailing list): All the code is in src/ui/dialog/clonetiler.cpp. The main function is CloneTiler::clonetiler_get_transform. This function essentially gets all info, as well as a row and column index. It then computes all the transforms required for that position and combines them. As far as I can tell it combines them in such a way that first a scaling is applied, then a rotation and finally a translation. If you select a different symmetry group then the translation can become a more complicated transform. | ||
The scheme we talked about earlier that would interpolate transforms is not necessarily compatible. This is because in the latter the case the entire transform would be interpolated, while what Inkscape does is essentially interpolating per kind of transform. That this is not the same can be seen by realizing that rotate(50)translate(1)rotate(50)translate(1) is not the same as rotate(100)translate(2). The former is more or less what we talked about (or at least what I had in mind during that discussion), the latter is what Inkscape does. | |||
However, Inkscape currently seems to store almost nothing about the tiling in the file. So it would be relatively benign to change behaviour. Existing files would not be affected in any way, users would only be affected when trying to change a tiling or create a new one. (This is not to say that it's necessarily a good idea to make it impossible to achieve the current behaviour, just that if we cannot reconcile the two, there is some room for change.) | |||
Note that it would be possible to emulate Inkscape's current behaviour through interpolation of transforms, but only if we would allow "stacking" transforms. I'm not sure how this would have to be supported UI-wise though. | |||
|} | |} | ||
=== | == Implementation == | ||
Proposed implementation steps: | |||
=== 0. Very desirable: Guide management === | |||
See [https://blueprints.launchpad.net/inkscape/+spec/guides-improvement Existing blueprint]. Rather, what is needed here is not a full guide management system, but rather how to "define" a guide, as the guides here have properties very different from "normal" objects. | |||
=== I. Core feature: addition of an on-canvas base tile or render frame === | |||
Jasper explains where the tiling code is located: | |||
"All the code is in src/ui/dialog/clonetiler.cpp. The main function is CloneTiler::clonetiler_get_transform. This function essentially gets all info, as well as a row and column index." | |||
As a first step, the programmer could program a "base tile" or "render frame" object as a separate file, that can be tested independently from the tiling code. This object: | |||
* Provides a different base tile shape depending on the chosen transformation type | |||
* Allows to visualize extra rows and columns on-canvas (not necessary in a first step, but quite desirable). Unless the user wants to tweak the tiling code itself, this step currently does not allow adding or removing individual tiles | |||
* Creates a set of coordinates to be used by the existing tiling mechanism | |||
* The tool icon and toolbar can be created from the start for testing or added later | |||
Testing would basically be to ensure that the on-canvas behaviour is consistent with what the user expects, and the output values are correct. | |||
Once this object works as expected, it can then be "connected" to the tiling mechanism by calling it up and sending it the correct values. Basically, the tiling code itself would not need too many adjustments at this phase. | |||
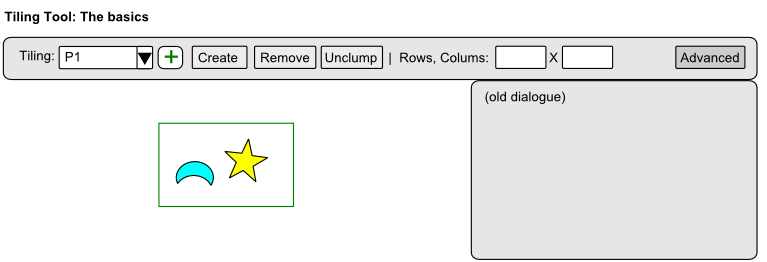
[[File:Tiling Tool Step1.png|UI Proposal for first step of tiling tool implementation]] | |||
<br clear="all"/> | |||
This is basically the minimum interface that would allow users to make basic tiling without opening the current tiling dialogue. Sequence: | |||
* Clicking the + button "adds" a render frame or just render tile (if the programmer hasn't programmed the ability to visualize extra rows and columns yet) of the chosen type. | |||
* Choose the pattern to tile and the guide | |||
* Click "create" | |||
=== | === II. More features to the render frame === | ||
These are features that can be added to the render frame object without changing the tiling code too much. | |||
''' 1. Tiling handles ''' | |||
# Handles are added to the base tiles, making it possible to switch from one tiling to another. | |||
# Users can be now offered to create a "Wallpaper" tile by default. Other transformation types are accessed via a pop-up when choosing "others." Previews are moved to this pop-up. Since the simple rectangle is the most commonly used tile shape, this default should be acceptable (and less confusing than "P1"). | |||
A few notes: | |||
* Changing symmetries should be the priority. | |||
* Eventually controls for angles could be added too, though this is lower priority, as not many users absolutely need to change from one tile shape to another. | |||
''' 2. On-canvas dynamics editing ''' | |||
This converts on-canvas cues to percentage values that are then fed to the tiling code. | |||
Under discussion: Visual representation of the mechanism? | |||
''' 3. Guide points? ''' | |||
The programmer must: | |||
# Define/create guide points. This object can be snapped to objects and guides. | |||
# Program it so that iterations of it appear and are rendered correctly in each tile of the render frame according to the chosen transformation mode. If the transformation type is changed, they must also update automatically. | |||
# Additional feature: Ctrl-drag to create a segment from the point: this helps make transformations in each tile more obvious, and helps for handle-snapping. | |||
''' 4. Radial tiling cheat? ''' | |||
A "radial tiling" guide form may be created on top of the existing mechanism. It's basically a P1 operation made to output radial tiling results. The render frame shsape allows users to more easily visualize radial tiling on-canvas. Any on-canvas dynamics manipulations also converts these values into settings appropriate for a "rows and columns" transformation. | |||
By building this on top of the existing tiling mechanism, the programmer removes the need to create a dynamics system specific to radial tiling. On the down side, a user who wants to input values manually will have to deal with the rows and columns settings, which in this case would be less intuitive than "angular and radial" settings. | |||
=== III. More tiling features === | |||
''' 1. Fuse mode ''' | |||
As noted, this is a cut + fuse operation. The programmer needs to implement the following features: | |||
# Boolean operations (specifically "cut") on groups | |||
# This also means fixing the cut operation, which is currently rather buggy... | |||
# The guides must be extended, and for each wallpaper group, the ways to "cut" the tiles must be defined | |||
# The programmer must then find the way to define the zone to be delete | |||
# "Fuse" uses the existing group node join operation however | |||
Alternatively, the programmer can make Inkscape render a shape over the tile and perform a union operation, but one that leaves resulting nodes instead of joining them. | |||
** [https://bugs.launchpad.net/inkscape/+bug/166302 Bug #166302: Cut Path looses some segments ] | |||
** [https://bugs.launchpad.net/inkscape/+bug/171379 Bug #171379: Boolean Operations on Groups ] | |||
** [https://bugs.launchpad.net/inkscape/+bug/701819 Bug #701819: Copy/Cut a Part of a Grouped Object ] (scenario of above) | |||
** [https://bugs.launchpad.net/inkscape/+bug/408551 Bug #408551: Cut Path with a grouped object does nothing ] | |||
This feature requires adding two additional phases to the tiling code: | |||
* A cut operation: the programmer must find a way to define which way the base tile is to be cut | |||
* Fuse operation at the very end | |||
''' 2. Allow adding and removing individual tiles to the render frame ''' | |||
The biggest work here is reworking the tiling code so that not all tiles are rendered. Combining this and "fuse path" will take some work. | |||
''' 3. Interpolation gradients? ''' | |||
As Jasper noted, this may require a whole rework of the tiling mechanism. | |||
=== IV. Line tiling === | |||
Line tiling requires a whole new mechanism combining dynamics and "pattern along path." A possible behaviour is: | |||
* The programmer adapts the tiling code to the Frieze groups | |||
* Clones are first generated in a straight line according to number and size inputs from the target path | |||
* They are then set along the target path using "pattern along path" mechanism. | |||
[[Category:Proposals]] | |||
Latest revision as of 07:54, 9 April 2012
Tiling tool
The current tiling interface is hard to use. The current interface attempts to make the process more user friendly through the use of a tool that creates a "render frame", which consists of two parts:
- A base tile, where the pattern is supposed to be
- A more general render frame, showing the location of the output
- Both can be edited on-canvas
The tiling process is simply:
- Create a frame
- Select a pattern and a frame
- Click "Render" from the tiling tool
- By default the frame becomes invisible after a render, and becomes "implied" in the generated output (a bit like clipping?).
- Undoing the render makes the frame appear again.
- The user can choose to drop a copy of the frame after a render for re-use however, or make a copy before applying.
| Type | Description |
|---|---|
| Wallpaper tiling | Allows users to use the 17 wallpaper types. |
| Radial tiling |
|
| Path tiling |
|
Transformation images for wallpaper groups
Render modes
There are two modes:
- Create clones: This is the current rendering mode
- Fuse: This mode first cuts excess for "inner" sides, then performs a "fuse" operation on the whole output.
Render frame
The render frame is made up of:
- A central tile, which defines the location of the pattern to copy
- A more general render grid
On-canvas transformation handles
Guide points
Guide points are there to serve as reference point when creating tile designs.
- When you add a guide point, "counterparts" are generated in all the other tiles
- Ctrl-drag to drag out a segment.
- The idea is that users can snap guide points along tile edges, snap a node of the pattern to that guide and snap the node handle to the end of the guide segment, then repeat with the guide point's counterparts. This should help easily create seamless transitions.
Option for dynamics Symmetry around base tile?
Proposal: option for all dynamics to be rendered in a symmetry around the base tile. This proposal is because users may want tiles to fade around a central tile. Rendering the frame in just one direction is easy, but achieving the symmetry otherwise is not.
The main difficulty is that the current dynamics mechanism is linear, so adjustments would be needed.
On-canvas dynamics editing
Currently the two following approaches to on-canvas dynamics editing have been considered:
- Edit a tile of the render frame (rotate and resize for example), all other tiles in the render frame are updated dynamically to give you an idea of the result.
- Pros: high preview value, as the outline of the tiles by themselves should give an idea as to the output of the whole tiling.
- Cons: forcing live update of tiles may be slow, and big displacements of tiles are distracting from the editing process. Worse if jitters are also visualized on-canvas.
- Edit only one or two "reference" tiles. None of the other tiles change. Inkscape deduces transformation values from there and converts them into values for the existing tiling mechanism.
- Pros: less taxing on the interface.
- Cons: Less preview value.
Tom Lechner made a possible mock-up for the second option: Mock-up for on-canvas tile dynamics editing
It could be possible to combine the best of both worlds with a "Dynamics preview" mode (so it's a preview of the dynamics, not of the pattern getting tiled):
- When preview mode is on, Inkscape generates a preview of the render frame's tiles with dynamics applied, including jitters.
- Editing is not allowed. You have to exit the preview mode to make other adjustments.
- The idea is that some complex tilings will probably take a long time to render. This preview mode gives a quick idea about the outcome without having to do a full render, then undo, adjust and re-render again.
Radial tiling
In theory, radial tiling could use the same mechanism as rows and columns tiling, by converting all input into X, Y input. Although users can also use rows and columns tiling to achieve radial tiling, doing so would not be very intuitive.
Line tiling
Implementing line tiling would be more complicated that implementing radial tiling, because it is an extension of the Pattern Along Path function rather than of the existing tiled clones mechanism. So, the programer would have to figure out a way to combine Pattern Along Path and the dynamics for Tiled Clones, all the while implementing the proper render guide. If he achieves it though, it'd be an amazingly powerful and versatile tool for designers of all kinds.
Line tiling actually comes in two sets of guides:
- A pattern guide.
- A target guide. This target guide appears over the target path, which has to be copied first to the clipboard.
The pattern guide can actually be edited independently of a target path, but unless a target path is copied to the clipboard, the user cannot render the line tiling. So, the user can first adjust the pattern design and tiling properties, then copy a path, adjust and apply.
Tile stacking
You can stack different tilings!
Inkscape will likely have an Effects stacking mechanism in the future. Whatever it is, tiling would also fit right into it.
Line patterns
And why not "line patterns" while we're at it?
UI design status
This section is a summary of how ready the UI proposal for the various features are (as well as comments about coding):
General concept and tiling methods:
| Feature | Status |
|---|---|
| General concept | Valerie: The current interface is the result of exploring several very different concepts with inputs and criticism by a number of people. The "On-canvas editable central tile + render frame" concept is currently the first of these concepts to have encountered no major objections as to its usability, so it should be safe to consider this an acceptable general direction unless a better proposal comes along. |
| Wallpaper tiling | Valerie: The general proposal (base tile, handles + render frame) doesn't seem to generate many objections. The exact form of the handles and the details about manipulation could still be refined. |
| Radial tiling | Valerie: Not much input yet. |
| Line tiling | Valerie: Not much input yet. There should be, as this is a potentially very powerful feature for designers, though also hard to implement. |
Specific features (all tiling methods)
| Feature | Status |
|---|---|
| Fuse mode | Valerie: General input seems to be that this is a "good idea." |
| Guide points | Valerie: General input seems to be that this is a "good idea." |
| On-canvas handling of dynamics | Valerie: Concensus is that on-canvas manipulation of dynamics is very desirable. However, the exact form is still up to debate. Tom Lechner has a proposal that will allow to visualize most elements, but more work is needed to establish a mechanism for visualizing and controlling jitter as well. |
| Multi-Stop Interpolation Gradient (multi-stop dynamics) | Valerie: Such a mechanism would require reworking the entire tiling mechanism. The only bright side is that Inkscape doesn't store any tiling information, so changing the mechanism won't break backwards compatibility. See Jasper's detailed comment in "Implementation." |
| Symmetrical dynamics output around base tile | Valerie: Looking at Jasper's explanation below, symmetrical dynamics around a central tile basically aren't supported by the current mechanism. |
| Tile stacking and line pattern management | Valerie: At this point both are just suggestions, as Inkscape has neither the mechanisms in place nor an UI. |
Implementation comments
| Feature | Comments |
|---|---|
| Multi-Stop Interpolation Gradient | Jasper (mail from mailing list): All the code is in src/ui/dialog/clonetiler.cpp. The main function is CloneTiler::clonetiler_get_transform. This function essentially gets all info, as well as a row and column index. It then computes all the transforms required for that position and combines them. As far as I can tell it combines them in such a way that first a scaling is applied, then a rotation and finally a translation. If you select a different symmetry group then the translation can become a more complicated transform.
The scheme we talked about earlier that would interpolate transforms is not necessarily compatible. This is because in the latter the case the entire transform would be interpolated, while what Inkscape does is essentially interpolating per kind of transform. That this is not the same can be seen by realizing that rotate(50)translate(1)rotate(50)translate(1) is not the same as rotate(100)translate(2). The former is more or less what we talked about (or at least what I had in mind during that discussion), the latter is what Inkscape does. However, Inkscape currently seems to store almost nothing about the tiling in the file. So it would be relatively benign to change behaviour. Existing files would not be affected in any way, users would only be affected when trying to change a tiling or create a new one. (This is not to say that it's necessarily a good idea to make it impossible to achieve the current behaviour, just that if we cannot reconcile the two, there is some room for change.) Note that it would be possible to emulate Inkscape's current behaviour through interpolation of transforms, but only if we would allow "stacking" transforms. I'm not sure how this would have to be supported UI-wise though. |
Implementation
Proposed implementation steps:
0. Very desirable: Guide management
See Existing blueprint. Rather, what is needed here is not a full guide management system, but rather how to "define" a guide, as the guides here have properties very different from "normal" objects.
I. Core feature: addition of an on-canvas base tile or render frame
Jasper explains where the tiling code is located:
"All the code is in src/ui/dialog/clonetiler.cpp. The main function is CloneTiler::clonetiler_get_transform. This function essentially gets all info, as well as a row and column index."
As a first step, the programmer could program a "base tile" or "render frame" object as a separate file, that can be tested independently from the tiling code. This object:
- Provides a different base tile shape depending on the chosen transformation type
- Allows to visualize extra rows and columns on-canvas (not necessary in a first step, but quite desirable). Unless the user wants to tweak the tiling code itself, this step currently does not allow adding or removing individual tiles
- Creates a set of coordinates to be used by the existing tiling mechanism
- The tool icon and toolbar can be created from the start for testing or added later
Testing would basically be to ensure that the on-canvas behaviour is consistent with what the user expects, and the output values are correct.
Once this object works as expected, it can then be "connected" to the tiling mechanism by calling it up and sending it the correct values. Basically, the tiling code itself would not need too many adjustments at this phase.
This is basically the minimum interface that would allow users to make basic tiling without opening the current tiling dialogue. Sequence:
- Clicking the + button "adds" a render frame or just render tile (if the programmer hasn't programmed the ability to visualize extra rows and columns yet) of the chosen type.
- Choose the pattern to tile and the guide
- Click "create"
II. More features to the render frame
These are features that can be added to the render frame object without changing the tiling code too much.
1. Tiling handles
- Handles are added to the base tiles, making it possible to switch from one tiling to another.
- Users can be now offered to create a "Wallpaper" tile by default. Other transformation types are accessed via a pop-up when choosing "others." Previews are moved to this pop-up. Since the simple rectangle is the most commonly used tile shape, this default should be acceptable (and less confusing than "P1").
A few notes:
- Changing symmetries should be the priority.
- Eventually controls for angles could be added too, though this is lower priority, as not many users absolutely need to change from one tile shape to another.
2. On-canvas dynamics editing
This converts on-canvas cues to percentage values that are then fed to the tiling code. Under discussion: Visual representation of the mechanism?
3. Guide points?
The programmer must:
- Define/create guide points. This object can be snapped to objects and guides.
- Program it so that iterations of it appear and are rendered correctly in each tile of the render frame according to the chosen transformation mode. If the transformation type is changed, they must also update automatically.
- Additional feature: Ctrl-drag to create a segment from the point: this helps make transformations in each tile more obvious, and helps for handle-snapping.
4. Radial tiling cheat?
A "radial tiling" guide form may be created on top of the existing mechanism. It's basically a P1 operation made to output radial tiling results. The render frame shsape allows users to more easily visualize radial tiling on-canvas. Any on-canvas dynamics manipulations also converts these values into settings appropriate for a "rows and columns" transformation.
By building this on top of the existing tiling mechanism, the programmer removes the need to create a dynamics system specific to radial tiling. On the down side, a user who wants to input values manually will have to deal with the rows and columns settings, which in this case would be less intuitive than "angular and radial" settings.
III. More tiling features
1. Fuse mode
As noted, this is a cut + fuse operation. The programmer needs to implement the following features:
- Boolean operations (specifically "cut") on groups
- This also means fixing the cut operation, which is currently rather buggy...
- The guides must be extended, and for each wallpaper group, the ways to "cut" the tiles must be defined
- The programmer must then find the way to define the zone to be delete
- "Fuse" uses the existing group node join operation however
Alternatively, the programmer can make Inkscape render a shape over the tile and perform a union operation, but one that leaves resulting nodes instead of joining them.
This feature requires adding two additional phases to the tiling code:
- A cut operation: the programmer must find a way to define which way the base tile is to be cut
- Fuse operation at the very end
2. Allow adding and removing individual tiles to the render frame
The biggest work here is reworking the tiling code so that not all tiles are rendered. Combining this and "fuse path" will take some work.
3. Interpolation gradients?
As Jasper noted, this may require a whole rework of the tiling mechanism.
IV. Line tiling
Line tiling requires a whole new mechanism combining dynamics and "pattern along path." A possible behaviour is:
- The programmer adapts the tiling code to the Frieze groups
- Clones are first generated in a straight line according to number and size inputs from the target path
- They are then set along the target path using "pattern along path" mechanism.
