Difference between revisions of "Vector-brushes"
(Vector brushes for existing drawing tools (Pattern Along Path backend)) |
Romain2Boss (talk | contribs) m (Add category Proposals) |
||
| (5 intermediate revisions by one other user not shown) | |||
| Line 1: | Line 1: | ||
== Vector brushes for existing drawing tools (Pattern Along Path backend) == | == Vector brushes for existing drawing tools (Pattern Along Path backend) == | ||
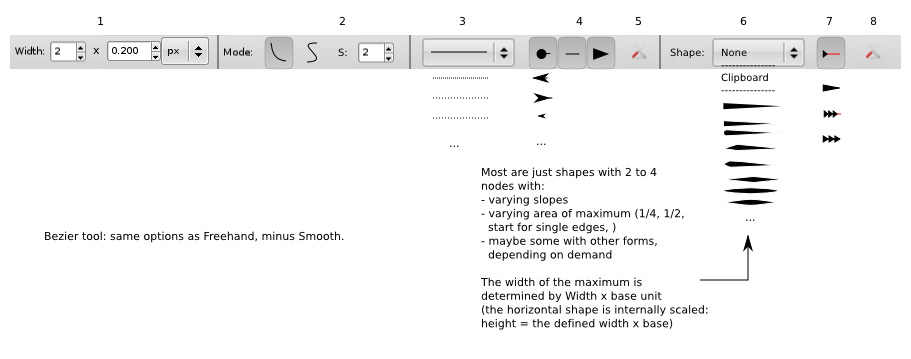
Adds a Shape drop-down to Freehand and Bezier with None, Clipboard and a few presets as options. When a path is drawn, the clipboard or preset shape is automatically applied to the path via pattern along path, allowing users to easily draw "complex strokes" and edit the direction. | |||
I've also included a few other proposals (bezier vs Spiro mode, access to dash and marker styles from toolbar) to show that they fit. | |||
[[Image:LPE.png]] | [[Image:LPE.png]] | ||
1. This gives the width of stroke when no "shapes" are applied, and the maximum diameter of the shape when shape is applied (since the shape is often supposed to be a stroke itself). | |||
* Width can controlled with the directional keys. | |||
* x (base unit)" allows for fine-tuning for thin lines. | |||
2. Two modes: | |||
* The normal bezier mode (possible icon: add handles?) | |||
* The new Spiro mode (possible icon: only Spiro nodes on a curve, as Spiro has no handles) | |||
* S (mouse-over: Smooth) is disabled for Spiro. | |||
3. Mouse-over: Line Style. | |||
4. Mouse-over to drop-downs (line = none): Start marker, Mid marker, End marker. | |||
5. Mouse-over: Advanced Stroke and Fill options. Pops up Fill & Stroke dialog, on Stroke page. (optional?) | |||
6. Mouse-over: Advanced Stroke Shapes. | |||
* Default is none. | |||
* for Clipboard, a user copies a shape. When a path is drawn, the selected shape is automatically applied to it via LPE. Good for not having to clutter presets with temporary shapes. | |||
* a few Presets, for those hundreds of pesky hair strands (more types to be added on user demand) | |||
* '''Note:''' when a '''shape''' is applied, '''both Line style and markers are greyed out and automatically turned off''' (though they can still be turned back on in the Stroke & Fill dialog). This is because in most cases, the shape applied -is- to obtain an (advanced) "stroke", and if it has its own stroke it may cause confusion, especially because of overlapping use of Width. | |||
* '''Clipboard items''', however, '''retain their original fill and stroke settings''' (save for rescaling as defined by width and path length). | |||
7. Mouse-over: Repeat options. Drop-down: Single, Single Stretched, Repeated, Repeated Stretched. | |||
8. Mouse-over: Advanced shapes options. Pops up LPE dialog. | |||
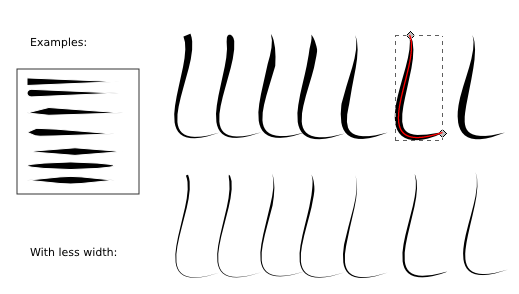
Examples of what can be produced with presets: | Examples of what can be produced with presets: | ||
| Line 36: | Line 63: | ||
== '''Credits''' == | == '''Credits''' == | ||
MUCH credits to Bulia Byak for noting that this should be implemented as a sub-mode of the Freehand and Bezier tools, and for extensive UI mentoring all along the way! Thank you! | |||
== '''Additional notes''' == | == '''Additional notes''' == | ||
People will ask for additional, "jitter" functionalities sooner or later: randomnize the color and size of the multiple copies produced with clipboard -> repeated. This future functionality will probably be stuffed into the LPE dialog (with presets possible), as it certainly won't fit into the top-level toolbar... | People will ask for additional, "jitter" functionalities sooner or later: randomnize the color and size of the multiple copies produced with clipboard -> repeated. This future functionality will probably be stuffed into the LPE dialog (with presets possible), as it certainly won't fit into the top-level toolbar... | ||
[[Category:Proposals]] | |||
Latest revision as of 10:41, 31 March 2012
Vector brushes for existing drawing tools (Pattern Along Path backend)
Adds a Shape drop-down to Freehand and Bezier with None, Clipboard and a few presets as options. When a path is drawn, the clipboard or preset shape is automatically applied to the path via pattern along path, allowing users to easily draw "complex strokes" and edit the direction.
I've also included a few other proposals (bezier vs Spiro mode, access to dash and marker styles from toolbar) to show that they fit.
1. This gives the width of stroke when no "shapes" are applied, and the maximum diameter of the shape when shape is applied (since the shape is often supposed to be a stroke itself).
- Width can controlled with the directional keys.
- x (base unit)" allows for fine-tuning for thin lines.
2. Two modes:
- The normal bezier mode (possible icon: add handles?)
- The new Spiro mode (possible icon: only Spiro nodes on a curve, as Spiro has no handles)
- S (mouse-over: Smooth) is disabled for Spiro.
3. Mouse-over: Line Style.
4. Mouse-over to drop-downs (line = none): Start marker, Mid marker, End marker.
5. Mouse-over: Advanced Stroke and Fill options. Pops up Fill & Stroke dialog, on Stroke page. (optional?)
6. Mouse-over: Advanced Stroke Shapes.
- Default is none.
- for Clipboard, a user copies a shape. When a path is drawn, the selected shape is automatically applied to it via LPE. Good for not having to clutter presets with temporary shapes.
- a few Presets, for those hundreds of pesky hair strands (more types to be added on user demand)
- Note: when a shape is applied, both Line style and markers are greyed out and automatically turned off (though they can still be turned back on in the Stroke & Fill dialog). This is because in most cases, the shape applied -is- to obtain an (advanced) "stroke", and if it has its own stroke it may cause confusion, especially because of overlapping use of Width.
- Clipboard items, however, retain their original fill and stroke settings (save for rescaling as defined by width and path length).
7. Mouse-over: Repeat options. Drop-down: Single, Single Stretched, Repeated, Repeated Stretched.
8. Mouse-over: Advanced shapes options. Pops up LPE dialog.
Examples of what can be produced with presets:
Gui
See mock-up. Clipboard mode or Presets are accessed via drop-down.
Width control: you specify a base unit (ex.: 0.2 pixels), and with the directional keys you can multiply this base unit. The resulting value is the width of the stroke (be it simple or a complex LPE stroke).
When LPE mode is activated, the underlying horizontal object is scaled so that its maximum height is this value, so you can easily control the width of the resulting object.
Note: the resulting LPE object will automatically have its own stroke disabled, though power users can still add one via Fill&Stroke dialog. The reasoning is that complex strokes don't need strokes of their own, especially not one of the same size...
Clipboard items though retain their own Fill and Stroke settings (save for rescaling), the reasoning being that if people create an object and want to draw with it, they probably don't want its properties to suddenly change (you copy a red heart but the drawn result is green).
Work flow
When activated, the user draws a path as usual, and when finished the form is automatically applied to it via Pattern Along Path. Editing pops out the red line for the skeleton (it is assumed that users would not want to finely edit the form of each individual hair stroke or such).
For users that Do need more precise forms or form editing, this could be done via a sub-mode of Edit, or by having the user creating the precise form himself, copy it and applying it via Clipboard.
Other items
I'd like to be able to access both stroke style and marker style from the top-level instead of from the Fill & Stroke dialog.
In any case, the mock-up shows everything fits into a bar a bit less than the current one for Select and Calligraphy, so all's good!
Credits
MUCH credits to Bulia Byak for noting that this should be implemented as a sub-mode of the Freehand and Bezier tools, and for extensive UI mentoring all along the way! Thank you!
Additional notes
People will ask for additional, "jitter" functionalities sooner or later: randomnize the color and size of the multiple copies produced with clipboard -> repeated. This future functionality will probably be stuffed into the LPE dialog (with presets possible), as it certainly won't fit into the top-level toolbar...

