Difference between revisions of "Tricks and tips"
(Add info about result of this page, add info about how to contribute) |
|||
| Line 1: | Line 1: | ||
{{Other languages|en=Tricks and tips}} | {{Other languages|en=Tricks and tips}} | ||
<div style="margin: 0 auto 1em; padding: 1.6em; width: 80%; border: 4px solid blue; background: #CCCCFF; font-style: italic; text-align: center;"> | |||
'''This page is outdated. It is kept for historical reasons, e.g. to document specific decisions in Inkscape development.''' | |||
{{{message|}}} | |||
</div><includeonly>[[Category:Wiki Attic]]</includeonly><noinclude> | |||
[[Category:Wiki templates]] | |||
</noinclude> | |||
Also see: [https://inkscape.org/doc/tutorials/tips/tutorial-tips.en.html Tips and Tricks Tutorial] (online version), interactive offline version available via the Help menu in the Inkscape program. | Also see: [https://inkscape.org/doc/tutorials/tips/tutorial-tips.en.html Tips and Tricks Tutorial] (online version), interactive offline version available via the Help menu in the Inkscape program. | ||
Latest revision as of 07:46, 16 May 2024
Other languages: العربية Català Česky Deutsch English Español Français Italiano 日本語 한국어 Polski Português Português do Brasil Русский Slovenčina 中文
This page is outdated. It is kept for historical reasons, e.g. to document specific decisions in Inkscape development.
Also see: Tips and Tricks Tutorial (online version), interactive offline version available via the Help menu in the Inkscape program.
Contents of this page may be slightly outdated. If you can help with updating the page, please contact the Inkscape developers mailing list, or the docs mailing list
Generic tricks and tips
The tips and tricks are collected to share/tutorials/tipsandtricks.svg and made apart of the release. If you want to contribute further, please add your tips and tricks to the SVN copy of the aforementioned. Also, you can add them below and they will be collected from time to time as a part of that tutorial.
New Tips and Tricks Scratchpad
Please enter your new tips and tricks here...
PDF/EPS bounding boxes
As of version 0.45: when you export an object to PDF or EPS, the figure's bounding box is the canvas (probably the page) rather than a tight box around the object. If you want a tight box, select your object (with the rubber band selector) and use "Fit Page to Selection" in the "Document Properties" dialog to crop the canvas tightly around the object. Then, you can export to PDF or EPS and get the bounding box you want. There isn't really a way to automate this process by using Inkscape's command-line options.
Changing languages
Remember when you first installed Inkscape, and there were a bunch of language options? To switch to Espanol, select Espanol when installing.
Adjusting the Canvas Size to Fit Your Image
So, you've done a bunch of drawing, and now the canvas is too big/small.
- File > Document Preferences
- Check "Show canvas border" if not already checked, just to get some feedback.
- Set Canvas size to "Custom".
- Back in the Document window drop-down select box to the right of the height/width boxes, set the units to the same units as shown in the Document Preferences window.
- Edit > Select All in All Layers
- Copy the Width and Height now shown in the Document window into the Width and Height of the Document Preferences window. Press the enter key after changing each number.
- Back in the Document window change the X and Y coordinates, both, to 0. Again, press the enter key after changing each number.
- Clean up after yourself:
- Edit > Deselect
- Close Document Preferences window
Note: Starting with version 0.44, you can use instead the button "Fit Page to Selection" under File > Document Properties. If nothing is selected then the page is adjusted to the whole drawing.
Scaling images to fit in webpages/HTML
When using the object tag to embed SVG images inside of webpages, it is useful to set the size in the object tag.
To do this you need to add a viewBox attribute.
- Using the XML editor, select the SVG root element (the first item in the list on the left)
- Next, add the viewBox attribute. In the one line text-box on the right hand side, type "viewBox". Underneath this type "0 0 100 100", then click set.
- Change the width and height attributes to 100%.
- Re-use process above to set the canvas size to the drawing's size.
You may also want to add preserveAspectRatio="none" to the SVG root element if you want to change the width/height disproportionately.
Alternatively, use the extensions attached to 'Saving Plain SVG with viewBox extension' bug.
Starting with 0.48, it is possible to do this using the "optimised SVG" output filetype. Go to File > Save as... > Optimised SVG , then check "Enable ViewBoxing" to do the same thing.
Starting with 0.91, a viewBox is added automatically, and the above procedure is not needed.
Position guides
Position a guide roughly, then double click it to bring up a dialog box in which you can enter the desired position. --Pbhj 13:00, 1 July 2006 (PDT)
- AFAIK you can't do this any other way ... I've been using Inkscape since not long after the split from sodipodi and I just today (1st July 06) found this out! Super! This was in the AI users tips.
Adding fill to Shapes drawn with the Calligraphic Pen tool
Quick tut on how to add fill to shapes you've drawn with the calligraphic pen. A far easier solution to creating fills for closed shapes drawn with the calligraphic tool than I described previously. Simple enough I should be able to do without pics, so here gos
- Draw the shape with the calligraphic tool
- Duplicate it. (ctrl + D)
- Draw another line in the region that will be filled.
- Select this line and the duplicate of the original.
- Do union (ctrl & + )
- break apart (ctrl + shift + K)
- Union again (ctrl & + )
- Send it backwards (Page down)
- Fill it with a whatever color you want.
The second and penultimate steps are only needed if your keeping the calligraphy line as a stroke. Alternatively, use the fill bounds tool :)
Mirror modelling
Inkscape is a drawing application, not CAD, so maybe the word "modelling" is not appropriate.
Mirror Modelling (PNG)
If you want to play with the image, the inkscape source available here.
How to make an edge
Join Two Nodes (PNG)
Source is here.
Comment :
- This doesn't explain anything to me. HOW do you break apart a node? HOW do you join two nodes? I see steps I through III, but those little graphics don't explain how to do it.
- I think this is trying to explain how to [apparently] join something to a closed loop; I'd like to see n-way nodes for this (is that in the spec?). What they are doing is taking a node on that loop and making it in to two nodes in the same place using -0-0- (that's my ASCII art for the node duplicate icon! it's on the menu bar when you are using the node edit tool on a path). Then we split using -0 0-. Then join one of the coincidental nodes to the other shape. It now looks like you have a spur off from your closed loop. But you don't. Is that it, do I get a cookie?? --Pbhj 15:08, 7 July 2006 (PDT)
How to rotate and duplicate
Need more appropriate name, like: how to make a swatch.
Not finished yet.
Khiraly - Feel free to comment on tips, if its not clear. Any comment are useful.
Text on circle
If you want to put text on a circle, you can do the following:
- create a circle
- create a text object with the text you want to put on the circle
- select both
- go to Text | Put on Path
So far so good, nothing special. Anyway, you'll notice that the text is always put on the outside of the circle - what if you want to put the text inside the circle? I've found this trick:
- create a circle
- select it and go to Path | Object to Path
- go to Path | Reverse
- create a text object with the text you want to put on the circle's internal
- select both the text and the circle
- go to Text | Put on Path
If you want to have the text to start at a specific position on the circle:
- follow either of the steps above
- then select the circle
- go to Object | Transform | Rotate
- change the angle until the text starts at the desired position
That's it!
Created punched-out text
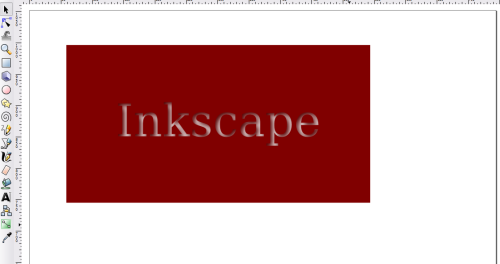
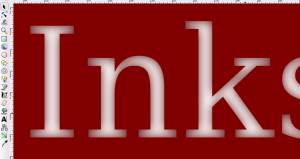
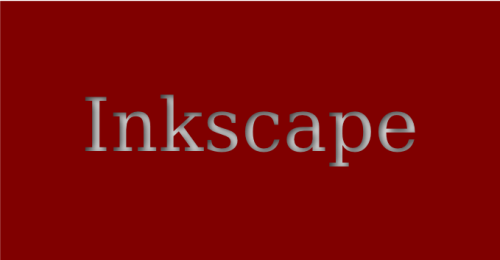
This will create a punched-out text with shadow effect that looks like this:
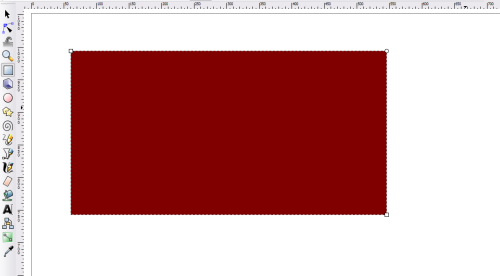
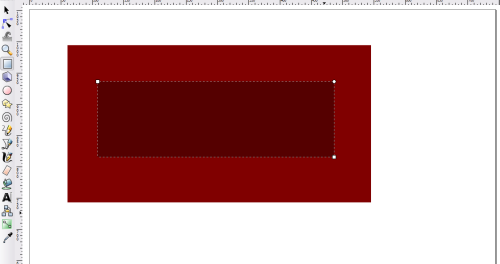
First, create the object you want to cut the text out from. Here I use a red rectangle:
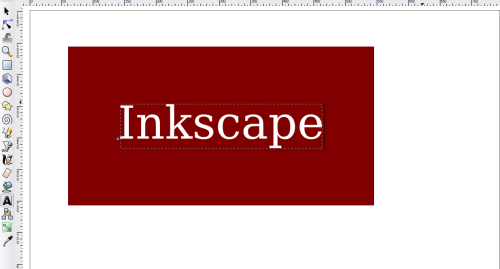
Then, create the text.
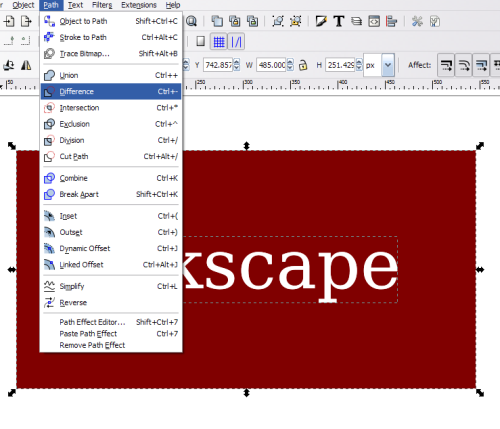
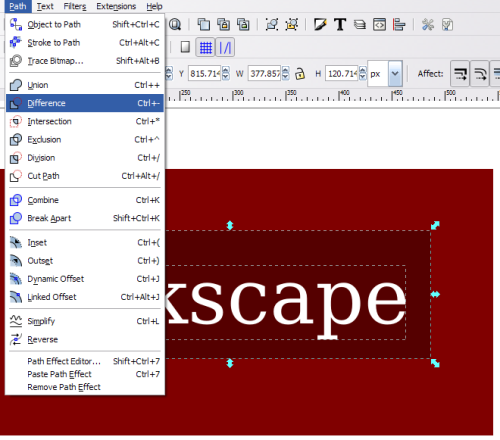
Duplicate the text (Ctrl+D) so you have two copies of it in exactly the same place, then select one of the copies of the text and the object at the same time by holding Shift and clicking on both of them. Now either open the Path menu and click Difference, or press Ctrl+Shift+-.
You will now (although it will be hidden behind the remaining piece of text, so you won't be able to see it) have an object with the text as a hole in the middle and the second (duplicate) piece of text. To create the shadow, create another rectangle—which must cover the area of the text—in the color of the shadow you want, like this:
Now repeat the previous process. First, send the new rectangle/object behind the remaining text (you can use PgDn) and select both of them, then do a difference between them.
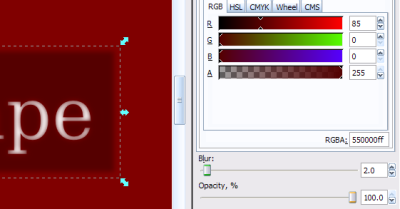
To make this object look like a shadow, you can add some blur to it. Open the Fill & Stroke sidebar and change 'blur' to whatever you want. I've chosen 2.0 here.
Finally, send this object behind the other object. You will see this kind of effect:
To make it look more like a shadow/better, feel free to change the colour, amount of blur and position. I, for example, ended up with this:
See the source of the final result.
Old tips
The tips here are out of date / incomplete or the issue they addreess has been worked around
Export to PDF Workaround
As of version 0.45 saving as pdf results in unclipped images.
The following is a good workaround (On Windows):
Install PDF Creator. Print to the PDFCreator device.
Printing or Producing PDFs in ISO A4 rather than US Specific Letter Paper
I've been messing with this for ages, and as it turns out it's got a very simple solution (much easier than emailing your SVG to a friend with Illustrator ;-).
With Inkscape 0.42, if you create an A4 canvas and print it, it will quite happily print properly on an A4 printer. It'll even produce suitable PostScript too. However, if you produce a PDF (either by Save As... or by using the command line ps2pdf or by using Adobe Acrobat) you'll always get a US Letter PDF. I think this is because the PostScript doesn't mandate A4 or suggests Letter, after all, most .ps files will convert perfectly like this. However, you can force ps2pdf to use A4, although sadly not in Inkscape. Do it on the command line after printing PostScript to a file:
ps2pdf -sPAPERSIZE=a4 myfile.ps
(it'll produce myfile.pdf, which should be an A4 PDF rather than the default Letter).
Hopefully one day, Inkscape will have a dialogue asking you what paper size you'd like when it produced PDFs (much like saving .eps asks you a couple of things). After all, Inkscape just uses ps2pdf to produce PDFs anyway, so it ought to be able to pass in the paper size specification when it does so.
