Difference between revisions of "WebSite"
| Line 35: | Line 35: | ||
bzr branch lp:inkscape-web | bzr branch lp:inkscape-web | ||
cd inkscape-web | cd inkscape-web | ||
sudo apt-get install python-virtualenv | |||
./utils/init.sh | ./utils/init.sh | ||
./utils/resetcms.sh | ./utils/resetcms.sh | ||
Revision as of 20:59, 23 May 2013
Website Development
The Inkscape project has a side project which produces the website seen by users and used by everyone to find resources.
The project can be found on launchpad: https://launchpad.net/inkscape-web
Website Editor
Editors can visit the new Inkscape website, log in as themselves and edit and add content to the django content management system (cms). This does not require any code access but does require knowledge of html and staff access plus that you be in the Editors group to give you all the required permissions.
The top bar shown here is made visible by clicking on the top-right plus [+] sign. From this bar you can turn editing on for any page you are visiting and edit the content therein. Ask for help if you get lost editing the various sections of the website.
Note: I'm going to use the word widgets instead of plugins, because it makes more sense.
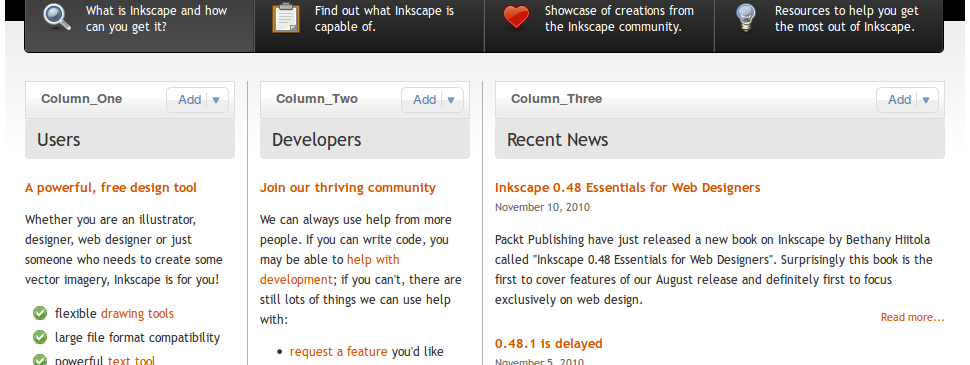
The above screenshot shows the front page with the editor mode switched on. As you can see, each editable section of a web page has a bar where you can add new widgets of content as well as edit existing widgets. Most pages will only have one such section, but the front page has several. If you need a page with a new design that has multiple widgets, please see website development below.
The CMS widgets come in a number of types. First File, Picture, Video widgets do as you would expect and allow you to add those media elements. Text widgets allow a simple piece of text including html. Snippets are similar to text, but you can reuse the same snippet in multiple places, editing snippets is an extra step.
Other plugins/widgets can be added to the website's cms platform. Please see the website development below.
Website Development
This guide for helping with the website development, code is available on launchpad in a bzr repository: https://code.launchpad.net/inkscape-web
Local Development
You can start an instance of the website locally if you wish to work on the code or design.
bzr branch lp:inkscape-web
cd inkscape-web
sudo apt-get install python-virtualenv
./utils/init.sh
./utils/resetcms.sh
./utils/run.sh
This should download the code, set up the python environment, set up your test database, download all the cms data from staging and run the server. You can also run the django manage.py manually using:
./pythonenv/bin/python ./inkscape/manage.py [command]
Once your local instance is running, you can navigate your web browser to localhost:8000 and have fun. The default username and password should be 'admin' and '123456'.
The website's database is a local sqlite file in ./data/ as are all the uploaded files. These are not committed to the branch.
Committing and Bug Reports
We use launchpad's bug tracker to report and track progress on bug reports. Please see https://bugs.launchpad.net/inkscape-web for possible things to fix.
You can use the fixes option when committing your fix to tie together the code and the bug report:
bzr commit --fixes=lp:798373 -m "I fixed that annoying bug"
Pushing Back
Once you have made your modifications, please commit back and push to your own branch for review unless otherwise granted permission to commit to trunk.
bzr push lp:~yourname/inkscape-web/my-awesome-branch
And ask for code review on launchpad by following the link from your new code branch on the website.
Publishing your Changes
The trunk branch is open to commits by members of the inkscape-webadmin team. There are two other branches for live and staging that are used to control deployment.
Deployment of branches should happen automatically by cron script on the server, if your commit is stuck, please ask for help on the inkscape mailing list and we can sort out any clogs.
The idea of the automatic deployment is that we can control the website via all the mechanisms we use to control code commits. This includes permissions, reversions etc. Large changes can be held for review on staging while smaller changes can be merged into live without fuss.

