WebSite
The Inkscape project welcomes contributions to its website at https://inkscape.org/. Your help is valuable in different areas, and this page provides info to guide you.
We always need editors, translators, testers, designers and developers — and if you think you can help in any of those areas, please contact us by sending a mail to the translators' mailing list (for translations) or the documentation mailing list (for website development and contents).
Editing
If you would like to help keep the website up-to-date and constantly look for ways to improve it, by collecting information from various sources and presenting it on the web site, join us in the chat for the documentation, the [marketing https://chat.inkscape.org/channel/team_vectors] and/or the website team. You can support us in various ways: suggest improvements or corrections, write contents about topics that are missing, write news articles and help with ‘marketing’, or join us long-term and help with contents maintenance.
General Rules
- All content on the website is licensed CC-BY-SA and GPLv2 or later. You will be required to agree to this license when you first edit a page.
- Don't disrupt existing pages. If you don't know what you want to do yet, then draft the page here on the wiki, Etherpad or in a separate page first.
- No page is precious to any one person. All pages can be edited by any editor and disputes about drafting changes should be brought to the inkscape-docs mailing list or website editor in chief.
- The website's content is usually very flexible to updates, but final decisions by the webmaster must be accepted by all editors.
- Page language in English or translated should keep to the contributors rules. No swearing, no aggressive content and on website pages there should be no opinion.
- Translations should be strictly a translation of the English versions of pages. If there is new content, it should be added to the English page first to keep all versions of the page in sync.
- When you have made a change to the English website that changes the contents (i.e. not correcting grammar or a typo), and thus requires translation, please kindly inform website translators via translators' mailing list of the change you made. Try to finalize your changes to a page, before you call out to them to do their work.
User Account
Please register an account using your email address and activate the account. Once active and logged in, please subscribe to the corresponding mailing list and email either the inkscape-docs or the inkscape-translators mailing list to get more information. For translations, please add some more info to your email, and additionally open a request to join the website translators' team (see Translation section below) and start by contributing to the website's .po file for your language.
If you're approved, your account will then be enabled with the right permissions to add and edit any of the pages on the website. Please take care not to disrupt other content as you edit the website. As before, don't hesitate to ask other website editors on their mailing list if you need help.
If anything goes wrong while you are editing — for example, you encounter a bug, or you accidentally delete something you did not intend to delete, or something weird happens, and you don't know why —, please ask for help on one of the mailing lists — either translators, or inkscape-docs. You can also contact your team admin directly or file a bug report for the website at the bug tracker.
Using the Website Editor
Editors and translators can visit the Inkscape website, log in as themselves and edit and add content to the django content management system (cms). This does not require any code access but does require knowledge of html and staff access plus that you be in the Editors or Translators group to give you all the required permissions.
When you want to edit a page for the first time after the update, you will be asked to agree to publish your work under the website's licence. This will ensure that your work can be built upon by others in a safe manner.
REMEMBER: Your changes are NOT published until you press the publish button on the tool bar! Once a change is published, there is NO WAY TO UNDO it, so check carefully before publishing.
From the tool bar at the top of the web page you can turn editing on for any cms page you are visiting and edit the content therein. Ask for help if you get lost editing the various sections of the website.

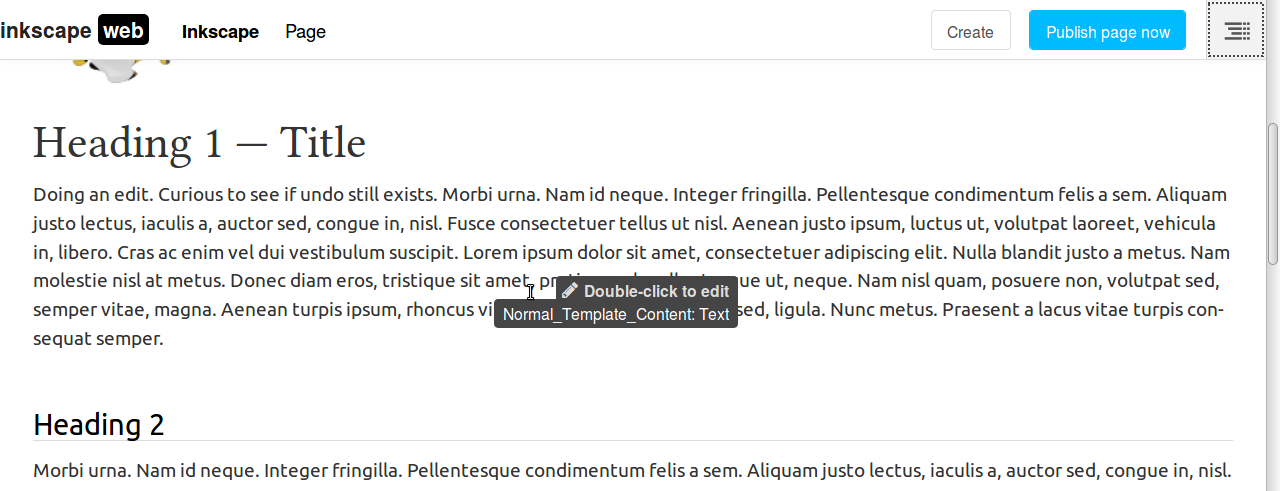
The screenshot to the right shows a page with the editor mode switched on. As you can see, when your mouse hovers above an editable section of a web page, you are prompted to double-click to edit that page. This allows you to add new content blocks as well as edit existing blocks. Most pages will only have one such section, but the front page has several. If you need a page with a new design that has multiple blocks, please see website development below.
The toolbar will indicate when there are changes on a page that can be published. Click on Publish changes to publish your (or another person's) changes, and / or click on View published to leave the edit mode.
To learn how to edit and tweak the front page, you can watch this video on YouTube (note: the video shows how this works on an older version of the website's cms, so icons and toolbar will look different):

Specific Instructions


Texts: When you save a text plugin, you will be asked to fill in a short description of your changes at the bottom of the editor window. This little summary will be used for updating others about your changes. Please provide a meaningful message.
External tools: If you decide to do your translations using your favourite editor, be sure to use a plain text editor for this. Office suites and other word processing tools that support formatting are unsuitable, because they might add additional formatting automatically, which can accidentally end up on the website and break the actual formatting.
Links: To insert a link, use the small chain icon in the editor. The dialog that opens supports looking up pages on the Inkscape website, when you enter a part of the url. Urls on the Inkscape website should always be specified as relative urls, i.e. leave out the 'https://inkscape.org' part, and only use, for example, '/learn/faq/'. You may need to select '<other>' in the protocol dropdown, to not have to insert https etc. We're still trying to figure out how language redirects will work. In the meantime, if you want to add a link to your own language's version of the website, use the language code in the urls, and add the English url after, i.e. '/fr/learn/faq' for the previous example.
Images: Images are plugins. They cannot be copied directly from one page to the other, unless one chooses ‘Copy all plugins from English’ to make a whole new page. To insert an image (raster images only, svg is not supported by our current plugin), choose ‘Picture’ from the plugin dropdown list and fill in the dialog with the necessary info. Don't forget to add licence and attribution info, if applicable. If you want to use a picture that is already used on a different page (e.g. when editing a translation), download that picture to your computer (use your browser's right-click menu for that) and upload it again using the picture plugin dialog.
TOC: The TOC (Table of Contents) plugin can be inserted into pages with long texts to make navigating them easier for users. It will also add little anchor symbols behind all headings on that page, that other people can directly link to.
Other plugins: The CMS widgets come in a number of types. File and Video widgets do as you would expect and allow you to add those media elements.
Spell Checking: Your browser's spell checker will work when editing text. To change the language or access suggested replacements, hold Ctrl down while right-clicking into the text.
Known Issues
- IMPORTANT: When you click on ‘Publish’ for a page, it may sometimes seem as if nothing happens for a few seconds. Don't click on ‘Publish’ twice, just wait until it starts by itself. Every click on this will send a mail to all subscribers, and add to the server load. Also, incomplete saves have been seen as a result.
- There's a ‘Create’ button now available in the top left. If you are a translator, you will never need this button. It is for creating new, non-translation pages.
- Copy-pasting any plugins, e.g. images or tables of contents (and changing them after this) will result in the plugin source page (i.e. the English page in most cases) being altered. Never copy plugins! Only copy contents using a detour via a plain text editor, i.e. copy the text from a web page, then paste it into, say, Notepad, then copy it from there back into your translation and adjust the formatting manually.
- Hitting ‘Enter’ while editing a plugin in a pop-up dialog may lose previous page edits.
- Sometimes, the ‘Edit’ button is not available. Then you can still edit the page by going to ‘Page -> Edit this Page’ in the toolbar, or add ‘?edit’ to the URL.
- Sometimes, your edits will not be visible in the preview after you clicked on save. In this case, go to 'view published', then switch back to Edit mode. You should be able to see the changes now.
- Sometimes, ‘Publish’ is not available, even if you made changes to some plugins. In this case, go to ‘Page -> Unpublish Page’ in the toolbar, and when it has been unpublished, click on the big blue ‘Publish now’ button to publish.
- On pages with a table of contents plugin, publishing may result in the TOC title being added a second time. The duplicate title can usually just be edited out, and will not be duplicated again the next time you publish. Make sure to not delete the plugin, but just the duplicated heading.
Translations
If you are fluent in a language different from English, please consider joining our website translators' team. We strive to make Inkscape accessible for as many people as possible, and internationalization is important to reach this goal.
For being able to translate the CMS contents and the news, you will first need to understand how editing the website works.
Translating CMS contents
Adding a new translation
To add a translation of a page which does not yet exist:
- Navigate to the English page that you want to translate.
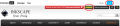
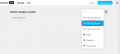
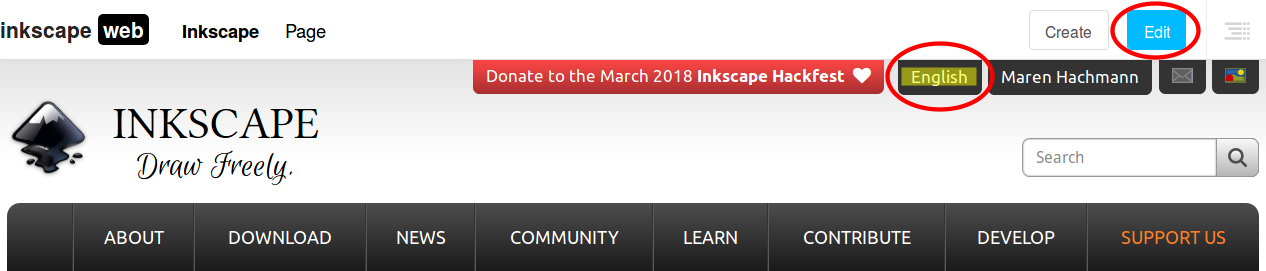
- Switch to Edit mode by clicking on the Edit button (Image 1).
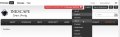
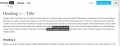
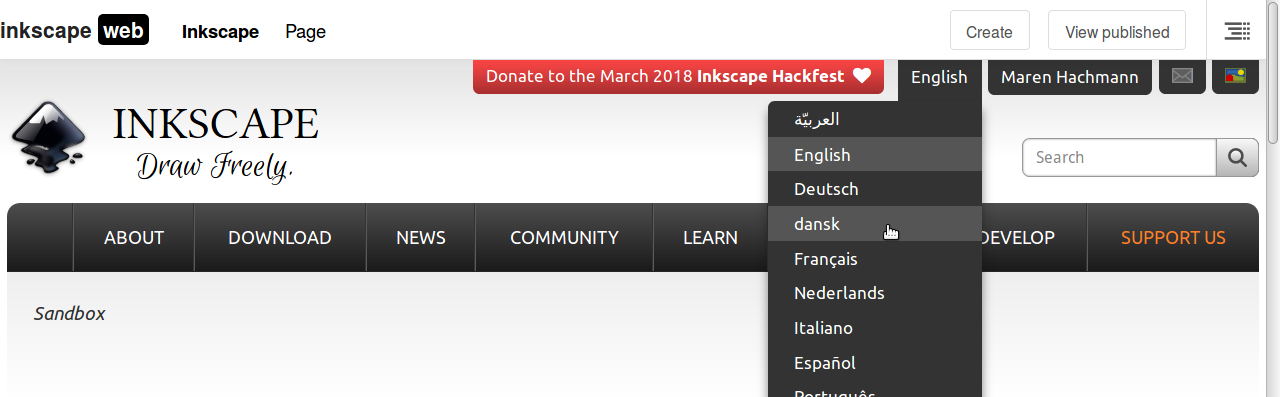
- Now use the language chooser to switch to your language (Image 2).
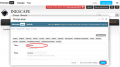
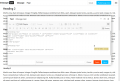
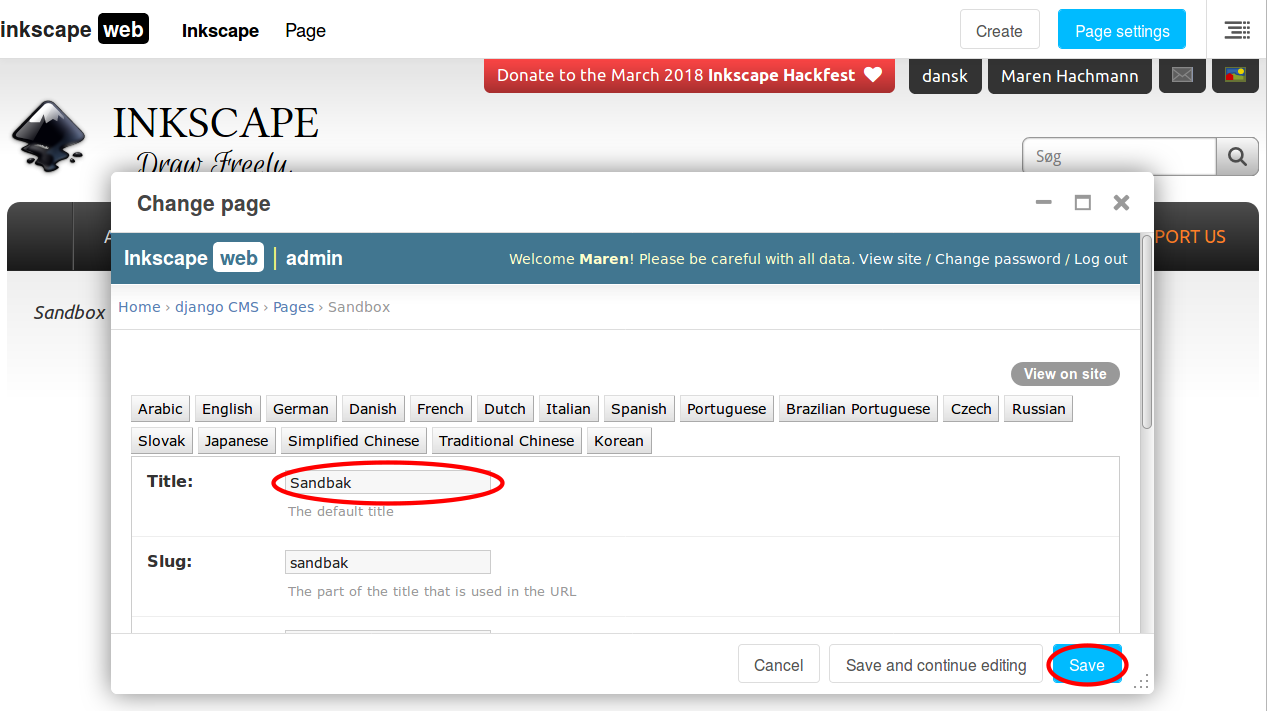
- You should now see a blue Page Settings button at the right. Click on it. (If there's a button that says 'Create', go back to the English page and switch to Edit mode. 'Create' will create a new page, not a translation.) (Image 3).
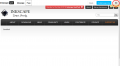
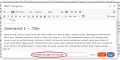
- In the Page settings, enter a title for your new translation and click on Save (Image 4).
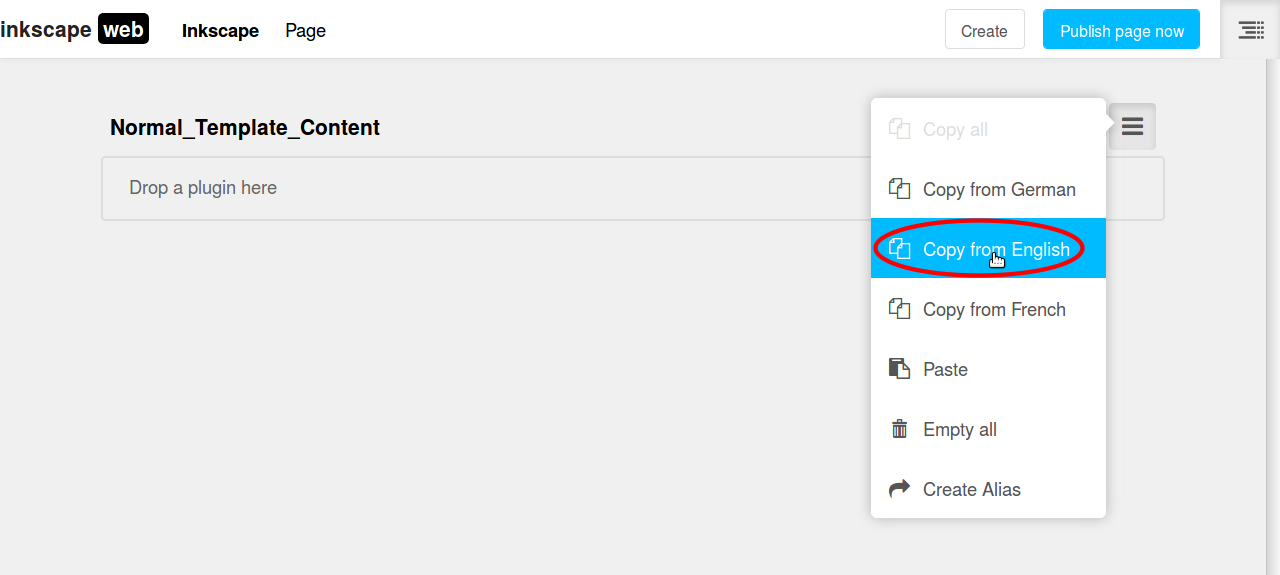
- At first, the new page will be empty. We must now fill it with a copy of the English content. Start by toggling the structure mode view (Image 5).
- Next, click on the topmost hamburger icon in the structure panel (next to the name of the template that is being used), and select Copy from English (Image 6).
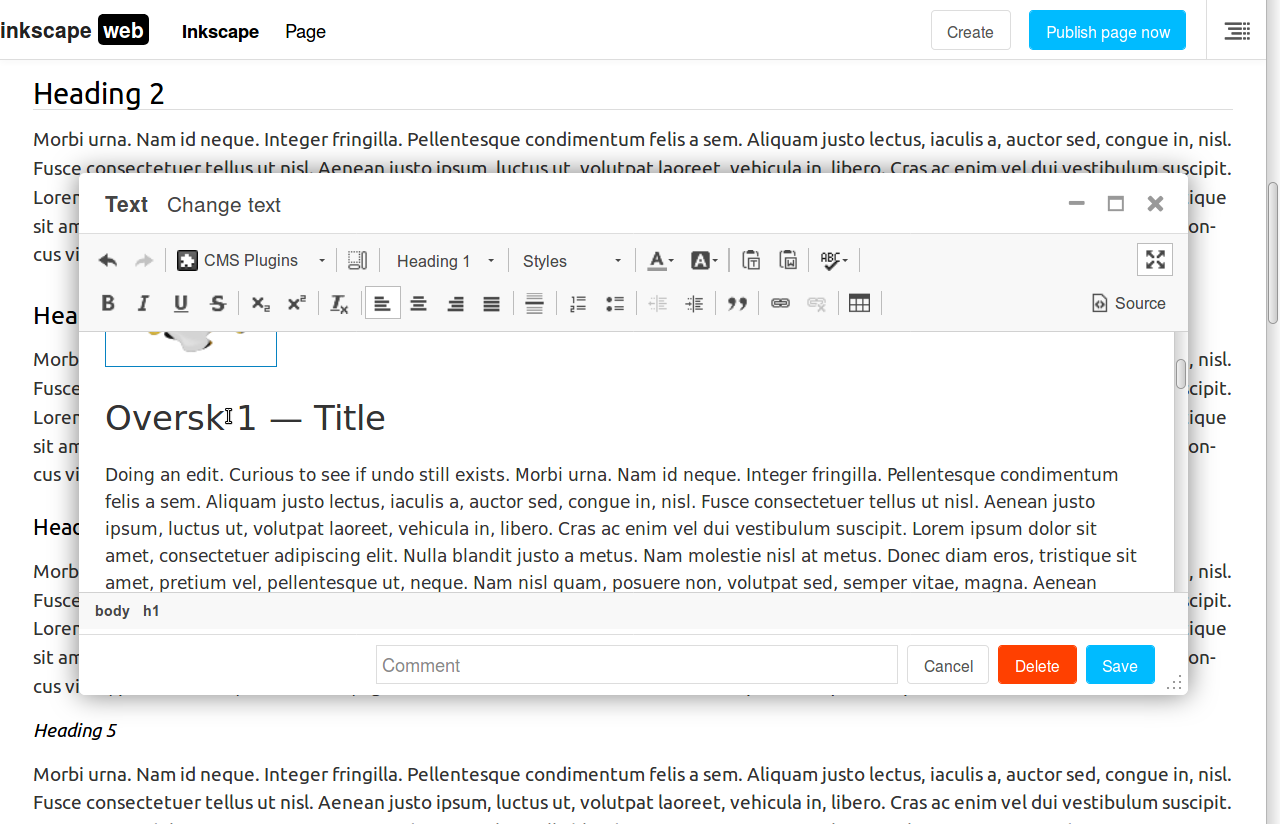
- The page will now contain the same texts and widgets as the English version does. You can click on the structure toggle icon again to hide the structure overview. To start translating, double-click on a text (Image 7).
- An editor window will pop up and you can translate the text (Image 8).
- If something does not look correct (for example, because you accidentally deleted a certain html tag), you can choose to edit the html source, too (Image 9).
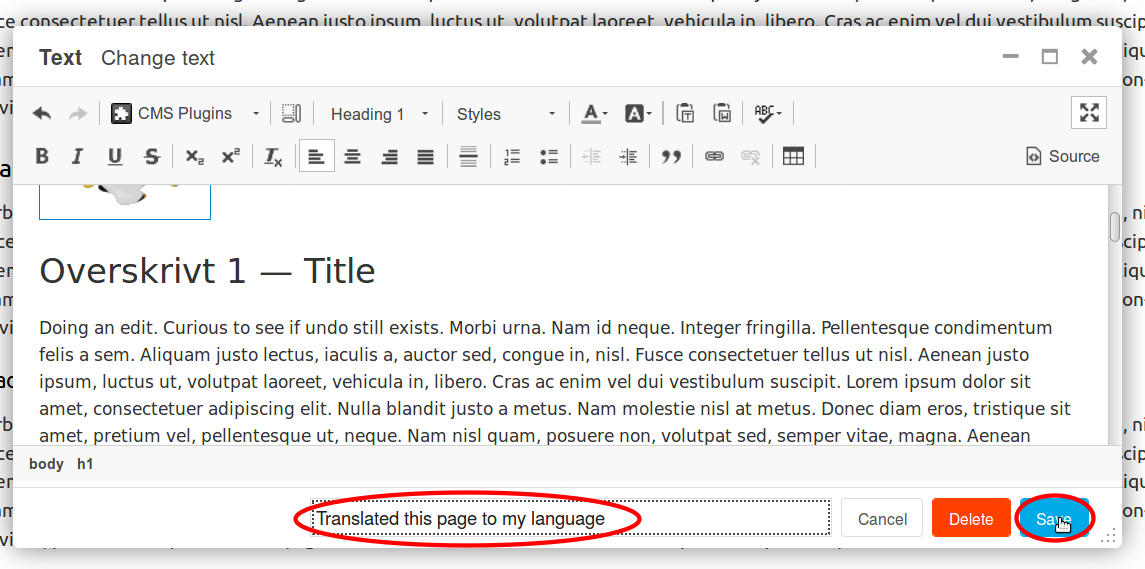
- When you are done, click on Save to save your work. Don't forget to leave a comment about your changes (Image 10).
- You can now take a look at your translation and if you are happy with your work, click on the Publish button at the top of the page. Only this will make your translation available to the site's visitors (Image 11).
1 — Switch to edit mode in English
2 — Switch to your language

3 — Select Page Settings
4 — Enter title
5 — Show page structure
6 — Copy from English
7 — Double-click to edit plugin

8 — The editor window in WYSIWYG mode
9 — Editing the html source
10 — Save your edit

11 — Publish changes


Please note:
- Take extra care to always check if the language you are editing is the one you actually want to edit. Please DO NOT translate a piece of text while under English or another language as you will cause trouble for that language.
- Menu entries are translated separately at [1] , and they update with a delay, so don't be surprised if your changes aren't visible right away.
Edit an existing translation
Many existing translations at inkscape.org are outdated, or contain a copy of an outdated English version. Please, before you start translating, make sure that you actually translate from the current English version. If the page is very outdated, consider deleting the blocks and copying all plugins from English, as described above in Adding a new translation.
To edit an existing translation, just go to the page in your language, toggle the ‘draft’ mode by clicking on the Edit button in the top bar and double-click on the widget you would like to translate.
If you edit an existing translation, because the English original has changed, you can do the following:
- Open the published English page, and also, in a second tab, your translation, in draft mode.
- Copy the new parts from English by selecting them with the mouse and hitting Ctrl+C.
- If they contain any pictures or other content that is a plugin:
- Paste them into a simple text editor (Ctrl+V), to remove the formatting and prevent plugins from being used on two different pages at the same time. Copy the clean text from the editor to the clipboard (Ctrl+C). If there are no plugins, you can also paste directly into the editor window.
- Insert this into your existing translation, in the correct place (Ctrl+V).
- Then translate the text and fix the formatting.
- Save.
- Continue with translation :)
- If there are no images, tables of contents or other plugins in the text you want to copy-paste:
- feel free to copy-paste it as a whole into your translation, and to translate in place.
Unpublishing
If a translated page contains outdated information, you might consider unpublishing it. Before you unpublish, please make sure to send a message to the inkscape-translators mailing list or the chat, to seek approval from other editors.

After you got an approval, you can move on to unpublish the page. To do this:
- Check if the page you're about to unpublish is saved on the Web Archive, to preserve the contents (as we're clearing them in later steps).
- Check if you've switched to the desired language you want to unpublish. You may unpublish pages in other languages if you didn't make sure, so please be extra careful.
- Enter edit mode by going to Page > Edit this page.
- Click Page > Unpublish. This would unpublish the page, but keep the contents.
- Clear the contents by going to the sidebar, and clicking the topmost hamburger menu > Empty all. Click on "Yes, I'm sure" to confirm.
- Re-publish the page by clicking the blue "Publish page" button. Make sure to do this to ensure that the page contents falls back to English, and in the case of root pages (e.g. Learn, Contribute), that its subpages keep working. Otherwise the page and every subpage of it will become 404 (Page not found).
Translating News
News are a special case on the Inkscape website. To translate a news article, visit it in your own language, then select ‘News -> Translate News’ in the toolbar at the top.
Then a window pops up where you can fill in your translation of the news. The text editor boxes for the excerpt and the news article contents will be pre-filled with the English version. You can also always see the English original when you click on ‘Show’ below the editor box.
Text can be formatted by using the text editor's buttons, links can be added by marking some text and clicking on the link symbol. Edit links by right-clicking on the link, then select ‘Edit link’ from the context menu. Save your translation when you're done.

Known Issues
- When you double-click on a link in the news editor, you'll get a popup dialog where you cannot click on anything. If this happens, click on ‘Save’ in the parent dialog to not lose any translated work. Continue editing after this.
- When you save your translation for the first time, you may be redirected to a non-existent page (404 error). To return to the article to continue editing, just remove everything after the last slash in the url, and hit enter. Then select your article on the page where this brought you, and edit it again.
- Always make sure you're on the correct page - always check the language abbreviation in the URL! Do not translate English articles, even if a redirect accidentally brings you there.
Translating Download contents
You can add translations of Release notes on this wiki. For this you need an account on the wiki: ask the inkscape-translator mailing list for it if you don't have one. When you're done with your translation, tell the translation administrator by sending an email to inkscape-translator and they'll publish your translation on the website.
The platform names and descriptions as well as the installation instructions for some platforms are translatable from the CMS administration pages. You may or may not have access rights to translate them.
- If you have access rights: go to Releases > Platforms. You'll see a table listing all the nodes of the platform tree. To see the tree more clearly, you can sort the table depending on the codename. From this table, choose the platform you want to translate, and type your translation in a new ‘Platform translation’ at the bottom.
- If you don't have access rights: you can send a text file to the inkscape-translator mailing list containing all your translations, and an authorized translator will set them for you.
Translating Menu contents
The menu items are translatable from the CMS administration pages.
- If you have access rights: go to EL_MENU > Menu items. All menu items are listed here, you can use the "FILTER" on the right panel and select "Main Menu" under "By category". Select the menu you want to translate, then in the last row under "MENU TRANSLATIONS" (the last row is blank), choose the language and type the URL and your translation. Save to finish this translation.
- If you don't have access rights: you can send your translation in a text file to the inkscape-translator mailing list, and an authorized translator will set them for you. Please prepare the text file with a list of the following format:
English menu entry, url, translated menu entry
(one line per entry)
e.g.
Forums, /forums, Foren
Overview, /about/overview/, Übersicht
Translating other parts of the website
There are a lot of other translatable sentences and phrases on the Inkscape website, which cannot be translated directly on the website itself. Those include words such as ‘Log in’, ‘Register’, ‘Confirm’ and ‘Save’.
If your language is not yet available on our website, you're still very welcome to help! In this case please file a bug report. Then we can prepare the website for your changes and make the translation file available, so you can start working on it.
You can download the PO file for your language from the website's translation repository. See here for info about how to deal with PO files.
When you are done, create a new issue in the repository at gitlab and attach your changed file to it, or make a merge request, if you are familiar with git / gitlab.
Website Development
The Inkscape project has a side project — inkscape-web — which produces the website seen by users and used by everyone to find resources.
You can support the website development with things as easy as reporting bugs, or focused testing, or you can volunteer to test the web site more systematically before a new release. Other important areas where you can help us are website design, and website development. If you would like to help, contact Martin Owens (doctormo@gmail.com).
These are the most important links:
- The published website: https://inkscape.org/
- The staging website (testing): http://staging.inkscape.org/ (currently unavailable)
- The project on gitlab (code repository and bug reports created since February 2017): https://gitlab.com/inkscape/inkscape-web
The guide below is for helping with the website development and to get a running version of the website for design work. The code is available on Gitlab in a git repository.
Django and Python
The website is written in Python using the Django framework. It is a good idea to have a familiarity with Django and a fairly healthy experience with Python before starting code development on the website:
- To learn Python, attend these online classes: http://www.codecademy.com/en/tracks/python
- To get to know Django, see this tutorial: http://tutorial.djangogirls.org/
Local Development
You can start an instance of the website locally if you wish to work on the code or design.
Needed dependencies (on Fedora): python-virtualenv and python-dev.
Getting the Website Code
- Option A:
$ git clone https://gitlab.com/inkscape/inkscape-web.git
- Option B (better):
- Create an ssh key if you don't have one yet, and upload your public ssh key to gitlab (instructions: https://docs.gitlab.com/ee/user/ssh.html).
$ git clone git@gitlab.com:inkscape/inkscape-web.git
Running the website locally
The following should download the code, set up the Python environment, set up your test database, download all the CMS data from the main website and run the server, showing its address (default is 127.0.0.1:8000):
$ ./utils/init$ ./utils/manage runserver [<domain>:<port>]- Open http://localhost:8000/ in your web browser (recommendation: Firefox or Chrome).
- Log in as the almighty admin user with username "admin" and password "123456".
You can also run the Django manage.py manually using:
$ ./utils/manage <command>
The website's database is a local SQLite file in ./data/ as are all the uploaded files. These are not committed to the branch.
To sync the CMS contents with live again, use the refresh-cms command:
$ ./utils/refresh-cms
Updating your development version to the current trunk version
To get the latest changes for your branch, run:
$ git pull
To update your branch after a pull that introduces changes to the database structure or the installed applications, run:
$ ./utils/update
Troubleshooting
- Make sure your path to your local copy of inkscape-web only contains ASCII characters.
- If you have any other issues setting up your local environment, email doctormo@gmail.com, send a message to the docs mailing list or create a bug report in the bug tracker for inkscape-web.
Bug Reports
We use Gitlab's bug tracker to report and track progress on bug reports. Please see https://gitlab.com/inkscape/inkscape-web/-/issues for possible things to fix.
Making changes
Once you have made your modifications, please commit back and push to your own fork of inkscape-web for review unless otherwise granted permission to commit to the master branch.
See https://docs.gitlab.com/ee/user/project/repository/forking_workflow.html for more info on forking a project on gitlab and making merge requests.
To set the origin of your local copy of inkscape-web to a personal fork on gitlab, you can do the following:
$ git remote set-url origin https://gitlab.com/USERNAME/OTHERREPOSITORY.git
This will allow you to share your modifications on gitlab.
If you have developer access to the project, you can also create branches within the original inkscape-web repository. One easy way to do so is via the button "New Branch" on any issue.
On the commandline, you'll need to do the following, after creating a new branch for your issue on gitlab:
$ git fetch$ git checkout branch_name- Work on code...
$ git commit -m "I fixed that annoying bug"$ git push origin branch_name
You can add "Fixes #<issue number on gitlab>" to the commit message to tie together code and the bug report, if you didn't create the branch directly from the issue on gitlab.
When will your changes be available on inkscape.org?
The master branch is open to commits by members of the Inkscape group on gitlab. There is one other branch for live that is used to control deployment. For separate features and WIP, you're welcome to create your own branches in the inkscape-web repo on gitlab.
Deployment of branches should happen automatically by cron script on the server. If your commit is stuck, please ask for help on the inkscape-docs mailing list and we can sort out any clogs.
The idea of the automatic deployment is that we can control the website via all the mechanisms we use to control code commits. This includes permissions, reversions, etc. Large changes can be held for review on staging while smaller changes can be merged into live without fuss.